Introduction
As you know, Mail Server tutorials are all over the internet. So if you stumbled upon mine, then you were like me trying to assemble one based on how others do it to save reading the manual. A mail server is NOT a walk through the park like some other servers are (such as Web, Database, etc). They can be very complicated to master; and frankly, when you’re short on time, it’s easier to just get one going right away. Don’t dismiss the need to learn how it works once you’ve set it up otherwise you may not know how to recover from a unexpected situation. But instead, learn about how it works (and how to further tweak it) after the deadlines have been met. Besides, your boss will be impressed when you show him your successful results sooner then later.
You’re reading this blog because your needs were/are similar to what mine were:
- You’re looking for an automated solution to installing a mail server with little effort because you’re on a tight deadline.
- You want a central configuration point; you want everything to be easy to maintain after it’s all set up.
- You want everything to just work the first time and you want to leave the figuring it out part to the end.
- Package management and version control is incredibly important to you.
Here is what my tutorial will be focused on:
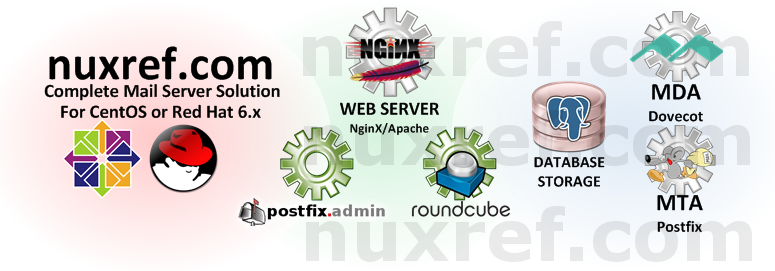
- A Database Backend (PostgreSQL) giving you central configuration. This tutorial focuses on version 8.4 because that is what ships with CentOS and Red Hat. But most (if not all) of this tutorial should still work fine if you choose to use version 9.x of the database instead.
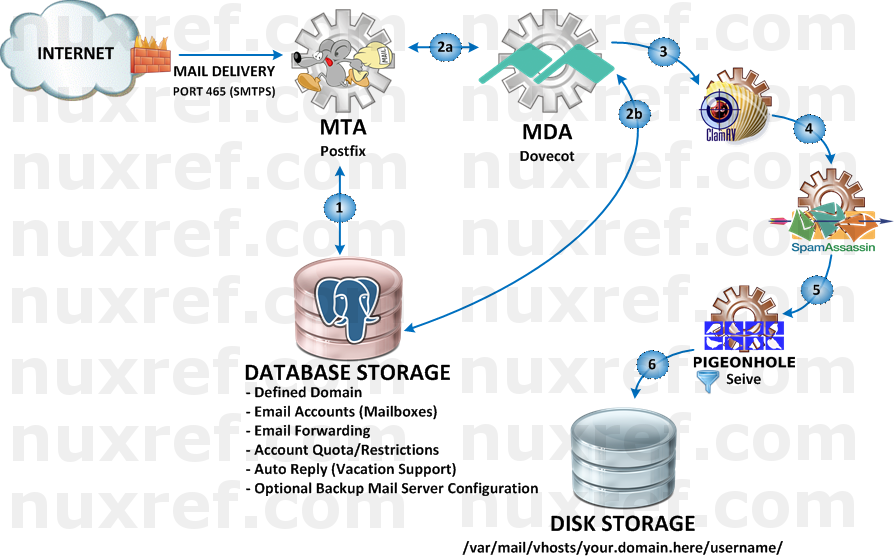
- Spam Control (SpamAssasin v3.3.x, Amavisd-new v2.8, and Clam AntiVirus v0.98) gives you some spam and anti-virus control. I’ve been looking into DSPAM but haven’t implemented it yet. I figure I’ll make a part 2 to this blog once i get around to working with it and mastering it’s setup.
- Dovecot Pigeonhole v2.0.x provides you a way of routing mail in the users inbox based on it’s content. You can key off of certain content within a received message and mark it as spam, or flag it as important because it was sent by a certain individual, etc. It basically gives you the ability to custom some of the post processing of a received message that passed through all the other checks (spam, anti-virus, etc).
- Security Considered
- Mail Delivery Agent (MDA) (DoveCot v2.0.x):
- Secure POP3 (POP3S) Access
- Secure IMAP (IMAPS) Access
- WebMail (RoundCube) Access

- Mail Transport Agent (MTA) (PostFix v2.6.x): Secure SMTP (SMTPS)
- Web Based Administration (PostFixAdmin v2.3.6). Life is made easier when you don’t have to do very much once everything has been set up. Run your server like an ISP would:
- Virtual Domain Administration: Add/Remove as many as you want
- Unlimited Virtual Aliases (or restrict if you want) per domain
- Unlimited Mailboxes (or restrict if you want) per domain
- Administrative Delegation: Grant enough privileges to another administrator who only has rights to his/her domain you granted them access to.
- Away on Vacation Support (automatic replies)

Please note the application versions identified above as this tutorial focuses specifically on only them. One big issue I found while researching how to set up a mail server was that the other tutorials I found didn’t really mention the software versions they were using. Hence, when I stumbled upon these old article(s) with new(er) software, it made for quite a painful experience when things didn’t work.
Please also note that other tutorials will imply that you setup one feature at a time. Then test it to see if it worked correctly before moving on to the next step. This is no doubt the proper way to do things. However, I’m just going to give it all to you at once. If you stick with the versions and packages I provide… If you follow my instructions, it will just work for you the first time. Debugging on your end will be a matter of tracing back to see what step you missed.
I tried to make this tutorial as cookie cutter(ish) as I could. Therefore you can literally just copy and paste what I share right to your shell prompt and the entire setup will be automated for you.
Hurdles
Just to let you know, I had many hurdles in order to pull this feat off. They were as follows:
- postfix as shipped with CentOS and in the EPEL repository is not compiled with PostgreSQL support. I had to recompile this package as well just to enable this extra database support.
- postfixadmin in the EPEL repository has qwirks I wasn’t happy with. I needed to fix a php error that kept coming up. I needed to adjust the database schema and permissions as well as fixing the Vacation Notification feature. I also did not want the mandatory MySQL dependency; so I removed that too.
- perl Yes… that’s right, I had to patch perl :(. I had to recompile it due to a bug that I don’t belive was correctly addressed. In a nutshell, prior to my custom rebuild, perl-devel would haul in absolutely every development package including kernel headers and the GCC compiler. In the past the perl-devel package could be installed by itself providing us some tools spamassassin and amavisd-new depended on. You’re welcome to use the official version of perl over the one I recompiled; but be prepared to have a ton of compilation tools and source code in your production environment. This is not something I wanted at all. Interestingly enough; after the developers at RedHat said they wouldn’t tackle the issue of rolling their changes back, they seem to be entertaining this new guy’s request who’s asking for a similar alternative. So who knows, maybe newer versions of perl will accommodate mail servers again! 🙂
- This blog itself was a massive hurdle. There are just so many configuration files and important points to account for that I found it easier to package my own rpm (nuxref-templates-mxserver) containing a series of configuration templates. The templates themselves took a while to construct in such a way that they could all be used together.
Installation
The following seven steps below will get you up and running.
Step 1 of 7: Setup Your Environment
Step 1 of 7: Setup Your Environment
This is the key to my entire blog; it’s going to make all of the remaining steps just work the first time for you. All; I repeat All of the steps below (after this one) assume that you’ve set this environment up. You will need to reset up your environment at least once before running through any of the remaining steps below or they will not work.
Make sure you hook up with my repository and then install all of the necessary packages:
# You'll need to be hooked up to my repository for
# the installation to be this simple. Make sure to
# visit: http://nuxref.com/nuxref-repository/

# You should use yum priorities (if you're not already) to
# eliminate version problems later, but if you intend on
# just pointing to my repository and not the others, then you'll
# be fine.
yum install -y yum-plugin-priorities

################################################################
# Install our required products
################################################################
yum install -y
       --enablerepo=nuxref
       --enablerepo=nuxref-shared
           postgresql-server postgresql
           php-pgsql php-imap php-mcrypt php-mbstring
           dovecot dovecot-pgsql dovecot-pigeonhole
           clamav amavisd-new spamassassin
           postfix postfix-perl-scripts
           roundcubemail postfixadmin
           nuxref-templates-mxserver

# Choose between NginX or Apache
## NginX Option (a) - This one is my preferred choice:
yum install -y
       --enablerepo=nuxref
       --enablerepo=nuxref-shared
           nginx php-fpm

## Apache Option (b):
yum install -y
       --enablerepo=nuxref
       --enablerepo=nuxref-shared
            httpd php

# Make sure your build of Postfix supports PostgreSQL
# execute the following to see:
postconf -c /etc/postfix -m |
   egrep -q '^pgsql$' && echo "Supported!" ||
      echo "Not Supported!"

# If it's not supported then you ran into the first of many
# problems I had. It also means you didn't haul in my version
# from the previous command.  This can happen if you already had
# postfix installed on your machine and it's of a newer version
# then what I'm hosting. Your options at this point is to either
# uninstall your copy of postfix and install mine or recompile
# your version of postfix (but this time with PostgreSQL support).

# Setup Default Timezone for PHP. For a list of supported
# timezones you can visit here: http://ca1.php.net/timezones
TIMEZONE="America/Montreal"
sed -i -e "s|^[ t]*;*(date.timezone[ t]*=).*|1 $TIMEZONE|g" /etc/php.ini

################################################################
# Setup PostgreSQL (v8.4)
################################################################
# The commands below should all work fine on a PostgreSQL v9.x
# database too; but your mileage may vary as I've not personally
# tested it yet.

# Only init the database if you haven't already. This command
# could otherwise reset things and you'll loose everything.
# If your database is already setup and running, then you can
# skip this line
service postgresql initdb

# Now that the database is initialized, configure it to trust
# connections from 'this' server (localhost)
sed -i -e 's/^[ t]*(local|host)([ t]+.*)/#12/g'
    /var/lib/pgsql/data/pg_hba.conf
cat << _EOF >> /var/lib/pgsql/data/pg_hba.conf
# Configure all local database access with trust permissions
local   all         all                               trust
host    all         all         127.0.0.1/32          trust
host    all         all         ::1/128               trust
_EOF

# Make sure PostgreSQL is configured to start up each time
# you start up your system
chkconfig --levels 345 postgresql on

# Start the database now too because we're going to need it
# very shortly in this tutorial
service postgresql start
To simplify your life, I’ve made the configuration of all the steps below reference a few global variables. The ones identified below are the only ones you’ll probably want to change. May I suggest you paste the below information in your favorite text editor (vi, emacs, etc) and adjust the variables to how you want them making it easier to paste them back to your terminal screen.
# Identify the domain name of your server here
DOMAIN=nuxref.com
# Setup what you want to be your Administrative email account
# Note: This does 'NOT' have to be of the same domain even though
#       thats how I set it up to be. Don't worry if the email
#       address doesn't exist, because when you're all done
#       following this blog, you'll be able to create it!
ADMIN=hostmaster@$DOMAIN

# The following is only used for our SSL Key Generation
COUNTRY_CODE="7K"
PROV_STATE="Westerlands"
CITY="Lannisport"
SITE_NAME="NuxRef"
Now for the rest of the global configuration; There really should be no reason to change any of these values (but feel free to). It’s important that you paste the above information (tailored to your liking’s) as well as the below information below to your command line interface (CLI) of the server you wish to set up.
# PostgreSQL Database
PGHOST=localhost
PGPORT=5432
PGNAME=system_mail
# This is the Read Only access user (or very limited access)
PGROUSER=mailreader
PGROPASS=mailreader
# This is for administration
PGRWUSER=mailwriter
PGRWPASS=mailwriter

# VHost Mail Directory
VHOST_HOME=/var/mail/vhosts
VHOST_UID=5000
# No real reason to make them differ
# but define tis variable anyway for
# below configuration to work
VHOST_GID=$VHOST_UID

# RoundCube Configuration
MXHOST=$PGHOST
PGRQNAME=system_roundcube
PGRQUSER=roundcube_user
PGRQPASS=roundcube_pass

# This is where our templates get installed to make your life
# incredibly easy and the setup to be painless. These files are
# installed from the nuxref-templates-mxserver RPM package you
# installed above. If you do not have this RPM package then you
# must install it or this blog simply won't work for you.
# > yum install --enablerepo=nuxref nuxref-templates-mxserver
NUXREF_TEMPLATES=/usr/share/nuxref
Once all of this has been set you can proceed to do any of the below steps! Keep in mind that if you decide to change any of the variables above, you may need to redo every single step identified below.
Step 2 of 7: System Preparation
First off, Make sure you’ve set up your environment correctly (defined in Step 1 above) or you will have problems with the outcome of this step!
General:
# Create vmail user; this will be a secure user no one else has
# permissions to that we can lock and keep our mail private
# from any prying eyes of people who have or gain access to our
# server.
useradd -u $VHOST_UID -d /var/mail/vhosts -M -s /sbin/nologin vmail
mkdir -p  /var/mail/vhosts/
chown vmail.vmail /var/mail/vhosts/
chmod 700 /var/mail/vhosts/

# Create a clam user we can preform our anti-virus scans as
usermod -G amavis clam

# Fix ClamD Sock Reference
sed -i -e 's|/var/spool/amavisd/clamd.sock|/var/run/clamav/clamd.sock|g' /etc/amavisd/amavisd.conf

# Fix Amavis Directory Permission
chmod 1770 /var/spool/amavisd/tmp/
# Amavis Domain Configuration
sed -i -e '/NuxRef BulletProofing/d'
       -e "s/(# $myhostname.*)/1n$myhostname = 'mail.$DOMAIN'; # NuxRef BulletProofing/g" /etc/amavisd/amavisd.conf
sed -i -e "s/^($mydomain[ t]*=[ t]*).*$/1'$DOMAIN';/g" /etc/amavisd/amavisd.conf

# Generate SSL Keys (if you don't have any already) that we
# will secure all our inbound and outbound mail as.
openssl req -nodes -new -x509 -days 730 -sha256 -newkey rsa:2048
   -keyout /etc/pki/tls/private/$DOMAIN.key
   -out /etc/pki/tls/certs/$DOMAIN.crt
   -subj "/C=$COUNTRY_CODE/ST=$PROV_STATE/L=$CITY/O=$SITE_NAME/OU=IT/CN=$DOMAIN"

# Permissions; protect our Private Key
chmod 400 /etc/pki/tls/private/$DOMAIN.key

# Permissions; protect our Public Key
chmod 444 /etc/pki/tls/certs/$DOMAIN.crt
Create PostgreSQL Mail Database:
# Optionally Eliminate Reset Database.
/bin/su -c "/usr/bin/dropdb -h $PGHOST -p $PGPORT $PGNAME 2>&1" postgres &>/dev/null
/bin/su -c "/usr/bin/dropuser -h $PGHOST -p $PGPORT $PGRWUSER 2>&1" postgres &>/dev/null
/bin/su -c "/usr/bin/dropuser -h $PGHOST -p $PGPORT $PGROUSER 2>&1" postgres &>/dev/null

# Create Read/Write User (our Administrator)
echo "Enter the role password of '$PGRWPASS' when prompted"
/bin/su -c "/usr/bin/createuser -h $PGHOST -p $PGPORT -S -D -R $PGRWUSER -P 2>&1" postgres

# Create Read-Only User
echo "Enter the role password of '$PGROPASS' when prompted"
/bin/su -c "/usr/bin/createuser -h $PGHOST -p $PGPORT -S -D -R $PGROUSER -P 2>&1" postgres

# Create our Database and assign it our Administrator as it's owner
/bin/su -c "/usr/bin/createdb -h $PGHOST -p $PGPORT -O $PGRWUSER $PGNAME 2>&1" postgres 2>&1

# Secure and protect a temporary file to work with
touch /tmp/pgsql.postfix.schema.sql
chmod 640 /tmp/pgsql.postfix.schema.sql
chown root.postgres /tmp/pgsql.postfix.schema.sql

# the below seems big; but will work fine if you just copy and
# it as is right to your terminal: This will prepare the SQL
# statement needed to build your mail server's database backend
sed -e '/^--?/d'
    -e "s/%PGROUSER%/$PGROUSER/g"
    -e "s/%PGRWUSER%/$PGRWUSER/g"
    -e "s/%DOMAIN%/$DOMAIN/g"
        $NUXREF_TEMPLATES/pgsql.postfix.template.schema.sql >
          /tmp/pgsql.postfix.schema.sql

# load DB
/bin/su -c "/usr/bin/psql -h $PGHOST -p $PGPORT -f /tmp/pgsql.postfix.schema.sql $PGNAME 2>&1" postgres 2>&1
# cleanup
/bin/rm -f /tmp/pgsql.postfix.schema.sql
Step 3 of 7: Setup our Mail Transfer Agent (MTA): Postfix
First off, Make sure you’ve set up your environment correctly (defined in Step 1 above) or you will have problems with the outcome of this step!
################################################################
# Configure Postfix (MTA)
################################################################
# Create backup of configuration files
[ ! -f /etc/postfix/main.cf.orig ] &&
   cp /etc/postfix/main.cf /etc/postfix/main.cf.orig
[ ! -f /etc/postfix/master.cf.orig ] &&
   cp /etc/postfix/master.cf /etc/postfix/master.cf.orig

# Directory to store our configuration in
[ ! -d /etc/postfix/pgsql ] &&
    mkdir -p /etc/postfix/pgsql

# Secure this new directory since it will contain passwords
# information
chmod 750 /etc/postfix/pgsql
chown root.postfix /etc/postfix/pgsql

# Now using our templates, build our SQL files:
for FILE in relay_domains.cf
            transport_maps.cf
            virtual_alias_maps.cf
            virtual_domains_maps.cf
            virtual_mailbox_limit_maps.cf
            virtual_mailbox_maps.cf
do
    sed -e "/^#?/d"
        -e "s/%PGROUSER%/$PGROUSER/g"
        -e "s/%PGROPASS%/$PGROPASS/g"
        -e "s/%PGHOST%/$PGHOST/g"
        -e "s/%PGNAME%/$PGNAME/g"
            $NUXREF_TEMPLATES/pgsql.postfix.template.$FILE >
                /etc/postfix/pgsql/$FILE
done

# main.cf
sed -e "/^#?/d"
    -e "s/%DOMAIN%/$DOMAIN/g"
    -e "s|%VHOST_HOME%|$VHOST_HOME|g"
    -e "s/%VHOST_UID%/$VHOST_UID/g"
    -e "s/%VHOST_GID%/$VHOST_GID/g"
        $NUXREF_TEMPLATES/pgsql.postfix.template.main.cf >
            /etc/postfix/main.cf

# master.cf
cat $NUXREF_TEMPLATES/pgsql.postfix.template.master.cf >
   /etc/postfix/master.cf

# Run the newaliases command to generate /etc/aliases.db
newaliases

# Vacation Support
echo "autoreply.$DOMAIN vacation:" > /etc/postfix/transport
postmap /etc/postfix/transport

# Update to latest Spam Assassin Rules/Filters
sa-update
# Update to latest Antivirus
freshclam

# Setup Auto-Cron Entries (so future antivirus updates
# can just be automatic).
sed -i -e '//etc/cron.hourly/d' /etc/crontab
sed -i -e '//etc/cron.daily/d' /etc/crontab
sed -i -e '//etc/cron.weekly/d' /etc/crontab
sed -i -e '//etc/cron.monthly/d' /etc/crontab
cat << _EOF >> /etc/crontab
  01 * * * * root run-parts /etc/cron.hourly
  02 4 * * * root run-parts /etc/cron.daily
  22 4 * * 0 root run-parts /etc/cron.weekly
  42 4 1 * * root run-parts /etc/cron.monthly
_EOF

# Enable our Services On Reboot
chkconfig --levels 345 spamassassin on
chkconfig --levels 345 clamd on
chkconfig --levels 345 clamd.amavisd on
chkconfig --levels 345 amavisd on
chkconfig --levels 345 postfix on

# Start all of our other services if they aren't already
service spamassassin start
service clamd start
service amavisd start
service clamd.amavisd start

# Restart our postfix service to on our new configuration
service postfix restart
Step 4 of 7: Setup our Mail Delivery Agent (MDA): Dovecot
First off, Make sure you’ve set up your environment correctly (defined in Step 1 above) or you will have problems with the outcome of this step!
################################################################
# Configure Dovecot (MDA)
################################################################
# Create backup of configuration files
[ ! -f /etc/dovecot/dovecot.conf.orig ] &&
   cp /etc/dovecot/dovecot.conf /etc/dovecot/dovecot.conf.orig

# dovcot.conf
sed -e "/^#?/d"
    -e "s/%DOMAIN%/$DOMAIN/g"
    -e "s|%VHOST_HOME%|$VHOST_HOME|g"
    -e "s/%VHOST_UID%/$VHOST_UID/g"
    -e "s/%VHOST_GID%/$VHOST_GID/g"
        $NUXREF_TEMPLATES/pgsql.dovecot.template.dovecot.conf >
            /etc/dovecot/dovecot.conf

# Create our Sieve Directories
[ ! -d /var/lib/sieve/users ] &&
   mkdir -p /var/lib/sieve/users
[ ! -d /var/lib/sieve/before.d ] &&
   mkdir -p /var/lib/sieve/before.d
[ ! -d /var/lib/sieve/after.d ] &&
   mkdir -p /var/lib/sieve/after.d
chown -R vmail.vmail /var/lib/sieve
chmod 750 /var/lib/sieve

# Dovecot PostgreSQL Configuration
for FILE in dovecot-sql.conf
            dovecot-dict-user-quota.conf
            dovecot-dict-domain-quota.conf
do
   sed -e "/^#?/d"
       -e "s|%VHOST_HOME%|$VHOST_HOME|g"
       -e "s/%VHOST_UID%/$VHOST_UID/g"
       -e "s/%VHOST_GID%/$VHOST_GID/g"
       -e "s/%PGROUSER%/$PGROUSER/g"
       -e "s/%PGROPASS%/$PGROPASS/g"
       -e "s/%PGHOST%/$PGHOST/g"
       -e "s/%PGNAME%/$PGNAME/g"
           $NUXREF_TEMPLATES/pgsql.dovecot.template.$FILE >
               /etc/dovecot/$FILE
   # permissions
   chmod 640 /etc/dovecot/$FILE
   chown root.dovecot /etc/dovecot/$FILE
done

# Warning Message when mailbox is almost full
sed -e "/^#?/d"
    -e "s/%DOMAIN%/$DOMAIN/g"
        $NUXREF_TEMPLATES/pgsql.dovecot.template.mail-warning.sh >
            /usr/libexec/dovecot/mail-warning.sh

# Make Script Executable
chmod 755 /usr/libexec/dovecot/mail-warning.sh

# Ensure Dovecot starts after each system reboot:
chkconfig --levels 345 dovecot on

# Start Dovecot (otherwise restart it if it's already running)
service dovecot status && service dovecot restart || service dovecot start
Step 5 of 7: Setup Postfix Admin
First off, Make sure you’ve set up your environment correctly (defined in Step 1 above) or you will have problems with the outcome of this step!
################################################################
# Configure PostfixAdmin
################################################################
sed -e "/^//?/d"
    -e "s/%DOMAIN%/$DOMAIN/g"
    -e "s/%ADMIN%/$ADMIN/g"
    -e "s/%PGHOST%/$PGHOST/g"
    -e "s/%PGNAME%/$PGNAME/g"
    -e "s/%PGRWUSER%/$PGRWUSER/g"
    -e "s/%PGRWPASS%/$PGRWPASS/g"
        $NUXREF_TEMPLATES/pgsql.postfixadmin.template.config.local.php >
            /etc/postfixadmin/config.local.php

# Protect file since it contains passwords
chmod 640 /etc/postfixadmin/config.local.php
chown root.apache /etc/postfixadmin/config.local.php

# Vacation Auto-respond Support
sed -e "/^#?/d"
    -e "s/%DOMAIN%/$DOMAIN/g"
    -e "s/%PGROUSER%/$PGROUSER/g"
    -e "s/%PGROPASS%/$PGROPASS/g"
    -e "s/%PGHOST%/$PGHOST/g"
    -e "s/%PGNAME%/$PGNAME/g"
        $NUXREF_TEMPLATES/pgsql.postfixadmin.template.vacation.conf >
            /etc/postfixadmin/vacation.conf

# Protect file since it contains passwords
chmod 640 /etc/postfixadmin/vacation.conf
chown root.vacation /etc/postfixadmin/vacation.conf

# Log Rotation
cat << _EOF > /etc/logrotate.d/postfix-vacation
/var/log/vacation.log {
        missingok
        notifempty
        create 644 vacation root
}
_EOF
Now you can setup NginX to host your administration; in the below example, I set up https://postfixadmin.<your.domain>/ to go to the postfixadmin page.
# Create dummy favicon.ico for now (silences some log entries)
touch /usr/share/postfixadmin/favicon.ico

# PostfixAdmin NginX Configuration
sed -e "/^#?/d"
    -e "s/%DOMAIN%/$DOMAIN/g"
        $NUXREF_TEMPLATES/nginx.postfixadmin.template.conf >
            /etc/nginx/conf.d/postfixadmin.conf

# You may have to bump php-fpm to be safe (if it's not already running)
service php-fpm status 2>/dev/null && service php-fpm restart || service php-fpm start
# make sure it starts on every reboot too:
chkconfig php-fpm --level 345 on
# Restart NginX if it's not already
service nginx status 2>/dev/null && service nginx restart || service nginx start
chkconfig nginx --level 345 on
Once you’re complete that, you’re now ready to access the administrator interface and set up a new account. Simply visit https://postfixadmin.<your.domain>/setup.php. The templates I provided will set the system password to admin. You’ll need to always enter this value prior to creating an account below.

Once you’re done creating an account, just change the setup.php script to read-only as a security precaution. You can preform every other action you’ll ever need using the account you already created.
################################################################
# Disable Future System Administrator Creation
################################################################
chmod 600 /usr/share/postfixadmin/setup.php

# later on, you can re-enable the setup.php file to create a new
# account in the distant future by just typing:
#
# chmod 644 /usr/share/postfixadmin/setup.php
#
You can simply access https://postfixadmin.<your.domain>/ now (without the setup.php) and login using the new administrator you created.
Step 6 of 7: Setup Roundcube
First off, Make sure you’ve set up your environment correctly (defined in Step 1 above) or you will have problems with the outcome of this step!
################################################################
# Configure RoundCube Mailer
################################################################
# RoundCube NginX Configuration
sed -e "/^#?/d"
    -e "s/%DOMAIN%/$DOMAIN/g"
        $NUXREF_TEMPLATES/nginx.roundcubemail.template.conf >
            /etc/nginx/conf.d/roundcubemail.conf

# Optionally Eliminate Reset RoundCube Database
/bin/su -c "/usr/bin/dropdb -h  $PGHOST -p $PGPORT $PGRQNAME 2>&1" postgres &>/dev/null
/bin/su -c "/usr/bin/dropuser -h $PGHOST -p $PGPORT $PGRQUSER 2>&1" postgres &>/dev/null

# Create RoundCube Admistrator User
echo "Enter the role password of '$PGRQPASS' when prompted"
/bin/su -c "/usr/bin/createuser -h $PGHOST -p $PGPORT -S -D -R $PGRQUSER -P 2>&1" postgres 2>&1

# Create our Database and assign it our Administrator as it's owner
/bin/su -c "/usr/bin/createdb -h $PGHOST -p $PGPORT -O $PGRQUSER $PGRQNAME 2>&1" postgres 2>&1
/usr/bin/psql -h $PGHOST -p $PGPORT -U $PGRQUSER $PGRQNAME -f /usr/share/doc/roundcubemail-0.9.5/SQL/postgres.initial.sql

# Configure Roundmail
sed -i -e "s|(^[ t]*$rcmail_config[[']db_dsnw['"]][ t]*=).*$|1 'pgsql://$PGRQUSER:$PGRQPASS@$PGHOST/$PGRQNAME';|g" /etc/roundcubemail/db.inc.php
sed -i -e "s|(^[ t]*$rcmail_config[[']default_host['"]][ t]*=).*$|1 'ssl://$MXHOST:993';|g" /etc/roundcubemail/main.inc.php
sed -i -e "s|(^[ t]*$rcmail_config[[']smtp_server['"]][ t]*=).*$|1 'tls://$MXHOST';|g" /etc/roundcubemail/main.inc.php
sed -i -e "s|(^[ t]*$rcmail_config[[']smtp_user['"]][ t]*=).*$|1 '%u';|g" /etc/roundcubemail/main.inc.php
sed -i -e "s|(^[ t]*$rcmail_config[[']smtp_pass['"]][ t]*=).*$|1 '%p';|g" /etc/roundcubemail/main.inc.php

# Some extra Roundmail options I preferred:
sed -i -e "s|(^[ t]*$rcmail_config[[']identities_level['"]][ t]*=).*$|1 3;|g" /etc/roundcubemail/main.inc.php
sed -i -e "s|(^[ t]*$rcmail_config[[']quota_zero_as_unlimited['"]][ t]*=).*$|1 true;|g" /etc/roundcubemail/main.inc.php
sed -i -e "s|(^[ t]*$rcmail_config[[']htmleditor['"]][ t]*=).*$|1 1;|g" /etc/roundcubemail/main.inc.php
sed -i -e "s|(^[ t]*$rcmail_config[[']preview_pane['"]][ t]*=).*$|1 true;|g" /etc/roundcubemail/main.inc.php

# You may have to bump php-fpm to be safe (if it's not already running)
service php-fpm status 2>/dev/null && service php-fpm restart || service php-fpm start
# make sure it starts on every reboot too:
chkconfig php-fpm --level 345 on
# Restart NginX if it's not already
service nginx status 2>/dev/null && service nginx restart || service nginx start
chkconfig nginx --level 345 on
You can simply access https://roundcube.<your.domain>/ now and access any mailboxes you configured. Just remember to tell your users that they must specify their full email address as their username.
Each mailbox you create using PostfixAdmin you’ll be able to access with your Roundcube webpage.
Step 7 of 7: Security
If you aren’t familiar with Fail2Ban; now would be an excellent time to learn about it. I wrote a blog about securing your CentOS system a while back and encourage you to read it. At the very least, read the section on Fail2Ban. The below explains how you can protect yourself from brute force.
# Monitor for multiple failed SASL Logins into postfix
cat << _EOF > /etc/fail2ban/filter.d/postfix-sasl.conf
[Definition]
failregex = (?i): warning: [-._w]+[<HOST>]: SASL (?:LOGIN|PLAIN|(?:CRAM|DIGEST)-MD5) authentication failed(: [A-Za-z0-9+/ ]*)?$
ignoreregex =
_EOF
# Monitor for multiple failed postfixadmin logins
cat << _EOF > /etc/fail2ban/filter.d/postfixadmin-auth.conf
[Definition]
failregex = ^<HOST> -.*POST.*login.php HTTP[^ t]+ 500$
ignoreregex =
_EOF

# Now in /etc/fail2ban/jail.conf you will want the following:
cat << _EOF >> /etc/fail2ban/jail.conf
[dovecot-iptables]
enabled  = true
filter   = dovecot
backend  = polling
action   = iptables[name=dovecot, port=110,143,993,995, protocol=tcp]
           sendmail-whois[name=dovecot, dest=root, sender=fail2ban@$DOMAIN]
logpath  = /var/log/mail.log

[sasl-iptables]
enabled  = true
filter   = postfix-sasl
backend  = polling
action   = iptables[name=sasl, port=25,587, protocol=tcp]
           sendmail-whois[name=sasl, dest=root, sender=fail2ban@$DOMAIN]
logpath  = /var/log/mail.log

[roundcube-iptables]
enabled  = true
filter   = roundcube-auth
backend  = polling
action   = iptables[name=RoundCube, port="http,https"]
           sendmail-whois[name=RoundCube, dest=root, sender=fail2ban@$DOMAIN]
logpath  = /var/log/roundcubemail/errors

[pfixadmadmin-iptables]
enabled  = true
filter   = postfixadmin-auth
backend  = polling
action   = iptables[name=PostfixAdmin, port="http,https"]
           sendmail-whois[name=PostfixAdmin, dest=root, sender=fail2ban@$DOMAIN]
logpath  = /var/log/nginx/postfixadmin.access.log
_EOF
You will want to additionally add the following to your iptables /etc/sysconfig/iptables:
#---------------------------------------------------------------
# Web Traffic (for PostfixAdmin and RoundCube)
#---------------------------------------------------------------
# Allow non-encrypted port so we can redirect these users to the
# encrypted version.  It's just a nicer effect to support
# redirection
-A INPUT -m state --state NEW -m tcp -p tcp --dport 80 -j ACCEPT
-A INPUT -m state --state NEW -m tcp -p tcp --dport 443 -j ACCEPT

#---------------------------------------------------------------
# SMTP /Message Transfer Agent Communication
#---------------------------------------------------------------
-A INPUT -m state --state NEW -m tcp -p tcp --dport 465 -j ACCEPT

#---------------------------------------------------------------
# IMAP
#---------------------------------------------------------------
-A INPUT -m state --state NEW -m tcp -p tcp --dport 993 -j ACCEPT

#---------------------------------------------------------------
# POP3
#---------------------------------------------------------------
-A INPUT -m state --state NEW -m tcp -p tcp --dport 995 -j ACCEPT
Useful Commands When Running Your Mail Server
- doveconf -a: Display Dovecot configuration
- postconf -n: Display Postfix configuration
- postqueue -p: Display mail queue information
Sometimes when first playing with quotas, you may or may not want to recalculate them against a user. This can be done as follows:
#  Recalculate a specific users quota
doveadm quota recalc -u foobar@your.domain.com

# Or you can do this and recalculate ALL user quotas
doveadm quota recalc -A

# You will also want to run the following command if you decide
# to recalculate someone (or all) in your database:
# UPDATE domain_quota SET bytes=sq.sb, messages=sq.sm
#   FROM (SELECT 'your.domain.com',
#           sum(bytes) as sb, sum(messages) as sm from quota2 WHERE
#            username like '%@your.domain.com') AS sq
#   WHERE domain = 'your.domain.com';
Note: If you delete a mailbox for a specified domain, remember to manually remove: /var/mail/vhosts/domain/user
So… That’s it? Now I’m done?
Yes and No… My blog pretty much hands over a working mail server with little to no extra configuration needed on your part. But to properly accept mail from other people around the world, you will need:
- This mail server (ideally) must be accessible to the internet via a static IP address. This means that if you’re hosting this at home, the IP address your ISP provides you may not work (Dynamic IP vs Static IP). That said; a lot of ISPs can offer you a static IP if you don’t already have one for little (to no) extra cost.
- Your own domain name (if you don’t have an official one already) because you can’t have an email@your.domain.com if your.domain.com isn’t publicly recognized.
- A Mail Exchange (MX) Record that points to your new mail server by via it’s accessible IP on the internet. This is the only way the outside world will be able to send mail back to you; this step is not required if the only thing you’re doing is sending email out.
Most Domain Registars allow you to set your own MX record (GoDaddy.com, NameCheap.com) which can simply be entered right from their webpage with little to no effort. If you’re paying someone else to host your websites for the domain you own, then most likely they have the MX record already pointing to them. You may need to open a support ticket (or call them) and tell them you want the MX record changed to point back to your own server instead or forward it.
Please keep in mind that there are risks involved with running your own mail server. You can get yourself temporarily (or permantenly) blacklisted if you’re not careful. Once you’re blacklisted, you’ll have a very hard time getting other mail servers on the internet to accept your emails for delivery. Blacklisting occurs when mail servers (which you will now be interacting with) detect abuse. In most cases, the mail server administrator (this is YOU) won’t even know you’re abusing other peoples servers. The abuse will start under your nose from emails that originated from your system by those you given mailboxes too. In fact, once your domain is blacklisted; it can be a pain in the @$$ to get de-listed later. A Blacklisted domain’s emails usually never reaches their intended recipient. Instead, they are immediately flagged as spam and sent to the deleted items (by the remote server). The configuration I provided considers most of the cases, but you still need to consider:
- Don’t create mailboxes for people that you know intend to use it for derogatory purposes or for the intentions of spamming others. Hence; don’t allow users to send out hundreds of thousands of emails a day to a massive distribution on a regular bases even if it’s meaningful mail. Consider that the same stuff that you don’t like in your inbox is the same stuff that nobody else likes in theirs either. 🙂
- Don’t allow your mail server to relay mail from untrusted sources. Hence; make sure you only allow users you create accounts for to send mail from your server.
- Throttle all outbound mail delivery to each of their relay locations. With respect to the first point, even if you have to send massive amounts of mail from your system on a regular basis, do it in small batches. This way you won’t overwhelm the remote servers accepting your mail you want delivered.
If you followed my blog and are using the settings I put in place, then you’re already configured for the last 2 options above. The first option is governed by your own decisions.
No system is bulletproof; disaster can always strike when you’re least expecting it. To cover yourself, always consider backups of the following:
- Your PostgreSQL Database: This is where all of your mail configuration is for both your MTA and MDA. You definitely do not want to lose this. May I suggest you reference my other blog entry here where I wrote a really simple backup/restore tool for a PostgreSQL database.
- /etc/postfixadmin/*: Your Postfix Admin flat file configuration allowing you to centrally manage everything via a webpage.
- /etc/postfix/*: Your Postfix flat file configuration which defines the core of your MTA. It’s configuration allows you to centrally manage everything else through the Postfix Administration website.
- /etc/roundcube/*: Your Roundcube flat file configuration which allowing users to check their mail via a webpage you host.
- /etc/dovecot/*: Your Dovecot flat file configuration which defines the core of your MDA. It’s configuration allows you to centrally manage everything through the Postfix Administration website.
- /var/mail/vhosts/*: All of your user’s mailboxes are defined here. This is a vast storage of unread and read mail that resides on your server.
Oct 20th, 2014 Security Update: Handles The Poodle SSLv3 Exploit
Last week a security exploit was found specifically targeting web hosting making use of the SSLv3 (see here for details) protocol. Previously, the NginX templates (residing in nuxref-templates-mxserver version 1.0.1 or less) I provided did not protect you from this vulnerability. As a result; earlier readers of this blog entry may be susceptible to a man-in-the-middle attack. I just recently posted an update to the nuxref-templates-mxserver (v1.0.2) which will automatically cover any new bloggers building a mail server. For the previous readers, you just need to make 2 changes to correct yourself of this exploit:
- Open up /etc/nginx/conf.d/roundcubemail.conf and /etc/nginx/conf.d/postfixadmin.conf and change this:
   ssl_ciphers HIGH:!ADH:!MD5;
   ssl_prefer_server_ciphers on;
   ssl_protocols SSLv3;
   ssl_session_cache shared:SSL:1m;
   ssl_session_timeout 15m;
to this:
   ssl_session_timeout  5m;
   ssl_protocols TLSv1 TLSv1.1 TLSv1.2;
   ssl_ciphers 'ECDHE-RSA-AES128-GCM-SHA256:ECDHE-ECDSA-AES128-GCM-SHA256:ECDHE-RSA-AES256-GCM-SHA384:ECDHE-ECDSA-AES256-GCM-SHA384:DHE-RSA-AES128-GCM-SHA256:DHE-DSS-AES128-GCM-SHA256:kEDH+AESGCM:ECDHE-RSA-AES128-SHA256:ECDHE-ECDSA-AES128-SHA256:ECDHE-RSA-AES128-SHA:ECDHE-ECDSA-AES128-SHA:ECDHE-RSA-AES256-SHA384:ECDHE-ECDSA-AES256-SHA384:ECDHE-RSA-AES256-SHA:ECDHE-ECDSA-AES256-SHA:DHE-RSA-AES128-SHA256:DHE-RSA-AES128-SHA:DHE-DSS-AES128-SHA256:DHE-RSA-AES256-SHA256:DHE-DSS-AES256-SHA:DHE-RSA-AES256-SHA:AES128-GCM-SHA256:AES256-GCM-SHA384:AES128:AES256:AES:DES-CBC3-SHA:HIGH:!aNULL:!eNULL:!EXPORT:!DES:!RC4:!MD5:!PSK';
   ssl_prefer_server_ciphers on;
   ssl_session_cache  builtin:1000  shared:SSL:10m;
This information was based on a great blog entry on securing your NginX configuration found here.
- Finally you will want to reload your NginX configuration so it takes on the new updates you applied:
# Reload NginX
service nginx reload
What about Apache?
Apache is a perfectly fine alternative solution as well! I simply chose NginX because it is much more lightweight approach. In fact, PostfixAdmin and RoundCube mail already come with Apache configuration out of the box located in /etc/httpd/conf.d/. Thus, if you simply start up your Apache instance (service httpd start), you will be hosting its services right away. Please keep in mind that the default (Apache) configuration does not come with all the SSL and added security I provided with the NginX templates. Perhaps later on, I will update the template rpm to include an Apache secure setup as well.
Credit
This blog took me a very (,very) long time to put together and test! The repository hosting alone now accommodates all my blog entries up to this date. If you like what you see and wish to copy and paste this HOWTO, please reference back to this blog post at the very least. It’s really all I ask.
Repository
This blog required me to set up my own repository of which I was thinking that some people might want me to continue to maintain. Such as fetching and applying the latest security updates after testing them first for the continued promise of stability. Personally, I believe I may be setting up a new can of worms for myself by offering this service because bandwidth costs money and updates cost time. But I’ll share it publicly and see how things go anyway.
If you’d like me to continue to monitor and apply updates as well as hosting the repository for long terms, please consider donating or offering a mirror server to help me out! This would would be greatly appreciated!
Sources
This blog could not have been made possible without the tons of resources that I used. Some of these resources including other peoples blogs too which I picked and chose approaches they took.
- Mail Server Blog – Stay off of blacklists: Limit postfix recipients
- Installing a fully fledged, ready to use mailserver on CentOS 6
- SOHO Mailserver with Postfix + Postgresql + Dovecot + SpamAssassin + Roundcube
- DNSB: Spam Database Lookup. Use this site if you think your domain is blacklisted.
Software Resources
- Amavisd-new: Email filter with virus scanner and spamassassin support
- Spam Assassin: Reduce (if not completel eliminate) unsolicited comercial email (SPAM) from your incoming email.
- The Clam AntiVirus Daemon
- PostFixAdmin: Mail Server Web Administration
- Roundcube: Open Source Webmail Software
- PostFix: Mail Transport Agent (MTA)
- DoveCot: Mail Delivery Agent (MDA)
- DoveCot: Database Prefetch Documentation
- Strong SSL Security on NginX: A great blog entry on web server security!