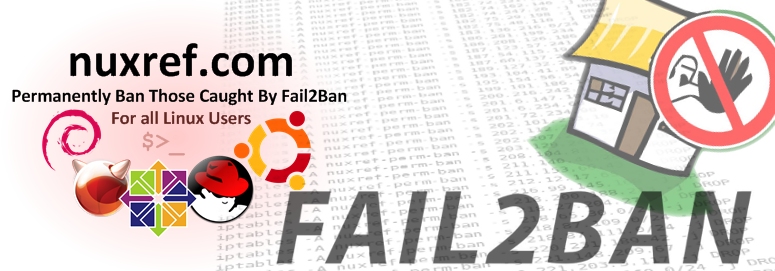
Fail2ban is probably one of the best intrusive detection based tools an administrator can deploy onto their system. This is especially the case if your system is connected to the internet. If you aren’t already using it; consider reading my blog entry here that talks about it.
In this blog, I provide a scripted solution that will capture the current list of banned users from Fail2Ban and make their ban permanent. This allows us to limit the constant emails one might receive about the same people trying to compromise our system(s). For those who aren’t using the emailing portion of Fail2Ban; this script still greatly takes the load off of Fail2Ban because it no longer has to manage the constant repeat offenders. Our logs are less cluttered too.
The script will address several things:
It will handle multiple attacks from people within the same Class C type netmask.
It will allow for the permanent bans to stick even after your system is rebooted. Unlike Fail2Ban’s list of blocked perpetrators, which is lost if the system (or iptables) is restarted.
It will enforce the use of iptable’s DROP directive instead of REJECT. This is a slightly more secure approach in handling those who aren’t ever allowed to come back.
It will support the fact that over time, you may want to add and remove from this new ban list I keep speaking of. Basically you can re-run the steps outlined in this blog again (and again) and not lose the addresses you’ve already blocked.
The script maintains a global list of addresses in a simple delimited format. You can then choose to share this list with other systems (or colleagues) to block the same unwanted users on these systems too.
Script Dependencies and Requirements
For this script to work, you can virtually use any Linux/FreeBSD/Unix operating system as long as you’re also using fail2ban in conjunction with iptables.
The script makes use of sed, and gawk to massage the data. These tools are common an available to all operating systems. But not all of them necessarily have them installed by default. Make sure you’ve got them before proceeding:
Without further ado, the below code is documented quite heavily so that you can just copy the sections into your terminal screen as the systems root user. Don’t try the next section until you’re done with the previous.
Although this code works for me, I still must caution you all the same: I will not be held liable for any loss, damage or expense as a result of the actions taken by my script. I’ve only used it without problem with CentOS 6.x. That said, the simplicity of it should make it work with any other *nux based OS as well.
# Author: Chris Caron
# Date: Tue, Apr 7th, 2015
########################################
# Environment Variables
########################################
# YOU MUST CORRECTLY SET THESE OR THE REMAINING FUNCTIONS OF
# THIS CODE WILL NOT WORK CORRECTLY.
#
# THIS SCRIPT ASSUMES YOU ARE RUNNING AS 'root'
#
# Public Ethernet Device
# For my home system, i have this set to ppp0; You'll want to
# set this to the Ethernet device that harm can venture from.
# such as the internet.
PUBDEV=eth0

# The name of the iptables chain to manage the permanent bans
# within. The name doesn't matter so long that it doesn't
# collide with a chain you're already managing.
# Also, Do not change this value in the future because that
# will hinder the ability to upgrade/append new bans easily.
# It is doubtful that it's current set value will conflict
# with anything. Therefore just leave the name the way it is
# now:
FILTER=nuxref-perm-ban

# The script makes an effort to detect IP Addresses all
# coming from the same Class C type network.  Rather then
# have an entry per IP like fail2ban manages; we group
# them into 1 to speed the look-ups iptables preforms.
# You'll want to identify the minimum number of IP
# addresses matched within the same alike (Class C) network
# before this grouping takes place.
CLASSCGRP_MIN=2

# IP Tables configuration file read during your system
# startup.
IPTABLES_CFG=/etc/sysconfig/iptables

# IPTables Chain Index
# Identify where you want your ban list to be applied
# To reduce overhead, the banlist should be processed 'after'
# some core checks you do.  For example I have a series of other
# checks i do first such as allowing already established
# connections to pass through.  I didn't want the ban list
# being applied to these, so for my system, i set this to 11.
# Setting it to 1 is safe because it guarantees it's at least
# processed first on systems who don't actively maintain their
# own custom firewall list.
CHAINID=1

########################################
# Preparation
########################################

# First we built a massive sorted and unique list of
# already banned IP addresses.
# The below is clever enough to include previous content
# you've banned from before (if any exists):
(
   # carry over old master list
   iptables -L -n | awk "/Chain $FILTER/, $NF ~ /RETURN/" |
    egrep DROP | sed -e 's/^[^0-9.]*([0-9]+.[0-9]+.[0-9]+).([0-9/]+).*/1 .2/g'
   # update master list with new data
   iptables -L -n | egrep REJECT |
    sed -e 's/^[^0-9.]*([0-9]+.[0-9]+.[0-9]+).([0-9]+).*/1 .2/g'
) | sort -n | uniq > list

# Now we build a separate list (in memory) that will track
# all of the ip addresses that met our $CLASSCGRP_MIN flag.
CLASSC_LIST=$(cat list | cut -f1 -d' ' | uniq -c |
    sed 's/^ *//g' | sort -n |
    awk "int($1)>=$CLASSCGRP_MIN" | cut -f2 -d' ')

# We eliminate the duplicates already pulled into memory
# from the master list of IPs
for NW in $CLASSC_LIST; do sed -i -e "/^$NW /d" list; done

# Now we scan our list and repopulate them into our master
# list. We place these entries at the head of the file so
# that they'll be added to our iptable ban chain first.
for NW in $CLASSC_LIST; do sed -i "1s/^/$NW .0/24n/" list; done

# Using our list of banned IP addresses, we now generate
# the actual iptable entries (into a file called
# 'commands':
(
   # Creates the chain
   echo iptables -N $FILTER

   # Build List of Addresses using our list file
   while read line; do
      IP=$(echo $line | tr -d '[:space:]')
      echo iptables -A $FILTER -s $IP -j DROP;
   done < list

   # Allow future iptable processing to continue
   # after reading through this chain by appending
   # the RETURN action.
   echo iptables -A $FILTER -j RETURN

   # Add chain to INPUT
   echo iptables -t filter -I INPUT $CHAINID -i $PUBDEV -j $FILTER
) > commands

########################################
# IPTables (Temporary Instalment)
########################################

# Have a look at our commands if you want:
cat commands

# Apply these new rules now with the following command:
sh commands

# The commands generated in the 'commands' text file
# are only temporary; they will be lost if your
# machine (or iptables) is ever restarted

########################################
# IPTables (Permanent Installation)
########################################
# Consider making a backup of your configuration in case you
# need to roll back
/bin/cp -f $IPTABLES_CFG $IPTABLES_CFG.backup

# Now we generate all of the commands needed to place
# into our iptables configuration file:
sed -e 's/^iptables[ ]*//g' commands |
    egrep "^-A $FILTER -s " > commands-iptables
# Clean up old configuration
sed -i -e "/^:$FILTER -/d" "$IPTABLES_CFG"
sed -i -e "/^-A INPUT .* $FILTER$/d" "$IPTABLES_CFG"
sed -i -e "/^-A $FILTER -/d" "$IPTABLES_CFG"

# Now push all of our new ban entries into the iptables file
sed -i -e "/:OUTPUT .*/a:$FILTER - [0:0]" "$IPTABLES_CFG"
sed -i -e "/:$FILTER - .*/a-A INPUT -i $PUBDEV -j $FILTER" "$IPTABLES_CFG"
sed -i -e "/-A INPUT -i $PUBDEV -j $FILTER.*/r commands-iptables" "$IPTABLES_CFG"

# Now preform the following to reset all of the fail2ban
# jails you've got as well load your new permanent ban setup
service fail2ban stop
service iptables restart
service fail2ban start

# If you have a problem; just roll back your backup you
# created and rerun the 3 commands above again. You can
# have a look at the table with the following command:
iptables -L -n -v

########################################
# IPTables (Optional Tiding)
########################################
# the above will insert the banlist at the top
# The below will just correct this and move it
# clean entry(s) from INPUT
(
   while [ 1 -eq 1 ]; do
      ID=$(iptables -nL --line-numbers |
           egrep "^[0-9]+[ t]+$FILTER " |
           head -n 1 |
           sed -e 's/^([0-9]+).*/1/g')
      [ -z "$ID" ] && break;
      iptables -D INPUT $ID
   done
   # Re insert at the correct $CHAINID
   iptables -t filter -I INPUT $CHAINID -i $PUBDEV -j $FILTER
)

# have another look if you want (if you tidied)
iptables -L -n -v

########################################
# Cleanup (Optional)
########################################
# Remove temporary files when your done; or save them if you
# want to port this data to another server:
rm -f list commands commands-iptables
You can undo and destroy the new entries an any time using the following:
This blog took some time to put together and test! If you like what you see and wish to copy and paste this HOWTO, please reference back to this blog post at the very least. It’s really all I ask.
Sources
There were not many sources used to make this entry. Most of it is just shell scripting knowledge I’ve adopted over the years mixed with some iptable commands. Here are some sources anyway that are applicable:
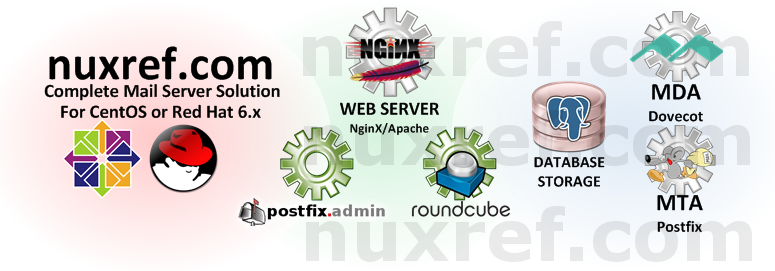
As you know, Mail Server tutorials are all over the internet. So if you stumbled upon mine, then you were like me trying to assemble one based on how others do it to save reading the manual. A mail server is NOT a walk through the park like some other servers are (such as Web, Database, etc). They can be very complicated to master; and frankly, when you’re short on time, it’s easier to just get one going right away. Don’t dismiss the need to learn how it works once you’ve set it up otherwise you may not know how to recover from a unexpected situation. But instead, learn about how it works (and how to further tweak it) after the deadlines have been met. Besides, your boss will be impressed when you show him your successful results sooner then later.
You’re reading this blog because your needs were/are similar to what mine were:
You’re looking for an automated solution to installing a mail server with little effort because you’re on a tight deadline.
You want a central configuration point; you want everything to be easy to maintain after it’s all set up.
You want everything to just work the first time and you want to leave the figuring it out part to the end.
Package management and version control is incredibly important to you.
Here is what my tutorial will be focused on:
A Database Backend (PostgreSQL) giving you central configuration. This tutorial focuses on version 8.4 because that is what ships with CentOS and Red Hat. But most (if not all) of this tutorial should still work fine if you choose to use version 9.x of the database instead.
Spam Control (SpamAssasin v3.3.x, Amavisd-new v2.8, and Clam AntiVirus v0.98) gives you some spam and anti-virus control. I’ve been looking into DSPAM but haven’t implemented it yet. I figure I’ll make a part 2 to this blog once i get around to working with it and mastering it’s setup.
Dovecot Pigeonhole v2.0.x provides you a way of routing mail in the users inbox based on it’s content. You can key off of certain content within a received message and mark it as spam, or flag it as important because it was sent by a certain individual, etc. It basically gives you the ability to custom some of the post processing of a received message that passed through all the other checks (spam, anti-virus, etc).
Security Considered
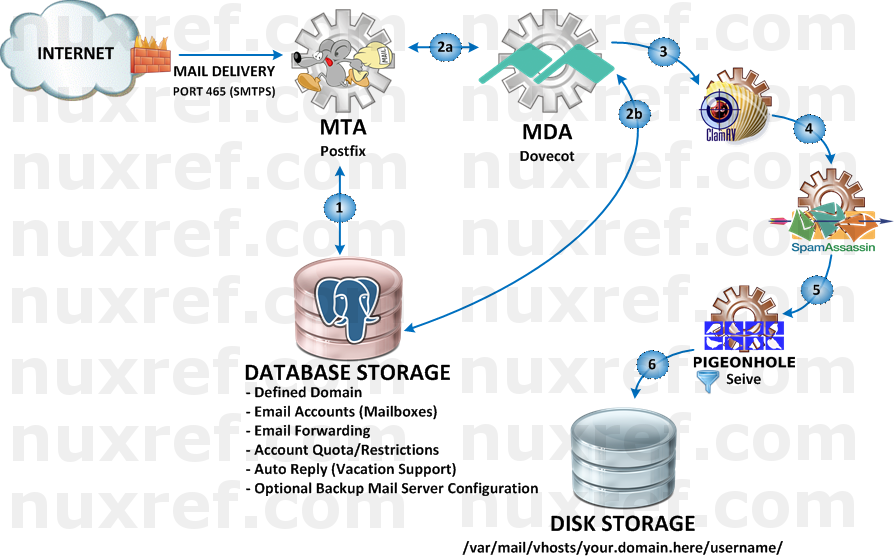
Mail Delivery Agent (MDA) (DoveCot v2.0.x):
Secure POP3 (POP3S) Access
Secure IMAP (IMAPS) Access
WebMail (RoundCube) Access
MDA Configuration
Mail Transport Agent (MTA) (PostFix v2.6.x): Secure SMTP (SMTPS)
MTA Configuration
Web Based Administration (PostFixAdmin v2.3.6). Life is made easier when you don’t have to do very much once everything has been set up. Run your server like an ISP would:
Virtual Domain Administration: Add/Remove as many as you want
Unlimited Virtual Aliases (or restrict if you want) per domain
Unlimited Mailboxes (or restrict if you want) per domain
Administrative Delegation: Grant enough privileges to another administrator who only has rights to his/her domain you granted them access to.
Away on Vacation Support (automatic replies)
Central Configuration
Please note the application versions identified above as this tutorial focuses specifically on only them. One big issue I found while researching how to set up a mail server was that the other tutorials I found didn’t really mention the software versions they were using. Hence, when I stumbled upon these old article(s) with new(er) software, it made for quite a painful experience when things didn’t work.
Please also note that other tutorials will imply that you setup one feature at a time. Then test it to see if it worked correctly before moving on to the next step. This is no doubt the proper way to do things. However, I’m just going to give it all to you at once. If you stick with the versions and packages I provide… If you follow my instructions, it will just work for you the first time. Debugging on your end will be a matter of tracing back to see what step you missed.
I tried to make this tutorial as cookie cutter(ish) as I could. Therefore you can literally just copy and paste what I share right to your shell prompt and the entire setup will be automated for you.
Hurdles
Just to let you know, I had many hurdles in order to pull this feat off. They were as follows:
postfix as shipped with CentOS and in the EPEL repository is not compiled with PostgreSQL support. I had to recompile this package as well just to enable this extra database support.
postfixadmin in the EPEL repository has qwirks I wasn’t happy with. I needed to fix a php error that kept coming up. I needed to adjust the database schema and permissions as well as fixing the Vacation Notification feature. I also did not want the mandatory MySQL dependency; so I removed that too.
perl Yes… that’s right, I had to patch perl :(. I had to recompile it due to a bug that I don’t belive was correctly addressed. In a nutshell, prior to my custom rebuild, perl-devel would haul in absolutely every development package including kernel headers and the GCC compiler. In the past the perl-devel package could be installed by itself providing us some tools spamassassin and amavisd-new depended on. You’re welcome to use the official version of perl over the one I recompiled; but be prepared to have a ton of compilation tools and source code in your production environment. This is not something I wanted at all. Interestingly enough; after the developers at RedHat said they wouldn’t tackle the issue of rolling their changes back, they seem to be entertaining this new guy’s request who’s asking for a similar alternative. So who knows, maybe newer versions of perl will accommodate mail servers again! 🙂
This blog itself was a massive hurdle. There are just so many configuration files and important points to account for that I found it easier to package my own rpm (nuxref-templates-mxserver) containing a series of configuration templates. The templates themselves took a while to construct in such a way that they could all be used together.
Installation
The following seven steps below will get you up and running.
Step 1 of 7: Setup Your Environment
This is the key to my entire blog; it’s going to make all of the remaining steps just work the first time for you. All; I repeat All of the steps below (after this one) assume that you’ve set this environment up. You will need to reset up your environment at least once before running through any of the remaining steps below or they will not work.
# You'll need to be hooked up to my repository for
# the installation to be this simple. Make sure to
# visit: http://nuxref.com/nuxref-repository/

# You should use yum priorities (if you're not already) to
# eliminate version problems later, but if you intend on
# just pointing to my repository and not the others, then you'll
# be fine.
yum install -y yum-plugin-priorities

################################################################
# Install our required products
################################################################
yum install -y
       --enablerepo=nuxref
       --enablerepo=nuxref-shared
           postgresql-server postgresql
           php-pgsql php-imap php-mcrypt php-mbstring
           dovecot dovecot-pgsql dovecot-pigeonhole
           clamav amavisd-new spamassassin
           postfix postfix-perl-scripts
           roundcubemail postfixadmin
           nuxref-templates-mxserver

# Choose between NginX or Apache
## NginX Option (a) - This one is my preferred choice:
yum install -y
       --enablerepo=nuxref
       --enablerepo=nuxref-shared
           nginx php-fpm

## Apache Option (b):
yum install -y
       --enablerepo=nuxref
       --enablerepo=nuxref-shared
            httpd php

# Make sure your build of Postfix supports PostgreSQL
# execute the following to see:
postconf -c /etc/postfix -m |
   egrep -q '^pgsql$' && echo "Supported!" ||
      echo "Not Supported!"

# If it's not supported then you ran into the first of many
# problems I had. It also means you didn't haul in my version
# from the previous command.  This can happen if you already had
# postfix installed on your machine and it's of a newer version
# then what I'm hosting. Your options at this point is to either
# uninstall your copy of postfix and install mine or recompile
# your version of postfix (but this time with PostgreSQL support).

# Setup Default Timezone for PHP. For a list of supported
# timezones you can visit here: http://ca1.php.net/timezones
TIMEZONE="America/Montreal"
sed -i -e "s|^[ t]*;*(date.timezone[ t]*=).*|1 $TIMEZONE|g" /etc/php.ini

################################################################
# Setup PostgreSQL (v8.4)
################################################################
# The commands below should all work fine on a PostgreSQL v9.x
# database too; but your mileage may vary as I've not personally
# tested it yet.

# Only init the database if you haven't already. This command
# could otherwise reset things and you'll loose everything.
# If your database is already setup and running, then you can
# skip this line
service postgresql initdb

# Now that the database is initialized, configure it to trust
# connections from 'this' server (localhost)
sed -i -e 's/^[ t]*(local|host)([ t]+.*)/#12/g'
    /var/lib/pgsql/data/pg_hba.conf
cat << _EOF >> /var/lib/pgsql/data/pg_hba.conf
# Configure all local database access with trust permissions
local   all         all                               trust
host    all         all         127.0.0.1/32          trust
host    all         all         ::1/128               trust
_EOF

# Make sure PostgreSQL is configured to start up each time
# you start up your system
chkconfig --levels 345 postgresql on

# Start the database now too because we're going to need it
# very shortly in this tutorial
service postgresql start
To simplify your life, I’ve made the configuration of all the steps below reference a few global variables. The ones identified below are the only ones you’ll probably want to change. May I suggest you paste the below information in your favorite text editor (vi, emacs, etc) and adjust the variables to how you want them making it easier to paste them back to your terminal screen.
# Identify the domain name of your server here
DOMAIN=nuxref.com
# Setup what you want to be your Administrative email account
# Note: This does 'NOT' have to be of the same domain even though
#       thats how I set it up to be. Don't worry if the email
#       address doesn't exist, because when you're all done
#       following this blog, you'll be able to create it!
ADMIN=hostmaster@$DOMAIN

# The following is only used for our SSL Key Generation
COUNTRY_CODE="7K"
PROV_STATE="Westerlands"
CITY="Lannisport"
SITE_NAME="NuxRef"
Now for the rest of the global configuration; There really should be no reason to change any of these values (but feel free to). It’s important that you paste the above information (tailored to your liking’s) as well as the below information below to your command line interface (CLI) of the server you wish to set up.
# PostgreSQL Database
PGHOST=localhost
PGPORT=5432
PGNAME=system_mail
# This is the Read Only access user (or very limited access)
PGROUSER=mailreader
PGROPASS=mailreader
# This is for administration
PGRWUSER=mailwriter
PGRWPASS=mailwriter

# VHost Mail Directory
VHOST_HOME=/var/mail/vhosts
VHOST_UID=5000
# No real reason to make them differ
# but define tis variable anyway for
# below configuration to work
VHOST_GID=$VHOST_UID

# RoundCube Configuration
MXHOST=$PGHOST
PGRQNAME=system_roundcube
PGRQUSER=roundcube_user
PGRQPASS=roundcube_pass

# This is where our templates get installed to make your life
# incredibly easy and the setup to be painless. These files are
# installed from the nuxref-templates-mxserver RPM package you
# installed above. If you do not have this RPM package then you
# must install it or this blog simply won't work for you.
# > yum install --enablerepo=nuxref nuxref-templates-mxserver
NUXREF_TEMPLATES=/usr/share/nuxref
Once all of this has been set you can proceed to do any of the below steps! Keep in mind that if you decide to change any of the variables above, you may need to redo every single step identified below.
Step 2 of 7: System Preparation
First off, Make sure you’ve set up your environment correctly (defined in Step 1 above) or you will have problems with the outcome of this step! General:
# Create vmail user; this will be a secure user no one else has
# permissions to that we can lock and keep our mail private
# from any prying eyes of people who have or gain access to our
# server.
useradd -u $VHOST_UID -d /var/mail/vhosts -M -s /sbin/nologin vmail
mkdir -p  /var/mail/vhosts/
chown vmail.vmail /var/mail/vhosts/
chmod 700 /var/mail/vhosts/

# Create a clam user we can preform our anti-virus scans as
usermod -G amavis clam

# Fix ClamD Sock Reference
sed -i -e 's|/var/spool/amavisd/clamd.sock|/var/run/clamav/clamd.sock|g' /etc/amavisd/amavisd.conf

# Fix Amavis Directory Permission
chmod 1770 /var/spool/amavisd/tmp/
# Amavis Domain Configuration
sed -i -e '/NuxRef BulletProofing/d'
       -e "s/(# $myhostname.*)/1n$myhostname = 'mail.$DOMAIN'; # NuxRef BulletProofing/g" /etc/amavisd/amavisd.conf
sed -i -e "s/^($mydomain[ t]*=[ t]*).*$/1'$DOMAIN';/g" /etc/amavisd/amavisd.conf

# Generate SSL Keys (if you don't have any already) that we
# will secure all our inbound and outbound mail as.
openssl req -nodes -new -x509 -days 730 -sha256 -newkey rsa:2048
   -keyout /etc/pki/tls/private/$DOMAIN.key
   -out /etc/pki/tls/certs/$DOMAIN.crt
   -subj "/C=$COUNTRY_CODE/ST=$PROV_STATE/L=$CITY/O=$SITE_NAME/OU=IT/CN=$DOMAIN"

# Permissions; protect our Private Key
chmod 400 /etc/pki/tls/private/$DOMAIN.key

# Permissions; protect our Public Key
chmod 444 /etc/pki/tls/certs/$DOMAIN.crt
Create PostgreSQL Mail Database:
# Optionally Eliminate Reset Database.
/bin/su -c "/usr/bin/dropdb -h $PGHOST -p $PGPORT $PGNAME 2>&1" postgres &>/dev/null
/bin/su -c "/usr/bin/dropuser -h $PGHOST -p $PGPORT $PGRWUSER 2>&1" postgres &>/dev/null
/bin/su -c "/usr/bin/dropuser -h $PGHOST -p $PGPORT $PGROUSER 2>&1" postgres &>/dev/null

# Create Read/Write User (our Administrator)
echo "Enter the role password of '$PGRWPASS' when prompted"
/bin/su -c "/usr/bin/createuser -h $PGHOST -p $PGPORT -S -D -R $PGRWUSER -P 2>&1" postgres

# Create Read-Only User
echo "Enter the role password of '$PGROPASS' when prompted"
/bin/su -c "/usr/bin/createuser -h $PGHOST -p $PGPORT -S -D -R $PGROUSER -P 2>&1" postgres

# Create our Database and assign it our Administrator as it's owner
/bin/su -c "/usr/bin/createdb -h $PGHOST -p $PGPORT -O $PGRWUSER $PGNAME 2>&1" postgres 2>&1

# Secure and protect a temporary file to work with
touch /tmp/pgsql.postfix.schema.sql
chmod 640 /tmp/pgsql.postfix.schema.sql
chown root.postgres /tmp/pgsql.postfix.schema.sql

# the below seems big; but will work fine if you just copy and
# it as is right to your terminal: This will prepare the SQL
# statement needed to build your mail server's database backend
sed -e '/^--?/d'
    -e "s/%PGROUSER%/$PGROUSER/g"
    -e "s/%PGRWUSER%/$PGRWUSER/g"
    -e "s/%DOMAIN%/$DOMAIN/g"
        $NUXREF_TEMPLATES/pgsql.postfix.template.schema.sql >
          /tmp/pgsql.postfix.schema.sql

# load DB
/bin/su -c "/usr/bin/psql -h $PGHOST -p $PGPORT -f /tmp/pgsql.postfix.schema.sql $PGNAME 2>&1" postgres 2>&1
# cleanup
/bin/rm -f /tmp/pgsql.postfix.schema.sql
Step 3 of 7: Setup our Mail Transfer Agent (MTA): Postfix
First off, Make sure you’ve set up your environment correctly (defined in Step 1 above) or you will have problems with the outcome of this step!
################################################################
# Configure Postfix (MTA)
################################################################
# Create backup of configuration files
[ ! -f /etc/postfix/main.cf.orig ] &&
   cp /etc/postfix/main.cf /etc/postfix/main.cf.orig
[ ! -f /etc/postfix/master.cf.orig ] &&
   cp /etc/postfix/master.cf /etc/postfix/master.cf.orig

# Directory to store our configuration in
[ ! -d /etc/postfix/pgsql ] &&
    mkdir -p /etc/postfix/pgsql

# Secure this new directory since it will contain passwords
# information
chmod 750 /etc/postfix/pgsql
chown root.postfix /etc/postfix/pgsql

# Now using our templates, build our SQL files:
for FILE in relay_domains.cf
            transport_maps.cf
            virtual_alias_maps.cf
            virtual_domains_maps.cf
            virtual_mailbox_limit_maps.cf
            virtual_mailbox_maps.cf
do
    sed -e "/^#?/d"
        -e "s/%PGROUSER%/$PGROUSER/g"
        -e "s/%PGROPASS%/$PGROPASS/g"
        -e "s/%PGHOST%/$PGHOST/g"
        -e "s/%PGNAME%/$PGNAME/g"
            $NUXREF_TEMPLATES/pgsql.postfix.template.$FILE >
                /etc/postfix/pgsql/$FILE
done

# main.cf
sed -e "/^#?/d"
    -e "s/%DOMAIN%/$DOMAIN/g"
    -e "s|%VHOST_HOME%|$VHOST_HOME|g"
    -e "s/%VHOST_UID%/$VHOST_UID/g"
    -e "s/%VHOST_GID%/$VHOST_GID/g"
        $NUXREF_TEMPLATES/pgsql.postfix.template.main.cf >
            /etc/postfix/main.cf

# master.cf
cat $NUXREF_TEMPLATES/pgsql.postfix.template.master.cf >
   /etc/postfix/master.cf

# Run the newaliases command to generate /etc/aliases.db
newaliases

# Vacation Support
echo "autoreply.$DOMAIN vacation:" > /etc/postfix/transport
postmap /etc/postfix/transport

# Update to latest Spam Assassin Rules/Filters
sa-update
# Update to latest Antivirus
freshclam

# Setup Auto-Cron Entries (so future antivirus updates
# can just be automatic).
sed -i -e '//etc/cron.hourly/d' /etc/crontab
sed -i -e '//etc/cron.daily/d' /etc/crontab
sed -i -e '//etc/cron.weekly/d' /etc/crontab
sed -i -e '//etc/cron.monthly/d' /etc/crontab
cat << _EOF >> /etc/crontab
  01 * * * * root run-parts /etc/cron.hourly
  02 4 * * * root run-parts /etc/cron.daily
  22 4 * * 0 root run-parts /etc/cron.weekly
  42 4 1 * * root run-parts /etc/cron.monthly
_EOF

# Enable our Services On Reboot
chkconfig --levels 345 spamassassin on
chkconfig --levels 345 clamd on
chkconfig --levels 345 clamd.amavisd on
chkconfig --levels 345 amavisd on
chkconfig --levels 345 postfix on

# Start all of our other services if they aren't already
service spamassassin start
service clamd start
service amavisd start
service clamd.amavisd start

# Restart our postfix service to on our new configuration
service postfix restart
Step 4 of 7: Setup our Mail Delivery Agent (MDA): Dovecot
First off, Make sure you’ve set up your environment correctly (defined in Step 1 above) or you will have problems with the outcome of this step!
################################################################
# Configure Dovecot (MDA)
################################################################
# Create backup of configuration files
[ ! -f /etc/dovecot/dovecot.conf.orig ] &&
   cp /etc/dovecot/dovecot.conf /etc/dovecot/dovecot.conf.orig

# dovcot.conf
sed -e "/^#?/d"
    -e "s/%DOMAIN%/$DOMAIN/g"
    -e "s|%VHOST_HOME%|$VHOST_HOME|g"
    -e "s/%VHOST_UID%/$VHOST_UID/g"
    -e "s/%VHOST_GID%/$VHOST_GID/g"
        $NUXREF_TEMPLATES/pgsql.dovecot.template.dovecot.conf >
            /etc/dovecot/dovecot.conf

# Create our Sieve Directories
[ ! -d /var/lib/sieve/users ] &&
   mkdir -p /var/lib/sieve/users
[ ! -d /var/lib/sieve/before.d ] &&
   mkdir -p /var/lib/sieve/before.d
[ ! -d /var/lib/sieve/after.d ] &&
   mkdir -p /var/lib/sieve/after.d
chown -R vmail.vmail /var/lib/sieve
chmod 750 /var/lib/sieve

# Dovecot PostgreSQL Configuration
for FILE in dovecot-sql.conf
            dovecot-dict-user-quota.conf
            dovecot-dict-domain-quota.conf
do
   sed -e "/^#?/d"
       -e "s|%VHOST_HOME%|$VHOST_HOME|g"
       -e "s/%VHOST_UID%/$VHOST_UID/g"
       -e "s/%VHOST_GID%/$VHOST_GID/g"
       -e "s/%PGROUSER%/$PGROUSER/g"
       -e "s/%PGROPASS%/$PGROPASS/g"
       -e "s/%PGHOST%/$PGHOST/g"
       -e "s/%PGNAME%/$PGNAME/g"
           $NUXREF_TEMPLATES/pgsql.dovecot.template.$FILE >
               /etc/dovecot/$FILE
   # permissions
   chmod 640 /etc/dovecot/$FILE
   chown root.dovecot /etc/dovecot/$FILE
done

# Warning Message when mailbox is almost full
sed -e "/^#?/d"
    -e "s/%DOMAIN%/$DOMAIN/g"
        $NUXREF_TEMPLATES/pgsql.dovecot.template.mail-warning.sh >
            /usr/libexec/dovecot/mail-warning.sh

# Make Script Executable
chmod 755 /usr/libexec/dovecot/mail-warning.sh

# Ensure Dovecot starts after each system reboot:
chkconfig --levels 345 dovecot on

# Start Dovecot (otherwise restart it if it's already running)
service dovecot status && service dovecot restart || service dovecot start
Step 5 of 7: Setup Postfix Admin
First off, Make sure you’ve set up your environment correctly (defined in Step 1 above) or you will have problems with the outcome of this step!
Now you can setup NginX to host your administration; in the below example, I set up https://postfixadmin.<your.domain>/ to go to the postfixadmin page.
# Create dummy favicon.ico for now (silences some log entries)
touch /usr/share/postfixadmin/favicon.ico

# PostfixAdmin NginX Configuration
sed -e "/^#?/d"
    -e "s/%DOMAIN%/$DOMAIN/g"
        $NUXREF_TEMPLATES/nginx.postfixadmin.template.conf >
            /etc/nginx/conf.d/postfixadmin.conf

# You may have to bump php-fpm to be safe (if it's not already running)
service php-fpm status 2>/dev/null && service php-fpm restart || service php-fpm start
# make sure it starts on every reboot too:
chkconfig php-fpm --level 345 on
# Restart NginX if it's not already
service nginx status 2>/dev/null && service nginx restart || service nginx start
chkconfig nginx --level 345 on
Once you’re complete that, you’re now ready to access the administrator interface and set up a new account. Simply visit https://postfixadmin.<your.domain>/setup.php. The templates I provided will set the system password to admin. You’ll need to always enter this value prior to creating an account below.
Once you’re done creating an account, just change the setup.php script to read-only as a security precaution. You can preform every other action you’ll ever need using the account you already created.
################################################################
# Disable Future System Administrator Creation
################################################################
chmod 600 /usr/share/postfixadmin/setup.php

# later on, you can re-enable the setup.php file to create a new
# account in the distant future by just typing:
#
# chmod 644 /usr/share/postfixadmin/setup.php
#
First off, Make sure you’ve set up your environment correctly (defined in Step 1 above) or you will have problems with the outcome of this step!
################################################################
# Configure RoundCube Mailer
################################################################
# RoundCube NginX Configuration
sed -e "/^#?/d"
    -e "s/%DOMAIN%/$DOMAIN/g"
        $NUXREF_TEMPLATES/nginx.roundcubemail.template.conf >
            /etc/nginx/conf.d/roundcubemail.conf

# Optionally Eliminate Reset RoundCube Database
/bin/su -c "/usr/bin/dropdb -h  $PGHOST -p $PGPORT $PGRQNAME 2>&1" postgres &>/dev/null
/bin/su -c "/usr/bin/dropuser -h $PGHOST -p $PGPORT $PGRQUSER 2>&1" postgres &>/dev/null

# Create RoundCube Admistrator User
echo "Enter the role password of '$PGRQPASS' when prompted"
/bin/su -c "/usr/bin/createuser -h $PGHOST -p $PGPORT -S -D -R $PGRQUSER -P 2>&1" postgres 2>&1

# Create our Database and assign it our Administrator as it's owner
/bin/su -c "/usr/bin/createdb -h $PGHOST -p $PGPORT -O $PGRQUSER $PGRQNAME 2>&1" postgres 2>&1
/usr/bin/psql -h $PGHOST -p $PGPORT -U $PGRQUSER $PGRQNAME -f /usr/share/doc/roundcubemail-0.9.5/SQL/postgres.initial.sql

# Configure Roundmail
sed -i -e "s|(^[ t]*$rcmail_config[[']db_dsnw['"]][ t]*=).*$|1 'pgsql://$PGRQUSER:$PGRQPASS@$PGHOST/$PGRQNAME';|g" /etc/roundcubemail/db.inc.php
sed -i -e "s|(^[ t]*$rcmail_config[[']default_host['"]][ t]*=).*$|1 'ssl://$MXHOST:993';|g" /etc/roundcubemail/main.inc.php
sed -i -e "s|(^[ t]*$rcmail_config[[']smtp_server['"]][ t]*=).*$|1 'tls://$MXHOST';|g" /etc/roundcubemail/main.inc.php
sed -i -e "s|(^[ t]*$rcmail_config[[']smtp_user['"]][ t]*=).*$|1 '%u';|g" /etc/roundcubemail/main.inc.php
sed -i -e "s|(^[ t]*$rcmail_config[[']smtp_pass['"]][ t]*=).*$|1 '%p';|g" /etc/roundcubemail/main.inc.php

# Some extra Roundmail options I preferred:
sed -i -e "s|(^[ t]*$rcmail_config[[']identities_level['"]][ t]*=).*$|1 3;|g" /etc/roundcubemail/main.inc.php
sed -i -e "s|(^[ t]*$rcmail_config[[']quota_zero_as_unlimited['"]][ t]*=).*$|1 true;|g" /etc/roundcubemail/main.inc.php
sed -i -e "s|(^[ t]*$rcmail_config[[']htmleditor['"]][ t]*=).*$|1 1;|g" /etc/roundcubemail/main.inc.php
sed -i -e "s|(^[ t]*$rcmail_config[[']preview_pane['"]][ t]*=).*$|1 true;|g" /etc/roundcubemail/main.inc.php

# You may have to bump php-fpm to be safe (if it's not already running)
service php-fpm status 2>/dev/null && service php-fpm restart || service php-fpm start
# make sure it starts on every reboot too:
chkconfig php-fpm --level 345 on
# Restart NginX if it's not already
service nginx status 2>/dev/null && service nginx restart || service nginx start
chkconfig nginx --level 345 on
You can simply access https://roundcube.<your.domain>/ now and access any mailboxes you configured. Just remember to tell your users that they must specify their full email address as their username.
Each mailbox you create using PostfixAdmin you’ll be able to access with your Roundcube webpage.
Step 7 of 7: Security
If you aren’t familiar with Fail2Ban; now would be an excellent time to learn about it. I wrote a blog about securing your CentOS system a while back and encourage you to read it. At the very least, read the section on Fail2Ban. The below explains how you can protect yourself from brute force.
You will want to additionally add the following to your iptables /etc/sysconfig/iptables:
#---------------------------------------------------------------
# Web Traffic (for PostfixAdmin and RoundCube)
#---------------------------------------------------------------
# Allow non-encrypted port so we can redirect these users to the
# encrypted version.  It's just a nicer effect to support
# redirection
-A INPUT -m state --state NEW -m tcp -p tcp --dport 80 -j ACCEPT
-A INPUT -m state --state NEW -m tcp -p tcp --dport 443 -j ACCEPT

#---------------------------------------------------------------
# SMTP /Message Transfer Agent Communication
#---------------------------------------------------------------
-A INPUT -m state --state NEW -m tcp -p tcp --dport 465 -j ACCEPT

#---------------------------------------------------------------
# IMAP
#---------------------------------------------------------------
-A INPUT -m state --state NEW -m tcp -p tcp --dport 993 -j ACCEPT

#---------------------------------------------------------------
# POP3
#---------------------------------------------------------------
-A INPUT -m state --state NEW -m tcp -p tcp --dport 995 -j ACCEPT
Useful Commands When Running Your Mail Server
doveconf -a: Display Dovecot configuration
postconf -n: Display Postfix configuration
postqueue -p: Display mail queue information
Sometimes when first playing with quotas, you may or may not want to recalculate them against a user. This can be done as follows:
#  Recalculate a specific users quota
doveadm quota recalc -u foobar@your.domain.com

# Or you can do this and recalculate ALL user quotas
doveadm quota recalc -A

# You will also want to run the following command if you decide
# to recalculate someone (or all) in your database:
# UPDATE domain_quota SET bytes=sq.sb, messages=sq.sm
#   FROM (SELECT 'your.domain.com',
#           sum(bytes) as sb, sum(messages) as sm from quota2 WHERE
#            username like '%@your.domain.com') AS sq
#   WHERE domain = 'your.domain.com';
Note: If you delete a mailbox for a specified domain, remember to manually remove: /var/mail/vhosts/domain/user
So… That’s it? Now I’m done?
Yes and No… My blog pretty much hands over a working mail server with little to no extra configuration needed on your part. But to properly accept mail from other people around the world, you will need:
This mail server (ideally) must be accessible to the internet via a static IP address. This means that if you’re hosting this at home, the IP address your ISP provides you may not work (Dynamic IP vs Static IP). That said; a lot of ISPs can offer you a static IP if you don’t already have one for little (to no) extra cost.
Your own domain name (if you don’t have an official one already) because you can’t have an email@your.domain.com if your.domain.com isn’t publicly recognized.
A Mail Exchange (MX) Record that points to your new mail server by via it’s accessible IP on the internet. This is the only way the outside world will be able to send mail back to you; this step is not required if the only thing you’re doing is sending email out.
Most Domain Registars allow you to set your own MX record (GoDaddy.com, NameCheap.com) which can simply be entered right from their webpage with little to no effort. If you’re paying someone else to host your websites for the domain you own, then most likely they have the MX record already pointing to them. You may need to open a support ticket (or call them) and tell them you want the MX record changed to point back to your own server instead or forward it.
Please keep in mind that there are risks involved with running your own mail server. You can get yourself temporarily (or permantenly) blacklisted if you’re not careful. Once you’re blacklisted, you’ll have a very hard time getting other mail servers on the internet to accept your emails for delivery. Blacklisting occurs when mail servers (which you will now be interacting with) detect abuse. In most cases, the mail server administrator (this is YOU) won’t even know you’re abusing other peoples servers. The abuse will start under your nose from emails that originated from your system by those you given mailboxes too. In fact, once your domain is blacklisted; it can be a pain in the @$$ to get de-listed later. A Blacklisted domain’s emails usually never reaches their intended recipient. Instead, they are immediately flagged as spam and sent to the deleted items (by the remote server). The configuration I provided considers most of the cases, but you still need to consider:
Don’t create mailboxes for people that you know intend to use it for derogatory purposes or for the intentions of spamming others. Hence; don’t allow users to send out hundreds of thousands of emails a day to a massive distribution on a regular bases even if it’s meaningful mail. Consider that the same stuff that you don’t like in your inbox is the same stuff that nobody else likes in theirs either. 🙂
Don’t allow your mail server to relay mail from untrusted sources. Hence; make sure you only allow users you create accounts for to send mail from your server.
Throttle all outbound mail delivery to each of their relay locations. With respect to the first point, even if you have to send massive amounts of mail from your system on a regular basis, do it in small batches. This way you won’t overwhelm the remote servers accepting your mail you want delivered.
If you followed my blog and are using the settings I put in place, then you’re already configured for the last 2 options above. The first option is governed by your own decisions.
No system is bulletproof; disaster can always strike when you’re least expecting it. To cover yourself, always consider backups of the following:
Your PostgreSQL Database: This is where all of your mail configuration is for both your MTA and MDA. You definitely do not want to lose this. May I suggest you reference my other blog entry here where I wrote a really simple backup/restore tool for a PostgreSQL database.
/etc/postfixadmin/*: Your Postfix Admin flat file configuration allowing you to centrally manage everything via a webpage.
/etc/postfix/*: Your Postfix flat file configuration which defines the core of your MTA. It’s configuration allows you to centrally manage everything else through the Postfix Administration website.
/etc/roundcube/*: Your Roundcube flat file configuration which allowing users to check their mail via a webpage you host.
/etc/dovecot/*: Your Dovecot flat file configuration which defines the core of your MDA. It’s configuration allows you to centrally manage everything through the Postfix Administration website.
/var/mail/vhosts/*: All of your user’s mailboxes are defined here. This is a vast storage of unread and read mail that resides on your server.
Oct 20th, 2014 Security Update: Handles The Poodle SSLv3 Exploit
Last week a security exploit was found specifically targeting web hosting making use of the SSLv3 (see here for details) protocol. Previously, the NginX templates (residing in nuxref-templates-mxserver version 1.0.1 or less) I provided did not protect you from this vulnerability. As a result; earlier readers of this blog entry may be susceptible to a man-in-the-middle attack. I just recently posted an update to the nuxref-templates-mxserver (v1.0.2) which will automatically cover any new bloggers building a mail server. For the previous readers, you just need to make 2 changes to correct yourself of this exploit:
Open up /etc/nginx/conf.d/roundcubemail.conf and /etc/nginx/conf.d/postfixadmin.conf and change this:
This information was based on a great blog entry on securing your NginX configuration found here.
Finally you will want to reload your NginX configuration so it takes on the new updates you applied:
# Reload NginX
service nginx reload
What about Apache?
Apache is a perfectly fine alternative solution as well! I simply chose NginX because it is much more lightweight approach. In fact, PostfixAdmin and RoundCube mail already come with Apache configuration out of the box located in /etc/httpd/conf.d/. Thus, if you simply start up your Apache instance (service httpd start), you will be hosting its services right away. Please keep in mind that the default (Apache) configuration does not come with all the SSL and added security I provided with the NginX templates. Perhaps later on, I will update the template rpm to include an Apache secure setup as well.
Credit
This blog took me a very (,very) long time to put together and test! The repository hosting alone now accommodates all my blog entries up to this date. If you like what you see and wish to copy and paste this HOWTO, please reference back to this blog post at the very least. It’s really all I ask.
Repository
This blog required me to set up my own repository of which I was thinking that some people might want me to continue to maintain. Such as fetching and applying the latest security updates after testing them first for the continued promise of stability. Personally, I believe I may be setting up a new can of worms for myself by offering this service because bandwidth costs money and updates cost time. But I’ll share it publicly and see how things go anyway.
If you’d like me to continue to monitor and apply updates as well as hosting the repository for long terms, please consider donating or offering a mirror server to help me out! This would would be greatly appreciated!
Sources
This blog could not have been made possible without the tons of resources that I used. Some of these resources including other peoples blogs too which I picked and chose approaches they took.
FTP Servers have been around for a very long time. On could easily argue that they aren’t always the best option to choose anymore. But for those dealing with legacy systems, the FTP protocol provides one the easiest ways to share and distribute files across external systems. Despite the hate some might give the protocol; it still receives a lot a love from others just because it’s still very compatible with just about everything; heck, even web browsers such as Internet Explorer, Chrome, and Firefox (and many more) have the protocol built right into it.
In my case, I needed to set up an FTP server to help a client with some legacy software they use (and are familiar with). This blog is more or less just the steps I took to make it work in case anyone else is interested.
Security Concerns
FTP preforms all of it’s transactions in ‘plain text’ including it’s authentication. This wasn’t a problem back in 1980 when online security wasn’t an issue. This also isn’t a problem for sites offering anonymous file hosting services. But for everyone else, it pretty much leaves you susceptible to privacy issues and possible intrusions.
FTPS (not to be confused with SFTP) is a way of securing the FTP protocol for the systems that require it allowing you to eliminate the ‘plain text’ problem. But this requires the client uses software that can take advantage of it.
Some additional security concerns I wanted to consider:
Separate user accounts from the system ones. We don’t want people trying to guess our root password or access anyone’s home directory unless with specifically configure the server to allow it.
Setup VSFTPD
VSFTPD stands for Very Secure FTP Daemon and provides all the flexibility we need. It’s official website can be found here.
The following will set up VSFTPD into your CentOS/RedHat environment in a isolated manor. You see we want to disconnect the users that currently access your system from the users we create for VSFTPD for more flexibility and control.
# First fetch the required packages
# db4:       The Berkeley Database (Berkeley DB) which is a
#             quick and dirty way of storing our user accounts.
# db4-utils: This provides a tool we'll use to build a small user
#             database with.  Technically you can uninstall (just)
#             this package afterwards for added security after.
# openssl:   This is used to grant our FTP server FTPS support
# vsftpd:    The FTP/FTPS Daemon itself
yum -y install db4 db4-utils openssl vsftpd

# Create a password file: /etc/vsftpd/users.passwd
# This file contains all of the users you want to allow on the
# site in the structure:
# Line: Entry
#  1  | USERNAME1
#  2  | PASSWORD1
#  3  | USERNAME2
#  4  | PASSWORD2
# This below creates a simple user 'foobar' and a password
# of 'barfoo'.  This isn't the safest way to build your password
# file because it leaves a persons password set available in
# the shell history... But for the purpose of this tutorial:
echo foobar > /etc/vsftpd/users.passwd
echo barfoo >> /etc/vsftpd/users.passwd

# Protect our password file now from prying eyes:
chmod 600 /etc/vsftpd/users.passwd
chown root.root /etc/vsftpd/users.passwd

# Prepare a directory we want the foobar user to send it's files
# to. You can also just use a directory you already have in place
# or someone elses home directory.
mkdir -p /var/ftp/foobar

# Set a comfortable permission to this directory granting the ftp
# user (or any user account your later going to assign to this user
# read/write access)
chown root.ftp /var/ftp/foobar
chmod 775 /var/ftp/foobar

# Convert our plain-text password file into the Berkeley Database
# format. This is the only command that requires the db4-utils
# rpm package which you can uninstall if you want for security
# reasons after you run the below command.  You'll need to
# re-install it though if you ever want to add or update accounts
db_load -T -t hash
   -f /etc/vsftpd/users.passwd /etc/vsftpd/virtual.users.db

# Protect our new (Berkley) database:
chmod 600 /etc/vsftpd/virtual.users.db
chown root.root /etc/vsftpd/virtual.users.db

# Prepare our virtual user directory; this is where we can
# optionally place over-riding configuration for each user
# we create in the Berkley database above.
mkdir -p /etc/vsftpd/virtual.users
chmod 700 /etc/vsftpd/virtual.users
chown root.root /etc/vsftpd/virtual.users

# Create PAM Module that points to our new database.
# Note: you do not provide the '.db' extension when creating
#       this file. The file is valid as you see it below.
cat << _EOF > /etc/pam.d/vsftpd-virtual
auth     required pam_userdb.so db=/etc/vsftpd/virtual.users
account  required pam_userdb.so db=/etc/vsftpd/virtual.users
session  required pam_loginuid.so
_EOF

# Protect our Module
chmod 644 /etc/pam.d/vsftpd-virtual
chown root.root /etc/pam.d/vsftpd-virtual

# Create an empty jail directory.  This is used for default
# configurations only. A well configured system won't even use
# this; but it's still good to have since we'll be referencing
# it in our configuration. This will become the default
# directory a user connects to if they aren't otherwise
# configured to go to another location.
mkdir -p /var/empty/vsftpd/
chown nobody.ftp /var/empty/vsftpd/
chmod 555 /var/empty/vsftpd/

# Now we want to allow FTPS support, we'll need an SSL key to
# do it with.  If you already have one, you can skip this step.
# Otherwise, the following will just generate you a self-signed
# key as a temporary solution.
openssl req -nodes -new -x509 -days 730 -sha256 -newkey rsa:2048
   -keyout /etc/pki/tls/private/nuxref.com.key
   -out /etc/pki/tls/certs/nuxref.com.crt
   -subj "/C=7K/ST=Westerlands/L=Lannisport/O=NuxRef/OU=IT/CN=nuxref.com"

# Protect our Keys
chmod 400 /etc/pki/tls/private/nuxref.com.key; # Private Key
chmod 444 /etc/pki/tls/certs/nuxref.com.crt; # Public Certificate

# Create ourselves a little banner we can use to at least alert
# human intruders that they are in fact being monitored.  This
# scare tactic may or may not work, but if you ever have a breach
# of security, you may need to reference that you gave the user
# ample warning that they were violating someones rights by
# continuing.  Feel free to adjust the banner to your liking.
cat << _EOF > /etc/banner
* - - - - - - W A R N I N G - - - - - - - W A R N I N G - - - - - *
*                                                                 *
* The use of this system is restricted to authorized users. All   *
* information and communications on this system are subject to    *
* review, monitoring and recording at any time, without notice or *
* permission.                                                     *
*                                                                 *
* Unauthorized access or use shall be subject to prosecution.     *
*                                                                 *
* - - - - - - W A R N I N G - - - - - - - W A R N I N G - - - - - *
_EOF

# Protect our banner
chmod 640 /etc/banner
At this point we have our environment set up the way we want it. The next step is to create our VSFTPD configuration.
# Lets first backup original configuration file
mv /etc/vsftpd/vsftpd.conf /etc/vsftpd/vsftpd.conf.orig

# Create new configuration
cat << _EOF > /etc/vsftpd/vsftpd.conf
# --------------------------------------------------------------
# Base Configuration
# --------------------------------------------------------------
anon_world_readable_only=NO
anonymous_enable=NO
chroot_local_user=YES
hide_ids=YES
listen=YES
local_enable=YES
max_clients=10
max_per_ip=3
nopriv_user=ftp
pasv_min_port=64000
pasv_max_port=64100
session_support=NO
user_config_dir=/etc/vsftpd/virtual.users
userlist_enable=YES
use_localtime=YES
xferlog_enable=YES
xferlog_std_format=NO
log_ftp_protocol=YES
pam_service_name=vsftpd-virtual
banner_file=/etc/banner
reverse_lookup_enable=NO
# --------------------------------------------------------------
# Secure Configuration (FTPS)
# --------------------------------------------------------------
ssl_enable=YES
virtual_use_local_privs=NO
allow_anon_ssl=NO
# forcing SSL makes the FTP portion of your site disabled and it
# will only operate as FTPS.  This may or may not be what you
# want.
force_local_data_ssl=NO
force_local_logins_ssl=NO
ssl_tlsv1=YES
ssl_sslv2=NO
ssl_sslv3=NO
# Point to our certificates
rsa_cert_file=/etc/pki/tls/certs/nuxref.com.crt
rsa_private_key_file=/etc/pki/tls/private/nuxref.com.key
require_ssl_reuse=NO
ssl_ciphers=HIGH:!MD5:!ADH
# --------------------------------------------------------------
# FTP Configuration
# --------------------------------------------------------------
async_abor_enable=YES
ftp_data_port=20
connect_from_port_20=YES
# --------------------------------------------------------------
# Default Anonymous Restrictions (over-ride per virtual user)
# --------------------------------------------------------------
guest_enable=NO
guest_username=nobody
# Default home directory once logged in
local_root=/var/empty/vsftpd
# write_enabled is required if the user is to make use of any of
# the anon_* commands below
write_enable=NO
# give the user the ability to make directories
anon_mkdir_write_enable=NO
# give the user the ability delete and overwrite files
anon_other_write_enable=NO
# give the user the ability upload new files
anon_upload_enable=NO
# Give the user permission to do a simple directory listings
dirlist_enable=NO
# Give the user permission to download files
download_enable=NO
# if the user has can upload or make new directories, then this
# will be the umask applied to them
anon_umask=0002
# delete failed uploads (speaks for itself)
delete_failed_uploads=YES
_EOF

# Protect our configuration
chmod 600 /etc/vsftpd/vsftpd.conf
chown root.root /etc/vsftpd/vsftpd.conf
Technically we’re done now, but because we intentionally specified very restrictive user access rights, our foobar user we created will only connect to the /var/empty/vsftpd directory with no access rights. Therefore, our final step is to create an additional configuration file for the foobar account granting him read/write access to /var/ftp/foobar.
# The file you write to in the /etc/vsftpd/virtual.users/ 'must' be the same
# name as the user(s) you created to over-ride their permissions!
cat << _EOF > /etc/vsftpd/virtual.users/foobar
local_root=/var/ftp/foobar
# --------------------------------------------------------------
# User
# --------------------------------------------------------------
guest_enable=YES
# Set this to any system user you want
guest_username=ftp
local_root=/var/ftp/foobar
# --------------------------------------------------------------
# Permissions
# --------------------------------------------------------------
# write_enabled is required if the user is to make use of any of
# the anon_* commands below
write_enable=YES
# give the user the ability to make directories
anon_mkdir_write_enable=YES
# give the user the ability delete and overwrite files
anon_other_write_enable=YES
# give the user the ability upload new files
anon_upload_enable=YES
# Give the user permission to do a simple directory listings
dirlist_enable=YES
# Give the user permission to download files
download_enable=YES
# if the user has can upload or make new directories, then this
# will be the umask applied to them
anon_umask=0002
# delete failed uploads (speaks for itself)
delete_failed_uploads=NO
_EOF

# Protect our foobar permission file
chmod 600 /etc/vsftpd/virtual.users/foobar
chown root.root /etc/vsftpd/virtual.users/foobar
You are now complete, you can start VSFTPD at any time:
# Have VSFTPD start after each system reboot
chkconfig --level 345 vsftpd on

# Start VSFTPD if it isn't already running
service vsftpd status || service vsftpd start
It’s worth noting that if you ever change any of the configuration or add more, you will need to restart the VSFTPD server in order for the changes you made to take effect:
# Restarting the vsftpd server is simple:
service vsftpd restart
Firewall Configuration
The FTP firewall configuration can get complicated especially when the ephemeral ports it chooses to open are random (when operating it in Passive mode). If you scan through the configuration file above, you’ll see that we’ve specified this range to be between 64000 and 64100.
In a nutshell, if you choose to use/enable FTPS (which I strongly recommend you do), the firewall configuration will look like this (/etc/sysconfig/iptables):
#....
#---------------------------------------------------------------
# FTP Traffic
#---------------------------------------------------------------
-A INPUT -p tcp -m state --state NEW --dport 21 -j ACCEPT
# non-encrypted ftp connections (ip_contrack_ftp) module looks
# after these ports, however for the encrypted sessions it can't
# spy so we need to disable ip_contrack_ftp and just open the
# port range himself
-A INPUT -p tcp -m state --state NEW --dport 64000:64100 -j ACCEPT
#...
However, if (and only if) you choose not to use FTPS and strictly operate using FTP only then your configuration will look as follows:
/etc/sysconfig/iptables
#....
#---------------------------------------------------------------
# FTP Traffic
#---------------------------------------------------------------
-A INPUT -p tcp -m state --state NEW --dport 21 -j ACCEPT
#...
/etc/sysconfig/iptables-config
This file requires you to add ip_conntrack_ftp to the variable IPTABLES_MODULES which is near the top of this file. You may also need to update /etc/sysconfig/ip6tables-config if you are using ip6; the change is the same. This keeps the entire range of 64000 to 64100 ports closed be default and through packet sniffing, they are opened on demand.
#...
IPTABLES_MODULES="ip_conntrack_ftp"
#...
If you’re not running any other modules, you can use the following one liner to update the file:
sed -i -e 's/^IPTABLES_MODULES=.*/IPTABLES_MODULES="ip_conntrack_ftp"/g'
    /etc/sysconfig/iptables-config
sed -i -e 's/^IPTABLES_MODULES=.*/IPTABLES_MODULES="ip_conntrack_ftp"/g'
    /etc/sysconfig/ip6tables-config
Be sure to reload your firewall configuration once you have these in place:
# Restart the firewall
service iptables restart
Fail2Ban Brute Force Configuration
The final thing you should consider if your server will be available via the internet is some bruit force prevention. I really recommend you read my blog on Securing Your CentOS 6 System, specifically my blurb on Fail2Ban which I think all systems should always have running. Fail2ban allows you to track all users hitting your FTP server and take immediate action on preventing further access to this potential intruder.
The configuration is as follows (remember to set the email to what you want it as where I’ve specified your@email.goes.here so you can be notified of any intrusions that take place.
Be sure to reload your Fail2Ban configuration once this is done
# Restart Fail2Ban
service fail2ban restart
Test Our Configuration
Make sure you have an ftp tool installed into your environment like lftp or even a GUI based tool like FileZilla that supports both FTP and FTPS. The old Linux tool ‘ftp’ will only allow you to test the un-encrypted connection.
# Install lftp to keep things simple
yum -y install lftp

# Test our server (FTP)
[root@nuxref ~]# lftp ftp://foobar:barfoo@localhost
lftp foobar@localhost:~> pwd
ftp://foobar:barfoo@localhost
lftp foobar@localhost:~> exit

# Test our server (FTPS)
[root@nuxref ~]# lftp ftps://foobar:barfoo@localhost
lftp foobar@localhost:~> pwd
ftps://foobar:barfoo@localhost
lftp foobar@localhost:~> exit
First lets just test the basic FTP portion (plain-text):
# Connect to our server
[root@nuxref ~]# ftp localhost
Connected to localhost (127.0.0.1).
220-* - - - - - - W A R N I N G - - - - - - - W A R N I N G - - - - - *
220-*                                                                 *
220-* The use of this system is restricted to authorized users. All   *
220-* information and communications on this system are subject to    *
220-* review, monitoring and recording at any time, without notice or *
220-* permission.                                                     *
220-*                                                                 *
220-* Unauthorized access or use shall be subject to prosecution.     *
220-*                                                                 *
220-* - - - - - - W A R N I N G - - - - - - - W A R N I N G - - - - - *
220
Name (localhost:nuxref): foobar
331 Please specify the password.
Password:
230 Login successful.
Remote system type is UNIX.
Using binary mode to transfer files.
ftp> ls
227 Entering Passive Mode (127,0,0,1,250,83).
150 Here comes the directory listing.
226 Directory send OK.
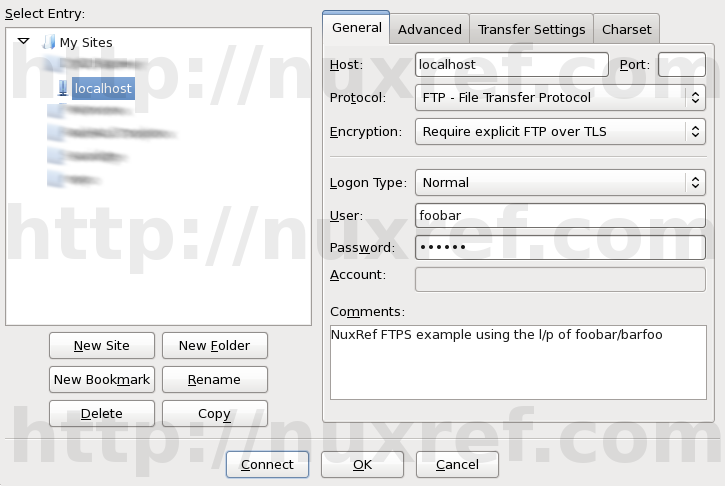
FileZilla FTPS Configuration
If you plan on using FileZilla as your solution, You need to configure it to connect as the FTP protocol with the Encryption set to Requires explicit FTP over TLS similar to the screen shot I provided.
You may or may not have to accept your certificate afterwards that we created earlier in this blog.
FileZilla On-Going FTPS Bug
The FileZilla Client is a pretty sweet application for those who like to work with a GUI instead of a command line. Those who choose to test their configuration with this should just know that there is an outstanding bug with FileZilla and the FTPS protocol. Hence, if you’re using Filezilla to to test your new VSFTPD server and it’s not working, it might not be your configuration at the end of the day. The versions seem to be hit and miss of which cause the bug to surface; reports of v3.5.2 working and v3.5.3 not. That all said, I’m using v3.7.3 and am not having a problem.
Here is the ticket #7873 that identifies the problem. One thing that is mentioned is that an earlier version of FileZilla works perfectly fine (specifically v3.5.2). But I’ve also had no problem with the current version (at the time was v3.7.3). I guess my main point is… don’t panic if you see this error; it’s not necessarily anything you’ve configured incorrectly. If you followed this blog then you shouldn’t have any issue at all.
Credit
I may not blog often; but I want to re-assure the stability and testing I put into everything I intend share.
If you like what you see and wish to copy and paste this HOWTO, please reference back to this blog post at the very least; it’s really all that I ask of you.