Tag Archives: Linux

Configuring and Installing VSFTPD on CentOS 6

Introduction

FTP Servers have been around for a very long time. On could easily argue that they aren’t always the best option to choose anymore. But for those dealing with legacy systems, the FTP protocol provides one the easiest ways to share and distribute files across external systems. Despite the hate some might give the protocol; it still receives a lot a love from others just because it’s still very compatible with just about everything; heck, even web browsers such as Internet Explorer, Chrome, and Firefox (and many more) have the protocol built right into it.

In my case, I needed to set up an FTP server to help a client with some legacy software they use (and are familiar with). This blog is more or less just the steps I took to make it work in case anyone else is interested.

Security Concerns

FTP preforms all of it’s transactions in ‘plain text’ including it’s authentication. This wasn’t a problem back in 1980 when online security wasn’t an issue. This also isn’t a problem for sites offering anonymous file hosting services. But for everyone else, it pretty much leaves you susceptible to privacy issues and possible intrusions.

FTPS (not to be confused with SFTP) is a way of securing the FTP protocol for the systems that require it allowing you to eliminate the ‘plain text’ problem. But this requires the client uses software that can take advantage of it.

Some additional security concerns I wanted to consider:

  • Separate user accounts from the system ones. We don’t want people trying to guess our root password or access anyone’s home directory unless with specifically configure the server to allow it.

Setup VSFTPD

VSFTPD stands for Very Secure FTP Daemon and provides all the flexibility we need. It’s official website can be found here.

The following will set up VSFTPD into your CentOS/RedHat environment in a isolated manor. You see we want to disconnect the users that currently access your system from the users we create for VSFTPD for more flexibility and control.

# First fetch the required packages
# db4:       The Berkeley Database (Berkeley DB) which is a
#             quick and dirty way of storing our user accounts.
# db4-utils: This provides a tool we'll use to build a small user
#             database with.  Technically you can uninstall (just)
#             this package afterwards for added security after.
# openssl:   This is used to grant our FTP server FTPS support
# vsftpd:    The FTP/FTPS Daemon itself
yum -y install db4 db4-utils openssl vsftpd

# Create a password file: /etc/vsftpd/users.passwd
# This file contains all of the users you want to allow on the
# site in the structure:
# Line: Entry
#  1  | USERNAME1
#  2  | PASSWORD1
#  3  | USERNAME2
#  4  | PASSWORD2
# This below creates a simple user 'foobar' and a password
# of 'barfoo'.  This isn't the safest way to build your password
# file because it leaves a persons password set available in
# the shell history... But for the purpose of this tutorial:
echo foobar > /etc/vsftpd/users.passwd
echo barfoo >> /etc/vsftpd/users.passwd

# Protect our password file now from prying eyes:
chmod 600 /etc/vsftpd/users.passwd
chown root.root /etc/vsftpd/users.passwd

# Prepare a directory we want the foobar user to send it's files
# to. You can also just use a directory you already have in place
# or someone elses home directory.
mkdir -p /var/ftp/foobar

# Set a comfortable permission to this directory granting the ftp
# user (or any user account your later going to assign to this user
# read/write access)
chown root.ftp /var/ftp/foobar
chmod 775 /var/ftp/foobar

# Convert our plain-text password file into the Berkeley Database
# format. This is the only command that requires the db4-utils
# rpm package which you can uninstall if you want for security
# reasons after you run the below command.  You'll need to
# re-install it though if you ever want to add or update accounts
db_load -T -t hash 
   -f /etc/vsftpd/users.passwd /etc/vsftpd/virtual.users.db

# Protect our new (Berkley) database:
chmod 600 /etc/vsftpd/virtual.users.db
chown root.root /etc/vsftpd/virtual.users.db

# Prepare our virtual user directory; this is where we can
# optionally place over-riding configuration for each user
# we create in the Berkley database above.
mkdir -p /etc/vsftpd/virtual.users
chmod 700 /etc/vsftpd/virtual.users
chown root.root /etc/vsftpd/virtual.users

# Create PAM Module that points to our new database.
# Note: you do not provide the '.db' extension when creating
#       this file. The file is valid as you see it below.
cat << _EOF > /etc/pam.d/vsftpd-virtual
auth     required pam_userdb.so db=/etc/vsftpd/virtual.users
account  required pam_userdb.so db=/etc/vsftpd/virtual.users
session  required pam_loginuid.so
_EOF

# Protect our Module
chmod 644 /etc/pam.d/vsftpd-virtual
chown root.root /etc/pam.d/vsftpd-virtual

# Create an empty jail directory.  This is used for default
# configurations only. A well configured system won't even use
# this; but it's still good to have since we'll be referencing
# it in our configuration. This will become the default
# directory a user connects to if they aren't otherwise
# configured to go to another location.
mkdir -p /var/empty/vsftpd/
chown nobody.ftp /var/empty/vsftpd/
chmod 555 /var/empty/vsftpd/

# Now we want to allow FTPS support, we'll need an SSL key to
# do it with.  If you already have one, you can skip this step.
# Otherwise, the following will just generate you a self-signed
# key as a temporary solution.
openssl req -nodes -new -x509 -days 730 -sha256 -newkey rsa:2048 
   -keyout /etc/pki/tls/private/nuxref.com.key 
   -out /etc/pki/tls/certs/nuxref.com.crt 
   -subj "/C=7K/ST=Westerlands/L=Lannisport/O=NuxRef/OU=IT/CN=nuxref.com"

# Protect our Keys
chmod 400 /etc/pki/tls/private/nuxref.com.key; # Private Key
chmod 444 /etc/pki/tls/certs/nuxref.com.crt; # Public Certificate

# Create ourselves a little banner we can use to at least alert
# human intruders that they are in fact being monitored.  This
# scare tactic may or may not work, but if you ever have a breach
# of security, you may need to reference that you gave the user
# ample warning that they were violating someones rights by
# continuing.  Feel free to adjust the banner to your liking.
cat << _EOF > /etc/banner
* - - - - - - W A R N I N G - - - - - - - W A R N I N G - - - - - *
*                                                                 *
* The use of this system is restricted to authorized users. All   *
* information and communications on this system are subject to    *
* review, monitoring and recording at any time, without notice or *
* permission.                                                     *
*                                                                 *
* Unauthorized access or use shall be subject to prosecution.     *
*                                                                 *
* - - - - - - W A R N I N G - - - - - - - W A R N I N G - - - - - *
_EOF

# Protect our banner
chmod 640 /etc/banner

At this point we have our environment set up the way we want it. The next step is to create our VSFTPD configuration.

# Lets first backup original configuration file
mv /etc/vsftpd/vsftpd.conf /etc/vsftpd/vsftpd.conf.orig

# Create new configuration
cat << _EOF > /etc/vsftpd/vsftpd.conf
# --------------------------------------------------------------
# Base Configuration
# --------------------------------------------------------------
anon_world_readable_only=NO
anonymous_enable=NO
chroot_local_user=YES
hide_ids=YES
listen=YES
local_enable=YES
max_clients=10
max_per_ip=3
nopriv_user=ftp
pasv_min_port=64000
pasv_max_port=64100
session_support=NO
user_config_dir=/etc/vsftpd/virtual.users
userlist_enable=YES
use_localtime=YES
xferlog_enable=YES
xferlog_std_format=NO
log_ftp_protocol=YES
pam_service_name=vsftpd-virtual
banner_file=/etc/banner
reverse_lookup_enable=NO
# --------------------------------------------------------------
# Secure Configuration (FTPS)
# --------------------------------------------------------------
ssl_enable=YES
virtual_use_local_privs=NO
allow_anon_ssl=NO
# forcing SSL makes the FTP portion of your site disabled and it
# will only operate as FTPS.  This may or may not be what you
# want.
force_local_data_ssl=NO
force_local_logins_ssl=NO
ssl_tlsv1=YES
ssl_sslv2=NO
ssl_sslv3=NO
# Point to our certificates
rsa_cert_file=/etc/pki/tls/certs/nuxref.com.crt
rsa_private_key_file=/etc/pki/tls/private/nuxref.com.key
require_ssl_reuse=NO
ssl_ciphers=HIGH:!MD5:!ADH
# --------------------------------------------------------------
# FTP Configuration
# --------------------------------------------------------------
async_abor_enable=YES
ftp_data_port=20
connect_from_port_20=YES
# --------------------------------------------------------------
# Default Anonymous Restrictions (over-ride per virtual user)
# --------------------------------------------------------------
guest_enable=NO
guest_username=nobody
# Default home directory once logged in
local_root=/var/empty/vsftpd
# write_enabled is required if the user is to make use of any of
# the anon_* commands below
write_enable=NO
# give the user the ability to make directories
anon_mkdir_write_enable=NO
# give the user the ability delete and overwrite files
anon_other_write_enable=NO
# give the user the ability upload new files
anon_upload_enable=NO
# Give the user permission to do a simple directory listings
dirlist_enable=NO
# Give the user permission to download files
download_enable=NO
# if the user has can upload or make new directories, then this
# will be the umask applied to them
anon_umask=0002
# delete failed uploads (speaks for itself)
delete_failed_uploads=YES
_EOF

# Protect our configuration
chmod 600 /etc/vsftpd/vsftpd.conf
chown root.root /etc/vsftpd/vsftpd.conf

Technically we’re done now, but because we intentionally specified very restrictive user access rights, our foobar user we created will only connect to the /var/empty/vsftpd directory with no access rights. Therefore, our final step is to create an additional configuration file for the foobar account granting him read/write access to /var/ftp/foobar.

# The file you write to in the /etc/vsftpd/virtual.users/ 'must' be the same
# name as the user(s) you created to over-ride their permissions!
cat << _EOF > /etc/vsftpd/virtual.users/foobar
local_root=/var/ftp/foobar
# --------------------------------------------------------------
# User
# --------------------------------------------------------------
guest_enable=YES
# Set this to any system user you want
guest_username=ftp
local_root=/var/ftp/foobar
# --------------------------------------------------------------
# Permissions
# --------------------------------------------------------------
# write_enabled is required if the user is to make use of any of
# the anon_* commands below
write_enable=YES
# give the user the ability to make directories
anon_mkdir_write_enable=YES
# give the user the ability delete and overwrite files
anon_other_write_enable=YES
# give the user the ability upload new files
anon_upload_enable=YES
# Give the user permission to do a simple directory listings
dirlist_enable=YES
# Give the user permission to download files
download_enable=YES
# if the user has can upload or make new directories, then this
# will be the umask applied to them
anon_umask=0002
# delete failed uploads (speaks for itself)
delete_failed_uploads=NO
_EOF

# Protect our foobar permission file
chmod 600 /etc/vsftpd/virtual.users/foobar
chown root.root /etc/vsftpd/virtual.users/foobar

You are now complete, you can start VSFTPD at any time:

# Have VSFTPD start after each system reboot
chkconfig --level 345 vsftpd on

# Start VSFTPD if it isn't already running
service vsftpd status || service vsftpd start

It’s worth noting that if you ever change any of the configuration or add more, you will need to restart the VSFTPD server in order for the changes you made to take effect:

# Restarting the vsftpd server is simple:
service vsftpd restart

Firewall Configuration

The FTP firewall configuration can get complicated especially when the ephemeral ports it chooses to open are random (when operating it in Passive mode). If you scan through the configuration file above, you’ll see that we’ve specified this range to be between 64000 and 64100.

In a nutshell, if you choose to use/enable FTPS (which I strongly recommend you do), the firewall configuration will look like this (/etc/sysconfig/iptables):

#....
#---------------------------------------------------------------
# FTP Traffic
#---------------------------------------------------------------
-A INPUT -p tcp -m state --state NEW --dport 21 -j ACCEPT
# non-encrypted ftp connections (ip_contrack_ftp) module looks
# after these ports, however for the encrypted sessions it can't
# spy so we need to disable ip_contrack_ftp and just open the
# port range himself
-A INPUT -p tcp -m state --state NEW --dport 64000:64100 -j ACCEPT
#...

However, if (and only if) you choose not to use FTPS and strictly operate using FTP only then your configuration will look as follows:

  1. /etc/sysconfig/iptables
    #....
    #---------------------------------------------------------------
    # FTP Traffic
    #---------------------------------------------------------------
    -A INPUT -p tcp -m state --state NEW --dport 21 -j ACCEPT
    #...
  2. /etc/sysconfig/iptables-config
    This file requires you to add ip_conntrack_ftp to the variable IPTABLES_MODULES which is near the top of this file. You may also need to update /etc/sysconfig/ip6tables-config if you are using ip6; the change is the same. This keeps the entire range of 64000 to 64100 ports closed be default and through packet sniffing, they are opened on demand.
#...
IPTABLES_MODULES="ip_conntrack_ftp"
#...

If you’re not running any other modules, you can use the following one liner to update the file:

sed -i -e 's/^IPTABLES_MODULES=.*/IPTABLES_MODULES="ip_conntrack_ftp"/g' 
    /etc/sysconfig/iptables-config
sed -i -e 's/^IPTABLES_MODULES=.*/IPTABLES_MODULES="ip_conntrack_ftp"/g' 
    /etc/sysconfig/ip6tables-config

Be sure to reload your firewall configuration once you have these in place:

# Restart the firewall
service iptables restart

Fail2Ban Brute Force Configuration

The final thing you should consider if your server will be available via the internet is some bruit force prevention. I really recommend you read my blog on Securing Your CentOS 6 System, specifically my blurb on Fail2Ban which I think all systems should always have running. Fail2ban allows you to track all users hitting your FTP server and take immediate action on preventing further access to this potential intruder.

The configuration is as follows (remember to set the email to what you want it as where I’ve specified your@email.goes.here so you can be notified of any intrusions that take place.

cat << _EOF >> /etc/fail2ban/jail.conf
[my-vsftpd-iptables]

enabled  = true
filter   = vsftpd
action   = iptables[name=VSFTPD, port=ftp, protocol=tcp]
           sendmail-whois[name=VSFTPD, dest=your@email.goes.here]
logpath  = /var/log/vsftpd.log
_EOF

Be sure to reload your Fail2Ban configuration once this is done

# Restart Fail2Ban
service fail2ban restart

Test Our Configuration

Make sure you have an ftp tool installed into your environment like lftp or even a GUI based tool like FileZilla that supports both FTP and FTPS. The old Linux tool ‘ftp’ will only allow you to test the un-encrypted connection.

# Install lftp to keep things simple
yum -y install lftp

# Test our server (FTP)
[root@nuxref ~]# lftp ftp://foobar:barfoo@localhost
lftp foobar@localhost:~> pwd
ftp://foobar:barfoo@localhost
lftp foobar@localhost:~> exit

# Test our server (FTPS)
[root@nuxref ~]# lftp ftps://foobar:barfoo@localhost
lftp foobar@localhost:~> pwd
ftps://foobar:barfoo@localhost
lftp foobar@localhost:~> exit

First lets just test the basic FTP portion (plain-text):

# Connect to our server
[root@nuxref ~]# ftp localhost
Connected to localhost (127.0.0.1).
220-* - - - - - - W A R N I N G - - - - - - - W A R N I N G - - - - - *
220-*                                                                 *
220-* The use of this system is restricted to authorized users. All   *
220-* information and communications on this system are subject to    *
220-* review, monitoring and recording at any time, without notice or *
220-* permission.                                                     *
220-*                                                                 *
220-* Unauthorized access or use shall be subject to prosecution.     *
220-*                                                                 *
220-* - - - - - - W A R N I N G - - - - - - - W A R N I N G - - - - - *
220 
Name (localhost:nuxref): foobar
331 Please specify the password.
Password:
230 Login successful.
Remote system type is UNIX.
Using binary mode to transfer files.
ftp> ls
227 Entering Passive Mode (127,0,0,1,250,83).
150 Here comes the directory listing.
226 Directory send OK.
FileZilla FTPS Configuration

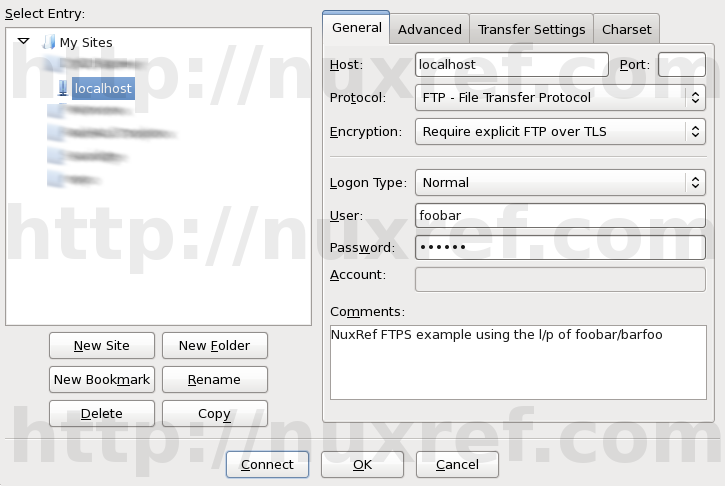
If you plan on using FileZilla as your solution, You need to configure it to connect as the FTP protocol with the Encryption set to Requires explicit FTP over TLS similar to the screen shot I provided.

You may or may not have to accept your certificate afterwards that we created earlier in this blog.

FileZilla On-Going FTPS Bug

The FileZilla Client is a pretty sweet application for those who like to work with a GUI instead of a command line. Those who choose to test their configuration with this should just know that there is an outstanding bug with FileZilla and the FTPS protocol. Hence, if you’re using Filezilla to to test your new VSFTPD server and it’s not working, it might not be your configuration at the end of the day. The versions seem to be hit and miss of which cause the bug to surface; reports of v3.5.2 working and v3.5.3 not. That all said, I’m using v3.7.3 and am not having a problem.

Here is the ticket #7873 that identifies the problem. One thing that is mentioned is that an earlier version of FileZilla works perfectly fine (specifically v3.5.2). But I’ve also had no problem with the current version (at the time was v3.7.3). I guess my main point is… don’t panic if you see this error; it’s not necessarily anything you’ve configured incorrectly. If you followed this blog then you shouldn’t have any issue at all.

Credit

I may not blog often; but I want to re-assure the stability and testing I put into everything I intend share.

If you like what you see and wish to copy and paste this HOWTO, please reference back to this blog post at the very least; it’s really all that I ask of you.

Sources:

Creating a Swap File for Your VPS

Introduction

RAM is expensive when compared to physical hard disk (storage) in today’s market. Combine this knowledge with Virtual Private Server (VPS) solutions offered by vendors such as Amazon EC2 who will literately give us our own Linux box in The Cloud. They’ll also grant us full root level privileges to do whatever we want in these new sandboxes of ours. These vendors usually provide their product to us with a ton of disk space and very little RAM. That said, the more cash we’re willing to shell out of our wallet, the more ram and disk space we’ll receive in return (just like everything else in our consumer driven world).

If you chose a VPS as your preliminary (or final) hosting solution, then you (like everybody else) are on a budget. There is a good chance you’re working with a very minimal amount of RAM (probably 512MB to 4GB) regardless of how much cash you forked out of your pocket. Now you could argue that this is all you need, but this is where I say: you still need swap space no matter what.

This is truly worth blogging about because if you install just about any Linux distribution, it will (usually) set up a swap partition for you as part of it’s default out of the box settings. But most VPS solutions out there provide you with a pre-configured distribution of Linux that is not equipped with any swap space whatsoever. I wrote this blog because popular VPS vendors such as Linode and Digital Ocean do not provide swap space with their virtual machine (or at least at the time of writing this).

You were saying…

Did you ever think that maybe they don’t provide it because you don’t need it?

No, that’s simply not the case. The fact of the matter is; they offer packages on their website such as 1GB of RAM and 20GB of storage space and that is exactly what they give you. Could you just imagine how frustrated you’d be as a customer if you paid for that deal and found out you actually only had 512MB (0.5GB) of physical RAM while the remaining 512MB was just your swap partition? That would be just false advertising in my opinion. The issue could get even more complicated then that… would that mean they’d be providing you with 20GB of storage space minus (-) 512MB because it’s reserved for this swap partition? Thankfully at the end of the day we get what we pay for. In this example we’d have purchased a Linux distribution with 1 root partition (/) that is exactly 20GB in size along with 1GB of physical RAM. We could type the command free -m and see this 1GB of physical RAM for ourselves.

Why do I need swap space?

  • You grant your system more (virtual) memory (RAM) to work with. This is especially useful in dire situations when your memory may be almost exhausted. Remember, if you run out of RAM, the services running on your server WILL start to fail on you.
  • It can save you money! Why opt for a more expensive VPS solution that comes with more RAM when your application you choose to host (A mail server for example) may only utilize all of the RAM during it’s start up. Once the application has finished starting up, it may only use 2GB of ram thereafter. Was it really worth spending $100+ more a year just to handle your applications startup? A swap disk can alleviate this for you allowing you to choose a cheaper server.
  • You will free up physical RAM while swap space is present.

    Consider this: you’re running a program that has 200 features in it, but you’re only using 10 of them. Without swap space, all 200 features may (and most probably will) be loaded into physical (expensive) memory; even the features you’re not using! But with a swap file/partition, the system will detect the sections of the code not being referenced/used (in RAM) and move it into swap space. This process frees up physical memory for other services you want to run. The program won’t care you’re doing this; as far as it’s concerned, the resources are still available to it (which they are).

    In other words: The operating system is smart enough to note the frequency of code being executed. These pieces of accessed code will always remain in memory while less frequently accessed code will be swapped to the (swap) disk until it is needed again. The process is called paging when the operating system goes back into the swap space to retrieve this data (returning it to RAM for the program that requested it). We have some control over the swapping process (to limit paging) which I talk about later (swappiness).

Swap files are slow and can cause extensive i/o:

Swapping content from RAM back to a file storage (and back) is slow; there is no question about this. I also will not argue with you that this process does generate i/o. You obviously want to minimize the swapping of the content that you’re quite sure will be used again. But you still never want to eliminate it completely as it plays a huge role in optimizing your system.

In fact, the cons of swap space only outweigh it’s benefits if you abuse it by treating it as if it were additional physical RAM.

Hence you DO NOT create virtual swap space because you are out of memory! You create a swap space to optimize system resources. You create swap space to provide a safety net for your applications during peak operation times. You create swap space to increase system performance by freeing up sections of memory that are rarely being used.

If you only paid for 0.5GB (512MB) of RAM from your VPS provider, then do not consider yourself as having 2.5GB of RAM after you create a 2GB swap file. Sure, let your applications think this, but you yourself don’t want to exceed this 0.5GB memory boundaries any more then you have to. Obviously you’re creating more (virtual) RAM so that you can venture into the higher ranges in dire situations, but thats it. Otherwise you’re not using swap space effectively.

A Final Word of Caution…

With some vendors such as Amazon EC, you’ll pay for the disk i/o you generate. So improper use of swap space would work against you (costing you). Meanwhile companies like Crissic Solutions go out of their way to micro-manage the virtual machines they host. They specifically look for people violating disk i/o unnecessarily and are quick to launch their own internal investigations to see if you’re abusing their privileges. It’s this tight environment they enforce on everyone that allows them to promise their clients a very responsive experience.

Word of Caution
Just a Final Word of Caution
If you decide you need swap space (as I did) along with your services (and you should), then do not treat your results as free RAM.

The decision you make in choosing how much extra RAM you will give yourself with a swap file will not decide if you intend to abuse your hosting privileges. However the amount of this new free memory you intend to exhaust at once could… so just be considerate! Most vendors will generally just trust that you are not doing anything malicious; in fact you acknowledged this as part of the Terms of Service when you first signed up. So with that said, please don’t abuse the information in this blog or your VPS provider WILL catch you if their system disk i/o spikes for long durations of time. Trust me when I say: “it won’t take rocket science to track the source to be your VPS if you abuse their services.”

Its also worth noting that if you already have a swap partition on your system, then it’s really not worth adding another. You probably want to consider adding or paying for more RAM if your system is still struggling.

How much swap space do I need?

This really is the magic question, there are lots of people who have tons of different considerations for this. Personally, it honestly depends on what your going to run. Some applications utilize an insane amount of ram up front, but once they’re past their start up phase, they only use a fraction of RAM. Meanwhile, other systems are just generally memory hogs.

At the end of the day, the size really isn’t important. In fact it’s probably safer to have to much then too little. I mean if you had 16GB of physical RAM in your VPS, I’d (arbitrarily) say create a 10GB swap partition. This allows you to run a TON of applications and all of them have plenty of space to dump their unused code to. It also leaves you with a bit of a buffer (of extra RAM) in critical situations. If you have 512MB to 4GB of physical RAM, then I’d say create a partition that is about 2GB in size. Disk space is cheap and 2GB really isn’t that much.

Again, the decision is really up to you… more space is better then less (but too much just becomes wasted disk space). There is also no reason for your swap space to ever be larger then your actual alloted physical RAM. You’ll want to watch and make sure that too much paging is taking place at the end of the day regardless of what size you pick. Excessive paging means you’ve exhausted your physical RAM and you’re relying on the swap space you created to fill the void. You need to consider paying for more RAM at this point or not running so many applications on the Virtual Machine your VPS provided you.

Commands

Here is how you can create your own swap space (as a swap file) on an already running system.

# Creating a directory to host our swap file
mkdir -p /var/swap

# Agree on a size... in my case I want a 2GB buffer.
# Now ideally this would be the easy to read command to run
# as the following:
#   dd if=/dev/zero of=/var/swap/swap.fs bs=2G count=512
#
# But.. no... it's not that simple, the above command would
# need 2GB of ram which you may or may not have (yet).... so we
# need to work with a smaller block size and a higher count to
# achieve the same results.
#
# The below command is more i/o intensive but less memory
# intensive which is the situation for must of us reading this today.
#
# 1024MB = 1GB
# (1024 * 1024MB * 2) = 2097152 block size
#
dd if=/dev/zero of=/var/swap/swap.fs bs=1024 count=2097152

# Format swap file (allowing it to be a recognizable swap space
# partition)
mkswap -L swapfs /var/swap/swap.fs

# You may see a warning about including -f; don't bother... you're
# done after the above command, Now you want to protect
# the new file you created
chmod 600 /var/swap/swap.fs
chmod 100 /var/swap

# Update fstab file:
echo '/var/swap/swap.fs swap swap defaults 0 0'  >> /etc/fstab

# Enable the swap partition
swapon /var/swap/swap.fs

You’re done… You can use the following command to test to see if your partition got activated or not:

# Test to see swap correctly activated itself:
free -m

Swappiness

Yes, swappiness is a word… at least it is in respect to disk swapping/paging it is. Your system is most likely set to the same level of swappiness as the rest of us have (60). Here is how you can check what yours is set to:

[root@node01 ~]# cat /proc/sys/vm/swappiness
60

Swappiness is a number from 0 to 100 where the higher values lead to more pages being swapped, and lower values lead to more applications being kept in memory, even if they are idle. Generally 60 is pretty safe to use, but if this isn’t your machine that is hosting it. You may want to tweak this value a bit. Bring it down a bit so you only swap in situations where you absolutely have to. This will minimizing the i/o impact on the server provided to you at such a great cost.

This can be done using the following command:

# Note this is temporary and will be lost on a reboot
echo 40 > /proc/sys/vm/swappiness

Or if your happy with your change, you can permanently save this change by updating your /etc/sysctl.conf file:

# first make sure an existing entry doesn't already exist
sed -i -e '/[ t]*vm.swappiness/d' /etc/sysctl.conf

# Now create it with our entry
echo "vm.swappiness=40" >> /etc/sysctl.conf

# Now future reboots will hold this setting for you

It’s not really necessary to play with the default swappiness value unless this isn’t your server you just created a swap file on. Then it becomes a nice way to minimize unnecessary i/o when using a VPS as your solution.

Credit

If you like what you see and wish to copy and paste this HOWTO, please reference back to this blog post at the very least. It’s really all I ask.

Sources

Swap file generation is really well documented everywhere and certainly isn’t a new concept. My goal was just to bring it to your attention that most VPS solutions do not provide you with any swap space at all initially and you should consider adding it right away. Here are some helpful links on swapping:

Virtual Private Server (VPS)

I made reference to a few of them in this blog; I don’t want to promote one over the other either. It’s still worth sharing the different VPS solutions out there since they are a cost-effective way to host content for your personal use or business.

Offline Blogging Solutions with CentOS 6

Introduction

BloGTK v2.0
BloGTK v2.0

Offline Blogging in Linux doesn’t offer us a wide selection of free (open source) choices. Of the choices we do have at our disposal each have their own pros and cons which are really just bias opinions we’ll all carry with each other. This blog isn’t going to tell you which product is better and which one isn’t. It will provide you some alternatives to what’s already available and allow you to choose on your own. I also make additionally options available to you here as well should you choose to try them.

Keep in mind I run CentOS 6 as my primary OS (currently), so I focus primarily on making these products work on this distribution. But this doesn’t mean that all of the source RPMs I provided won’t compile for you in another distribution.

Drivel v3.0.0 Login Screen

Open Source Offline Blogging Choices

The below outline some of the choices I found to be worth of digging further in:

I’m not sure what the status is on all of these project themselves. At this current time, I have to assume that both Drivel and BloGTK are some what dead since the last update to either of them

Gnome Blog v0.9.2
Gnome Blog v0.9.2

was back in late 2009. Meanwhile the last update made to Gnome Blog was in early 2010.

It is said that beggars can’t be choosers. So rolling with that in mind and the Open Source solutions available to us, we’ll accept what is offered and move on.

Hand over your work

With pleasure; it really didn’t take any time at all to package these properly.

Drivel (v3.0.0) took the most time to package; but even that didn’t take much effort. Drop Line provided a spec file of their own which didn’t work out of the box. It also didn’t include all the necessary dependencies. For this reason I just spun my own version of it. Have a look here if you want to see the spec file I generated.

BlogGTK v2.0 didn’t take me hardly any time at all. They didn’t change the installation that much from v1.1. The fact that it’s python based; there really isn’t a whole lot too it. You can view the spec for yourself if you’re interested.

Alternatively you can just fetch bloGTK from Pkgs.org which does such a great job organizing packages other people have put together. It’ll probably be an older version (as it was for me). At the time I wrote this blog it was BloGTK v1.1 on Pkgs.org hosted by RPMForge. It might be different when you try.

Gnome Blog was another one that actually packaged it’s own spec file within the official packaging. But the file was drastically missing dependencies and would not work out of the box at all. I had to massage it quite a bit; you can view the spec file here if you feel the need.

I will never trust you; I’ll build it for myself

Still feeling that way? No problem; here is how you can do it:

First off, I’m not a big fan of compiling code as the root user on the system I work with daily.   I am however a big fan of a tool called ‘mock‘ which allows us to develop software as root except within a safe virtual environment instead of our native one. I am also a big fan of package management; whether its a .DEB (Debian Package) or .RPM (Red Hat Package) for obvious reasons. For this tutorial; I’ll stick with RPMs since it’s what CentOS uses. We’ll prepare the RPMs and preform all our compilations within the mock environment.

# Install 'mock' into your environment if you don't have it already
# This step will require you to be the superuser (root) in your native
# environment.
yum install -y mock

# Grant your normal every day user account access to the mock group
# This step will also require you to be the root user.
usermod -a -G mock YourNonRootUsername

At this point it’s safe to change from the ‘root‘ user back to the user account you granted the mock group privileges to in the step above.  We won’t need the root user again until the end of this tutorial when we install our built RPM.

# Optionally fetch bloGTK v2.0
wget https://launchpad.net/blogtk/2.0/2.0/+download/blogtk-2.0.tar.gz
wget --output-document=blogtk.spec https://www.dropbox.com/sh/9dt7klam6ex1kpp/GR0uXU6PaC/20131008/blogtk.spec?dl=1

# Optionally fetch Drivel 3.0.0
wget --output-document=drivel-3.0.0.tar.bz2 http://prdownloads.sourceforge.net/drivel/drivel-3.0.0.tar.bz2?download
wget --output-document=drivel.spec https://www.dropbox.com/sh/9dt7klam6ex1kpp/MKD34uuBMs/20131008/drivel.spec?dl=1

# Optionally fetch gnome-blog v0.9.2
wget http://ftp.gnome.org/pub/GNOME/sources/gnome-blog/0.9/gnome-blog-0.9.2.tar.gz
wget --output-document=gnome-blog.spec https://www.dropbox.com/sh/9dt7klam6ex1kpp/O9nJdxoJMZ/20131008/gnome-blog.spec?dl=1

# Initialize Mock Environment
mock -v -r epel-6-x86_64 --init

# bloGTK dependencies
mock -v -r epel-6-x86_64 --install 
  python pygtk2 pygtk2-libglade desktop-file-utils

# Drivel dependencies
mock -v -r epel-6-x86_64 --install 
  gnome-doc-utils intltool gtk2 gtkspell-devel 
  glib-devel gtk2-devel GConf2-devel 
  gnome-vfs2-devel gtksourceview2-devel 
  libsoup-devel libxml2-devel

# gnome-blog dependencies
mock -v -r epel-6-x86_64 --install 
  pygtk2-devel gettext intltool 
  desktop-file-utils GConf2-devel 
  python-devel

mock -v -r epel-6-x86_64 --copyin blogtk.spec /builddir/build/SPECS
mock -v -r epel-6-x86_64 --copyin gnome-blog.spec /builddir/build/SPECS
mock -v -r epel-6-x86_64 --copyin drivel.spec /builddir/build/SPECS

mock -v -r epel-6-x86_64 --copyin drivel-3.0.0.tar.bz2 /builddir/build/SOURCES
mock -v -r epel-6-x86_64 --copyin gnome-blog-0.9.2.tar.gz /builddir/build/SOURCES
mock -v -r epel-6-x86_64 --copyin blogtk-2.0.tar.gz /builddir/build/SOURCES
mock -v -r epel-6-x86_64 --shell

# Within Shell Environment, Build the Desired RPM
rpmbuild -ba builddir/build/SPECS/drivel.spec
rpmbuild -ba builddir/build/SPECS/blogtk.spec
rpmbuild -ba builddir/build/SPECS/gnome-blog.spec

# exit shell (or press Cntrl-D)
exit

# Copy out your blogger of interest
mock -v -r epel-6-x86_64 --copyout /builddir/build/SRPMS/drivel-3.0.0-1.el6.src.rpm .
mock -v -r epel-6-x86_64 --copyout /builddir/build/RPMS/drivel-debuginfo-3.0.0-1.el6.x86_64.rpm .
mock -v -r epel-6-x86_64 --copyout /builddir/build/RPMS/drivel-3.0.0-1.el6.x86_64.rpm .

mock -v -r epel-6-x86_64 --copyout /builddir/build/SRPMS/blogtk-2.0-1.el6.src.rpm .
mock -v -r epel-6-x86_64 --copyout /builddir/build/RPMS/blogtk-2.0-1.el6.noarch.rpm .

mock -v -r epel-6-x86_64 --copyout /builddir/build/SRPMS/gnome-blog-0.9.2-1.src.rpm .
mock -v -r epel-6-x86_64 --copyout /builddir/build/RPMS/gnome-blog-0.9.2-1.x86_64.rpm .
mock -v -r epel-6-x86_64 --copyout /builddir/build/RPMS/gnome-blog-debuginfo-0.9.2-1.x86_64.rpm .

# Install your blogger of choice; you'll need to be root or
# have sudoers permission to do this:
yum localinstall drivel-3.0.0-1.el6.x86_64.rpm
yum localinstall blogtk-2.0-1.el6.noarch.rpm
yum localinstall gnome-blog-0.9.2-1.x86_64.rpm

Drivel & WordPress

Drivel supports WordPress with a small with the following configuration:

  1. Configure your User/Pass as you normally would have
  2. Set the Movable Type to Journal type
  3. Set the Server Address field to be http://yourusername.wordpress.com/xmlrpc.php. For example I would have put http://nuxref.wordpress.com/xmlrpc.php for my own blog.

Another thing to note about Drivel is I was unable to retrieve a list of recent posts made to the WordPress server. However every other aspect of the tool appears to fine. People using different blog engines may not notice any problem at all.

Gnome-Blog & WordPress

  1. Set the Blog Type to Self-Run Other
  2. Set the Blog Protocol to MetaWeblog
  3. Set the XML-RPC URL field to be http://yourusername.wordpress.com/xmlrpc.php. For example I would have put http://nuxref.wordpress.com/xmlrpc.php for my own blog.
  4. Configure your User/Pass as you normally would have

Not Open Source, but other Free Alternatives:

  • ScribeFire:A plugin exists for Firefox & Chrome users called ScribeFire which also enables blogging functionality from within your browser. It’s worth noting as another alternative if you want it. It doesn’t involve extra packaging since it can be installed from within your browser.
  • Thingamablog: Another free solution; Thingamablog provides the binaries directly from their website here

Credit

If you like what you see and wish to copy and paste this HOWTO, please reference back to this blog post at the very least. It’s really all I ask.

If I forgot any (Open Source) Offline Bloggers that you know about; please let me know. I have no problem updating this blog to accommodate it.

Sources

I referenced the following resources to make this blog possible: