Home security is important to all of us but why should we pay someone to monitor our home when we can do it ourselves (for free)? I mean, imagine if it were possible to just receive a text message on your phone when your alarm has been set off. Imagine if you could check to see if you armed the alarm this morning before you left for work. If you had forgotten, wouldn’t it offer you a peace of mind to be able to arm it from wherever you are?
Some great reasons why one would choose to monitor their home themselves:
Hundreds of Dollars in Yearly Savings: Think of how much money you invest in a 3rd party company that does nothing unless your alarm goes off. Even if you’re just paying $25 (before tax) a month for home security, we’re talking about a $300+ in yearly savings that you can pocket!
Faster Emergency Response Time: Consider the scenario where a thief has broken into your home and has begun loading up his van with all of your valuables.
Regardless of whether you’re paying for home monitoring or doing it yourself, the first thing that will happen is: Your alarm will sound within a 30+ seconds of the perpetrator’s entry; a very loud ear piercing siren I might add.
If you’re paying for a monitoring station service: They will call your home line to see if the threat is real or not (meanwhile your home is still being robbed). If they don’t receive an answer or get a busy signal, only then will they call the police. We’re easily a few minutes into the robbery before the authorities are even notified. The police will eventually arrive, they’ll file a report and you’re left to deal with insurance because the crime is long over and the criminals are long gone.
If you’re monitoring the home yourself: Well then your cell phone has already alerted you the second the alarm was set off. It’s a no brainer at this point, you can take action right then and there and call the police or 911 depending on if you’re home or not. You just immediately reduced the time the thief has to accomplish his crime in.
Remote Control: Ensure the alarm is armed at any time. Change the alarm keycode remotely or disarm it from a distance to let a construction worker in. You can even arm/disarm your alarm from the comfort of your bed via your tablet, laptop or cell phone.
This blog focuses on the amazing hard work of Alarm Decoder and their team. It specifically focuses on their AD2USB device which allows you to connect a virtual keypad to your existing alarm system.
It’s also worth noting that I specifically focus on the Honeywell Vista 15p/20p models because that’s what I have. But I’m sure you could use the content of this blog and the other supported alarm systems Alarm Decoders AD2USB supports and follow along.
The Goal
The goal of this blog is to share with you my success, but more importantly:
To show you how easy it is to tap into an existing (pre-wired) alarm system without paying for a monitoring service.
Receive SMS (text) messages, emails or other notification services when your alarm is ever set off.
To be able to control the (security) keypad in your house from anywhere and at anytime.
To provide you all of this in a cookie cutter solution that works out of the box. I spent several hours packaging everything into self installing RPMs residing on my repository.
This blog will assume you’re both familiar with and have access to either CentOS (or Red Hat) 6.x or 7.x.
I’ll also assume you don’t have much experience with alarm systems (as I certainly didn’t at the start). I’ll try to save you as much research as I can and provide everything to you here. As a result, this blog is probably a bit longer then it needs to be since I get wordy trying to explain it.
Prerequisites
There are a few things you’ll need to be able to pull this feat off:
An Ademco/Honeywell Vista 15p or 20p alarm system, but it doesn’t mean you can’t keep reading (just as long as your alarm panel is listed here as being supported).
If you don’t have an alarm system pre-wired in your home already, it might be worth spending the money to have one installed (sensors and keypad included). It will be the last cost you make since the monitoring will be free from that point forward. If you don’t intend do this, then the this blog won’t be of much use to you.
This blog assumes that the zones (sensors/alarms) are already pre-configured too. Thus, your sensors are all hooked up to the alarm system already.
Note: If you’re currently paying a 3rd party company to monitor your home, then you MUST cancel your contract with them before you proceed any further!
You’ll need full access to your Honeywell alarm system (usually in the basement) and at least one keypad (usually near the front entrance). Most alarm systems are (and should be) locked up in a small box accessible with a key. You will want this key because you’ll want to lock everything up when we’re done too!
You’ll need one NuTech AD2USB device which is what will bridge/connect your security system to your Linux Server. The AD2USB device effectively just becomes a second keypad attached to your alarm system.
At the time this blog was written, the NuTech AD2USB devices cost about $88USD ($119.99 CAN) ; a one time fee. The cost is well worth it since it’ll pay itself off in 2-4 months (if you compare it to the costs of a 3rd party home monitoring solution).
A Mini USB to USB CableYou’ll need one Linux server pre-configured with CentOS or Red Hat 6.x (or 7.x).
Enough wiring to get from the locked up alarm system to your Linux server. In my case, I am hooked up just below the panel, so I just needed about 4 feet. You can order this cable with your purchase;it’s only about .50 cents a foot (very inexpensive).
Wire strippers.
A small (1/4″) Philips screw driver.
A Mini-USB to USB cable (no longer then 10ft).
Alarm Installer Code
Before we can even look or use the NuTech AD2USB device, we need to first alert our current alarm system of it’s presence. To do this, you need to be able to re-program a tiny portion of the alarm system. Don’t worry, it’s not as complicated as it sounds! This step is done through the keypad already installed in your house (usually at one of your front entrance ways).
The installer code grants us unrestricted access to our entire alarm system (through it’s programming mode). The installer code is a 4 digit (numeric code) and won’t be the same one you’re used to keying in when activating/deactivate your alarm.
If you already know your installer code you can access the programming mode by keying in the following and skipping to the next section (substitute [ABCD] with the installer code): [ABCD] + [8] + [00]
If you don’t know what your installer code is then don’t worry, just keep reading…
Again, I can’t stress enough that you make sure you are ‘NOT’ still hooked up with an external monitoring service at this point because these next steps will disconnect them from your home (and could cause them to treat the situation as a crime in progress):
Unplug your alarm system’s main power by simply unplugging the transformer nearby from the wall.
Disconnect the battery backup from our alarm system. No need to unplug both terminals, just unplug one for the time being. We’ll be restoring the power back soon enough.
Note: At this point you’ve effectively powered off your alarm system completely.
To gain access to the programming mode and ‘take back’ the alarm system for your own, you need to just plug the transformer back in (leave the battery unplugged now).You now have 30 seconds to locate your alarm keypad and press and hold both the asterisks [*] and the hash button [#] down at the same time (for about ~1 to 2 seconds).
If the above step worked correctly for you, then you should see the value of 20 written on your keypad’s display. If not, then you’ll need to repeat all of the steps above again.
Note: If your battery backup for your alarm system is still unplugged, now would be a good time to just plug it back in (so we don’t forget about it later).
Keypad Configuration
This step requires you to be in-front of the same keypad described in the last section. More importantly, you must be in it’s programming mode. This means you either used your known installer key code or you booted the alarm up in such a away that granted you access to the programming mode (without a code). If you’re unsure what I’m talking about here, make sure to re-read the last section before proceeding!
Your alarm system is effectively organized as a series of registers (think of them as mailboxes organized by 2-3 digit addresses). Registers are basically a spot you can store and retrieve information from. You’ll always press the [*] followed by the register you want to modify (using it’s address), followed by the new value you want to store in it. Alternatively you can always press the hash [#] key followed by the register just to display it’s contents instead.
So with respect to the Mailbox analogy, programming our alarm system through our keypad works like so:
[*] + [mailbox] + [new value] Save content into a specific mailbox (by address) and then print it to the display.
[#] + [mailbox] Just print the content of the mailbox (by address) to the display.
Simple enough right?
Just to avoid any confusion, when I group numbers below as [20] and [1234], they can still be interpreted as pressing (sequentially / one after the other) [2] + [0] + [1] + [2] + [3] + [4]. It’s easier to group the actions separately for readability; this way you can think of it with respect to the mailbox/content analogy.
While in programming mode, execute the following commands:
Command
Details
[*]+ [20] + [ABCD]
Substitute ABCD with a 4 digit code you want to become the new programmer code. This is what you can use in the future to get into programming mode (without having to power off the entire system again).
[*]+ [41] + [*]
Remove the primary phone #’s of any external monitoring station that may or may not be hooked up. Even if this register is already empty; it doesn’t hurt to run this again just to ensure it really is empty. We don’t want our alarm system calling out to anyone.
[*]+ [42] + [*]
Remove the secondary phone #’s of any external monitoring station (if any is set). Again…even if this register is already empty; it doesn’t hurt to run this command again just to ensure it really is empty.. We don’t want our alarm system calling out to anyone.
[*] + [191] + [10]
Enabled keypad slot at Address 18; this is what the AD2USB device defaults to using. This default address should work for everyone.
[*] + [99]
Exit the installer mode returning the keypad to it’s regular state
We’re not done yet though, if this is you first time using your alarm system, it might be wise to set a new Master Code and clear all existing User Codes. In case you didn’t already know, there are actually 3 types of users that are associated with our alarm system:
The Installer: A key code that allows us to add/remove new keypads, acknowledge new sensors, configure zones, etc. In our case, our alarm system will only allows for 1 designated Installer Code.
The Master: A key code that allows us to to create/delete Users of the system. In our case, our alarm system only allows us to have 1 designated Master Code.
The User: Our alarm system allows us to program up to 31 of them (32 if you count the master). Residential owners will probably only need to set one user while a commercial business owner might set several for each of their employees. It will be our User Code that we’ll be using when interfacing with our alarm system 99% of the time. This blog will focus on just dealing with 1 main user.
So if you inherited this alarm, you may not know what was previously configured into it. You ideally should set a new Master Code (different then the Installer Code) and make sure there are no lingering User Codes active that we don’t know about. Note: The commands identified above are called outside of programming mode. They can be issued at any time as long as your alarm is not armed. If you’re still in programming mode, just type [*] + [99] to exit it.
Command
Details
[Installer Code] + [8] + [02] + [DEFG]
Substitute [DEFG] with your new 4 digit Master Code using the Installer Code we setup above.
[Master Code] + [8] + [03] + [WXYZ]
Substitute [WXYZ] with your new 4 digit User Code using the Master Code. This will become our main User account; the [03] identifies us as user #1. This is a code you’ll want to keep secret but can safely tell those whom you trust with access to and from your home.
[Master Code] + [8] + [04] + [#] + [0]
[Master Code] + [8] + [05] + [#] + [0]
[Master Code] + [8] + [06] + [#] + [0]
…
[Master Code] + [8] + [33] + [#] + [0]
Delete User #2 ([04]), #3 ([05]) and , #4 ([06]) in our alarm system (in case they exists). This step is entirely optional, but worth doing since you really don’t know how many users are actually set up from whomever had it before you.
If you’re really paranoid, you’ll iterate through all of the combinations identified here to cover of all 31 possible users where the last user (#31) is identified by [33]. In most cases your system will probably have just a few users (worst case) in it. Thus it’s probably safe to stop at [06] (user #4). I’ll let you use your own paranoia and discretion here as to how far you go.
You now have a security system and 3 Codes. The Installer and Master codes are useful to keep documented (but hidden) somewhere. The User Code will be the main code we use from now on; this code is safe to share with those you share your home with; obviously keep it safe from others.
Hook Up our NuTech AD2USB Device
First of all; let me point out to you that the Alarm Decoder’s Installation videos are a much better reference then anything I’ll identify in this section. I strongly encourage you to check the videos out (they’re only a few minutes) and get properly set up.
But in short, it really just boils down to connecting the AD2USB Device to our Home Alarm System and getting the wires correctly matched up and fastened tightly. From there you just connect the AD2USB device to your Linux Server via the mini-usb cable. NuTech AD2USB Wiring In a Nutshell
Your goal is to see the little green light blink; this is the devices internal heartbeat. It’s a good thing when this starts to flash on and off; if it isn’t, you’ll want to revisit your wiring!
Here is what my AD2USB device looked like after it was all hooked up. Obviously I can’t capture a pulsating green light in a single photo, so you’ll just to have to take my word for it that the light was blinking on and off. 🙂 NuTech AD2USB Device
At the end of the day, the AD2USB device is nothing but ‘another’ alarm keypad in your house. As far as the Alarm System is concerned, there is no distinguishable difference at all. What makes the device so powerful is the fact that now we can interface with it using software from anywhere!
However, I’ve spent hours (sadly) making it possible for these tools to just work in both CentOS 6.x and 7.x via installable RPMs. I strongly encourage you to go this route for several reasons:
You won’t be required to compile anything.
I handle SELinux for you so you won’t have to to disable it!
I handle all of the initial (and complicated configuration) out of the box for you.
I handled all of the system dependencies for you.
It’s easier to provide safe upgrades and version control through RPMs. Relying on pypi (pip) instead will make it difficult to reproduce your working setup since the packages there change constantly (for better of for worse).
If you want the RPM approach, then keep reading…
Install Core Components
You must be connected to my repository for this to work:
# Assuming you're correctly hooked up to the nuxref repositories:
yum --enablerepo=nuxref --enablerepo=nuxref-shared \
    alarmdecoder ser2sock \
    alarmdecoder-webapp alarmdecoder-webapp-selinux
Note: the SElinux package has to interact with the kernel to enable 4 web ports Alarm Decoder (WebApp) uses. During this time, it will appear as though your installation froze and/or hung. Do not abort this task, it’s completely normal to take up to a minute or more to do this. If you’re not using SELinux then you don’t need this package.
Enable ser2sock; this will convert your AD2USB device (in /dev/) into a TCP/IP stream. This is much easier to work with (and debug)
# Enable ser2sock and start it
chkconfig ser2sock on
service ser2sock start
If your ser2sock doesn’t start, then you have a problem with your AD2USB configuration and/or hookup. Feel free to have a look at /etc/ser2sock/ser2sock.conf to see the configuration it’s using. Alternatively, the next section discusses some troubleshooting steps you can do.
Start up our Alarm Decoder Webapp
Even if you’re using systemd, these commands will work (it’ll call the proper command for you).
# Enable gunicorn (back-end webserver)
chkconfig ad2web on
service ad2web start

# Enable NginX (front-end web hosting and static file control)
chkconfig nginx on
service nginx start

# If it was already running, then:
service nginx reload
You’ll need to open ports 5080 and 5443 on your firewall. CentOS/Red Hat 6.x users should be able to apply something like this in their /etc/sysconfig/iptables file:
# add (something like) this to your /etc/sysconfig/iptables
#---------------------------------------------------------------
# Home Security Monitoring
#---------------------------------------------------------------
# 192.168.1.0/24 is the subnet of my local home network and eth0
# is the device it access.
-A INPUT -i eth0 -s 192.168.1.0/24  -p tcp --dport 5080 -j ACCEPT
-A INPUT -i eth0 -s 192.168.1.0/24  -p tcp --dport 5443 -j ACCEPT
If you’re using CentOS 7.x, then you’ll need to use firewalld to accomplish the same task:
# Open the port in your home network
firewall-cmd --zone=home --add-port=5080/tcp --permanent
firewall-cmd --zone=home --add-port=5443/tcp --permanent
firewall-cmd --reload
I do not recommend opening the ports to the public (zone) network unless you strap on a bit of extra security such as fail2ban. This blog is already long enough, so I won’t discuss that here. Although, you can check out a blog I did on security that can get you started with fail2ban (6.x users).
It’s worth confirming at this point that everything is up and running too:
# This command just checks that we're properly listening on the
# ports we care about (with respect to Alarm Decoder):
netstat -nat | egrep LISTEN | egrep ':(10000|5(00[01]|080|443))'
5080: NginX non-encrypted hosting of the Alarm Decoder WeAapp.
5443: NginX secure hosting of the Alarm Decoder WeAapp.
10000: Ser2Sock (this is converting you’re AD2USB to a TCP/IP stream that the Alarm Decoder WebApp can read and display to you).
5000: This is forked from the gunicorn instance to handle all incoming requests from NginX
5001: This is the gunicorn application which helps with handling some of the backend tasks such as the detection of your AD2USB device.
You should be able to access the keypad website now; simply visit http://localhost:5080/ or it’s secure version https://localhost:5443/. If you’re configuring this on another server, we’ll then you’ll need to access the host/ip accordingly. Alarm Decoder WebApp Installation
You can accept the defaults for everything, just keep pressing next. Next 3 Setup Screens
When you’re all done with the setup and have created your administrative account, you’ll be able to sign in an access your new virtual keypad. Alarm Decoder Keypad
You can explore the software and take advantage of all of it’s features. You can setup a twilio account and have the Alarm Decoder WebApp send you a text message whenever an even occurs. You can have it email you, and/or use a variety of other messaging services too!
If the page still isn’t coming up, it might be because you have SELinux enabled. Unlike other bloggers, I will NOT tell you to disable it (although that’s an option). Instead I’d advise that you install the SELinux package I put together:
/etc/nginx/conf.d/alarmdecoder-webapp.conf: Here is your NginX configuration file. This is the front end of your keypad.
/etc/alarmdecoder-webapp/alembic.ini: This is another configuration file used by the website. It defines information such as the database type and location. By default, it’s just a simple sqlite database. But feel free to point it to a PostgreSQL or MySQL database too (see the sqlalchemy.url directive).
/etc/ser2sock/ser2sock.conf: This is ser2sock configuration file.
/etc/alarmdecoder-webapp/ad2web.conf.py: This is where your gunicorn configuration is defined.
/var/lib/alarmdecoder-webapp/instance/db.sqlite: Here is the database the website uses and interfaces with.
/var/lib/alarmdecoder-webapp/instance/logs/: Here are where you’re logs will appear from the webapp.
Troubleshooting
First make sure CentOS (or Red Hat) can see your NuTech AD2USB device properly.
# This ideally should return something like /dev/ttyUSB0
find /dev -mindepth 1 -maxdepth 1 -type c -name 'ttyUSB*'

# If you're using my RPM files, you'll also have another
# entry you can look for. The following should output
# something like /dev/alarm-XXXXXXXX where the X's represent
# the Serial # of your NuTech AD2USB
find /dev -mindepth 1 -maxdepth 1 -type l -name 'alarm-*'
If you can’t find your device, then:
Double check that the USB connections are firmly plugged in to both your PC and the AD2USB device.
You’ll want to see a pulsating green light on the AD2USB device signifying it’s getting power and running.
NuTech also make mention that the USB cable you use can not be longer then 10ft. Ideally the shorter the cable the better though (less noise/interference).
If your device does exist, then read on to the next step…
Ensure that the Honeywell Alarm System setup has been correctly configured to support a second keypad. This was discussed above in the Keypad Configuration section of the blog. Specifically you need to be in Programming Mode and enable keypad address 18 (done via the command: [*] + [191] + [10]).
You can verify that you’ve configured this correctly by accessing the Programming mode of your alarm keypad and typing: [#] + [191]. The device should output either a 10 or 0A (both are valid responses).
Make sure your NuTech AD2USB can properly communicate with your Alarm system.
I took extra care and time packaging everything, so I actually have another RPM you can install that may help you out:
# Assuming you're correctly hooked up to the nuxref repositories:
yum --enablerepo=nuxref alarmdecoder-cli
# These commands require you to be the superuser (root)
# or a user that is as a member of the 'alarm' group.

# Test your data feed (through ser2sock):
ad2-disp-sock

# Or test your block device directly:
ad2-disp-dev
Note: If ser2sock is running properly, you will not be able to test the block device (using ad2-disp-dev) until you stop it first. So don’t panic if the ad2-disp-sock works and ad2-disp-dev doesn’t!
You can adjust these test tools by editing /etc/ad2cli.conf (if the defaults
aren’t working for you).
If you can’t communicate properly, then you may need to recheck your wiring. Review the NuTech YouTube videos again if you need to.
If you still can’t communicate with your alarm system after confirming all of the suggestions above, then you may have a faulty device.
Don’t give up if you’re having problems. It’s worth searching the Alarm Decoder Forums for an answer. Post a question there too if you like. The Alarm Decoder team are a great bunch of people always willing to help.
What If
What if the thief cuts the power? In my case, my alarm system (yours should too) has a battery backup locked up tight with it. So it’ll keep monitoring in this situation no matter what. It wouldn’t hurt to connect both your server internet modem into a Uninterruptible Power Supply (UPS). These things are relatively cheap for what they offer. A UPS would certainly handle this situation.
What if the thief powers off the computer within the 30 second deactivation window?
Well, if they are this clever then yes, they cut you off from remote monitoring. But that’s all they do. Keep in mind that the 30 second deactivation timer is still counting down. It will reach zero… and when it does…
A properly installed alarm system will come with a siren (I know mine does) and they are quite loud and irritating! The siren will sound regardless of the NuTech Alarm Decoder, Internet or PC get shut off or unplugged. It might be a good idea to make sure your siren is installed in the attic where it is difficult to get to (and disable). Most people and installations place these devices in the basement. This is silly because a thief can just smash it or yank the wire from it to kill the sound. Either way, unless the thief knows your setup, he’s certainly playing with fire if he thinks silencing the siren will keep him safe.
Consider a backup plan; I mean what would the alarm company do if they could no longer suddenly monitor you’re home. They’d probably immediately attempt to contact you and then call the police. You could do the same. Call a neighbor, call a friend. The fact you even just have a heads up on the situation is more then the guy who doesn’t have any monitoring solution at all.
Another great tool you can use is Nagios; I wrote a blog on it a while ago. Pair that up with aNag (for Google Devices) or iNag (for Apple Devices), and you’ll be monitoring your ability to monitor. You can be notified immediately if your monitoring capabilities diminish.
On a side note, consider notifying your (trustworthy) neighbor(s) too of weeks you intend to be out of town, I’m sure they can alert authorities for you if they hear your house alarm going off.
Home Security Tips
Remember, since you’re doing the monitoring yourself, you need to be prepared for when or if a situation ever arises. There is no longer a remote monitoring station looking out for you. But remember that even they can fail to pull through, so the following information is useful regardless of what your monitoring situation is.
I am not a trained professional when it comes the safety and responsibilities (nor will I claim to be). But there are clear cut obvious things worth stating up front that you must always consider:
If you’re at home at night and the alarm goes off:
It’s our human nature to panic, but just don’t let the panic take over the situation.
Don’t ever second guess the potential danger of the situation!
Do not ever decide to be brave and investigate the situation unless you’re absolutely sure!!
Call 911 immediately. If the phone line is dead, then use a cell phone if you have one.
If you’re at work or on vacation and the alarm goes off:
Ask Yourself? Could it be your spouse? A Child? A Pet? Does the timing of this alarm jive with a notable time of day such as after school (maybe the kids got home)? Perhaps it’s around the time your spouse returns from work or other family member?
Can you contact a specific person in mind directly based on the time of day (with respect to the alarm going off)?
Remember though: if this truly is a robbery, then time is not on your side! The longer you wait, the more your home is exposed.
If you can’t be sure, then call the local police immediately!. If you fear someone else could be home during this time and at risk then call 911! Don’t think twice!
Make sure you have your local police contact information programmed in your cell phone. Alternatively, keep it on a sheet of paper in your wallet or purse.
If you have children, make sure they know what to do if they hear the alarm go off. If they have access to a phone, they should know how to call 911 during these kind of emergencies. Obviously their safety becomes your number one concern, so be sure to educate them to hide someplace close by. Having them leaving the room their in when the alarm is going off could put them in serious jeopardy depending on the situation.
Credit
This blog took me a very (,very) long time to put together and test! The repository hosting alone accommodates all my blog entries up to this date. If you like what you see and wish to copy and paste this HOWTO, please reference back to this blog post at the very least. It’s really all I ask.
Special thanks to the Alarm Decoder team; their support made it possible for me to write this blog. In return I was able to make it easier for everyone else!
About a month ago I wrote (and updated) an article on how to install Nagios Core 4 onto your system. I’m a bit of a perfectionist, so I’ve rebuilt the packages a little to accommodate my needs. Now I thought it might be a good idea to introduce some of the powerful extensions you can get for Nagios.
For an updated solution, you may wish to check out the following:
NRDP for Nagios Core on CentOS 7.x: This blog explains how awesome NRDP really is and why it might become a vital asset to your own environment. This tool can be used to replace NSCA’s functionality. The blog also provides the first set of working RPMs (with SELinux support of course) of it’s kind to support it.
NRPE for Nagios Core on CentOS 7.x: This blog explains how to set up NRPE (v3.x) for your Nagios environment. At the time this blog was written, there was no packaging of it’s kind for this version.
RPM Solution
RPMs provide a version control and an automated set of scripts to configure the system how I want it. The beauty of them is that if you disagree with something the tool you’re packaging does, you can feed RPMs patch files to accommodate it without obstructing the original authors intention.
Now I won’t lie and claim I wrote these SPEC files from scratch because I certainly didn’t. I took the stock ones that ship with these products (NRPE and NSCA) and modified them to accommodate and satisfy my compulsive needs. 🙂
My needs required a bit more automation in the setup as well as including:
A previous Nagios requirement I had was a /etc/nagios/conf.d directory to behave similar to how Apache works. I wanted to be able to drop configuration files into here and just have it work without re-adjusting configuration files. In retrospect of this, these plugins are a perfect example of what can use this folder and work right out of the box.
These new Nagios plugins should adapt to the new nagiocmd permissions. The nagioscmd group permission was a Nagios requirement I had made in my previous blog specifically for the plugin access.
NSCA should prepare some default configuration to make it easier on an administrator.
NSCA servers that don’t respond within a certain time should advance to a critical state. This should be part of the default (optional) configuration one can use.
Both NRPE and NSCA should plug themselves into Nagios silently without human intervention being required.
Both NRPE and NSCA should log independently to their own controlled log file that is automatically rotated by the system when required.
Nagios Enhancement Focus
The key things I want to share with you guys that you may or may not find useful for your own environment are the following:
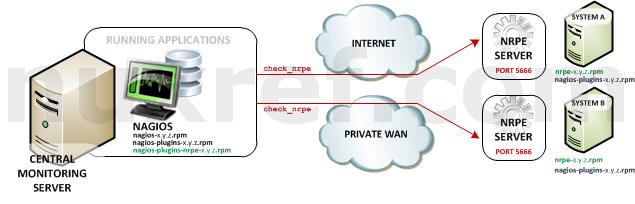
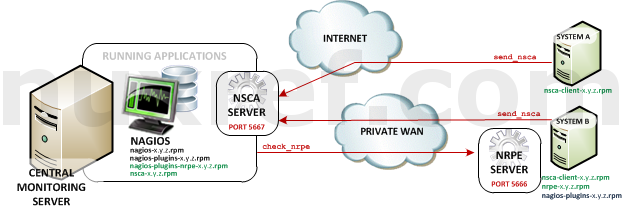
Nagios Remote Plugin Executor (NRPE): NRPE (officially accessed here) provides a way to execute all of the Nagios monitoring tools on a remote server. These actions are all preformed through a secure (private) connection to the remote server and then reported back to Nagios. NRPE can allow you to monitor servers that are spread over a WAN (even the internet) from one central monitoring server. This is truly the most fantastic extension of Nagios in my opinion.NRPE High Level Overview
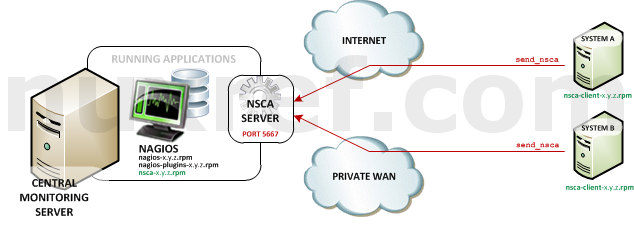
Nagios Service Check Acceptor (NSCA): NSCA (officially accessed here) provides a way for external applications to report their status directly to the Nagios Server on their own. This solution still allows the remote monitoring of a system by taking the responsibility off of the status checks off of Nagios. However the fantastic features of Nagios are still applicable: You are still centrally monitoring your application and Nagios will immediately take action in notifying you if your application stops responding or reports a bad status. This solution is really useful when working with closed systems (where opening ports to other systems is not an option).NSCA High Level Overview
In all cases, the RPMs take care of just about everything for you, so there isn’t really much to do at this point. Some considerations however are as follows:
NRPENRPE – Nagios Remote Plugin Executor
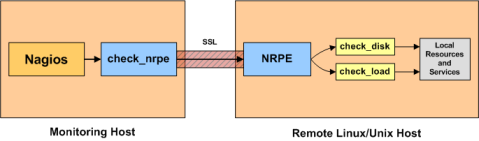
In an NRPE setup, Nagios is always the client and all of the magic happens when it uses the check_nrpe plugin. Most of NRPE’s configuration resides at the remote server that Nagios will monitor. In a nutshell, NRPE will provide the gateway to check a remote system’s status but in a much more secure and restrictive manor than the check_ssh which already comes with the nagios-plugins package. The check_ssh requires you to create a remote user account it can connect with for remote checks. This can leave your system vulnerable to an attack since you can do a lot more damage with a compromised SSH account. However check_nrpe uses the NRPE protocol and can only return what you let it; therefore making it a MUCH safer choice then check_ssh!
You’ll want to install nagios-plugins-nrpe on the same server your hosting Nagios on:
# Download NRPE
wget --output-document=nagios-plugins-nrpe-2.15-1.el6.x86_64.rpm http://repo.nuxref.com/centos/6/en/x86_64/custom/nagios-plugins-nrpe-2.15-4.el6.nuxref.x86_64.rpm

# Now install it
yum -y localinstall nagios-plugins-nrpe-2.15-1.el6.x86_64.rpm
Again I must stress, the above setup will work right away presuming you chose to use my custom build of Nagios introduced in my blog that went with it.
Just to show you how everything works, we’ll make the Nagios Server the NRPE Server as well. In real world scenario, this would not be the case at all! But feel free to treat the setup example below on a remote system as well because it’s configuration will be identical! 🙂
# Install our NRPE Server
wget --output-document=nrpe-2.15-1.el6.x86_64.rpm http://repo.nuxref.com/centos/6/en/x86_64/custom/nrpe-2.15-4.el6.nuxref.x86_64.rpm

# Install some Nagios Plugins we can configure NRPE to use
wget --output-document=nagios-plugins-1.5-1.x86_64.rpm http://repo.nuxref.com/centos/6/en/x86_64/custom/nagios-plugins-1.5-5.el6.nuxref.x86_64.rpm

# Now Install it
yum -y localinstall nrpe-2.15-1.el6.x86_64.rpm
   nagios-plugins-1.5-1.x86_64.rpm
# This tool requires xinetd to be running; start it if it isn't
# already running
service xinetd status || service xinetd start

# Make sure our system will always start xinetd
# even if it's rebooted
chkconfig --level 345 xinetd on
Now we can test our server by creating a test configuration:
# Create a NRPE Configuration our server can accept
cat << _EOF > /etc/nrpe.d/check_mail.cfg
command[check_mailq]=/usr/lib64/nagios/plugins/check_mailq -c 100 -w 50
_EOF

# Create a temporary test configuration to work with:
cat << _EOF > /etc/nagios/conf.d/nrpe_test.cfg
define service{
   use                 local-service
   service_description Check Users
   host_name           localhost
   # check_users is already defined for us in /etc/nagios/nrpe.cfg
	check_command		  check_nrpe!check_users
}

# Test our new custom one we just created above
define service{
   use                 local-service
   service_description Check Mail Queue
   host_name           localhost
   # Use the new check_mailq we defined above in /etc/nrpe.d/check_mail.cfg
	check_command		  check_nrpe!check_mailq
}
_EOF

# Reload Nagios so it sees our new configuration defined in
# /etc/nagios/conf.d/*
service nagios reload

# Reload xinetd so nrpe sees our new configuration defined in
# /etc/nrpe.d/*
service xinetd reload
We can even test our connection manually by calling the command:
# This is what the output will look like if everything is okay:
/usr/lib64/nagios/plugins/check_nrpe -H localhost -c check_mailq
OK: mailq is empty|unsent=0;50;100;0
Another scenario you might see (when setting on up on your remote server) is:
/usr/lib64/nagios/plugins/check_nrpe -H localhost -c check_mailq
CHECK_NRPE: Error - Could not complete SSL handshake.
Uh oh, Could not complete SSL handshake.! What does that mean?
This is the most common error people see with the NRPE plugin. If you Google it, you’ll get an over-whelming amount of hits suggesting how you can resolve the problem. I found this link useful.
That all said, I can probably tell you right off the bat why it isn’t working for you. Assuming you’re using the packaging I provided then it’s most likely because your NRPE Server is denying the requests your Nagios Server is making to it.
To fix this, access your NRPE Server and open up /etc/xinetd/nrpe in an editor of your choice. You need to allow your Nagios Server access by adding it’s IP address to the only_from entry. Or you can just type the following:
# Set your Nagios Server IP here:
NAGIOS_SERVER=192.168.192.168

# If you want to keep your previous entries and append the server
# you can do the following (spaces delimit the servers):
sed -i -e "s|^(.*only_from[^=]+=)[ t]*(.*)|1 2 $NAGIOS_SERVER|g"
   /etc/xinetd.d/nrpe

# The below command is fine too to just replace what is there
# with the server of your choice (you can use either example
sed -i -e "s|^(.*only_from[^=]+=).*|1 $NAGIOS_SERVER|g"
   /etc/xinetd.d/nrpe

# When your done, restart xinetd to update it's configuration
service xinetd reload
Those who didn’t receive the error I showed above, it’s only because your using your Nagios Server as your NRPE Server too (which the xinetd tool is pre-configured to accept by default). So please pay attention to this when you start installing the NRPE server remotely.
You will want to install nagios-plugins-nrpe on to your NRPE Server as well granting you access to all the same great monitoring tools that have already been proven to work and integrate perfectly with Nagios. This will save you a great deal of effort when setting up the NRPE status checks.
As a final note, you may want to make sure port 5666 is open on your NRPE Server’s firewall otherwise the Nagios Server will not be able to preform remote checks.
## Open NRPE Port (as root)
iptables -A INPUT -m state --state NEW -m tcp -p tcp --dport 5666 -j ACCEPT

# consider adding this change to your iptables configuration
# as well so when you reboot your system the port is
# automatically open for you. See: /etc/sysconfig/iptables
# You'll need to add a similar line as above (without the
# iptables reference)
# -A INPUT -m state --state NEW -m tcp -p tcp --dport 5666 -j ACCEPT
NSCANSCA – Nagios Service Check Acceptor
Remember, NSCA is used for systems that connect to you remotely (instead of you connecting to them (what NRPE does). This is a perfect choice plugin for systems you do not want to open ports up to unnecessarily on your remote system. That said, it means you need to open up ports on your Monitoring (Nagios) server instead.
You’ll want to install nsca on the same server your hosting Nagios on:
# Download NSCA
wget --output-document=nsca-2.7.2-9.el6.x86_64.rpm http://repo.nuxref.com/centos/6/en/x86_64/custom/nsca-2.7.2-10.el6.nuxref.x86_64.rpm

# Now install it
yum -y localinstall nsca-2.7.2-9.el6.x86_64.rpm

# This tool requires xinetd to be running; start it if it isn't
# already running
service xinetd status || service xinetd start

# Make sure our system will always start xinetd
# even if it's rebooted
chkconfig --level 345 xinetd on

# SELinux Users may wish to turn this flag on if they intend to allow it
# to call content as root (using sudo) which it must do for some status checks.
setsebool -P nagios_run_sudo on
The best way to test if everything is working okay is by also installing the nsca-client on the same machine we just installed NSCA on (above). Then we can simply create a test passive service to test everything with. The below setup will work presuming you chose to use my custom build of Nagios introduced in my blog that went with it.
# First install our NSCA client on the same machine we just installed NSCA
# on above.
wget http://repo.nuxref.com/centos/6/en/x86_64/custom/nsca-client-2.7.2-10.el6.nuxref.x86_64.rpm

# Now install it
yum -y localinstall nsca-client-2.7.2-9.el6.x86_64.rpm

# Create a temporary test configuration to work with:
cat << _EOF > /etc/nagios/conf.d/nsca_test.cfg
# Define a test service. Note that the service 'passive_service'
# is already predefined in /etc/nagios/conf.d/nsca.cfg which was
# placed when you installed my nsca rpm
define service{
   use                 passive_service
   service_description TestMessage
   host_name           localhost
}
_EOF

# Now reload Nagios to it reads in our new configuration
# Note: This will only work if you are using my Nagios build
service nagios reload
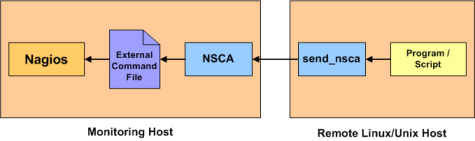
Now that we have a test service set up, we can send it different nagios status through the send_nsca binary that was made available to us after installing nsca-client.
# Send a Critical notice to Nagios using our test service
# and send_nsca. By default send_nsca uses the '<tab>' as a
# delimiter, but that is hard to show in a blog (it can get mixed up
# with the space.  So in the examples below i add a -d switch
# to adjust what the delimiter in the message.
# The syntax is simple:
#    hostname,nagios_service,status_code,status_msg
#
# The test service we defined above identifies both the
# 'host_name' and 'service_description' define our first 2
# delimited columns below. The status_code is as simple as:
#       0 : Okay
#       1 : Warning
#       2 : Critical
# The final delimited entry is just the human readable text
# we want to pass a long with the status.
#
# Here we'll send our critical message:
cat << _EOF | /usr/sbin/send_nsca -H 127.0.0.1 -d ','
localhost,TestMessage,2,This is a Test Error
_EOF

# Open your Nagios screen (http://localhost/nagios) at this point and watch the
# status change (it can take up to 4 or 5 seconds or so to register
# the command above).

# Cool?  Here is a warning message:
cat << _EOF | /usr/sbin/send_nsca -H 127.0.0.1 -d ',' -c /etc/nagios/send_nsca.cfg
localhost,TestMessage,1,This is a Test Warning
_EOF

# Check your warning on Nagios, when your happy, here is your
# OKAY message:
cat << _EOF | /usr/sbin/send_nsca -H 127.0.0.1 -d ',' -c /etc/nagios/send_nsca.cfg
localhost,TestMessage,0,Life is good!
_EOF
Since NSCA requires you to listen to a public port, you’ll need to know this last bit of information to complete your NSCA configuration. Up until now the package i provide only open full access to localhost for security reasons. But you’ll need to take the next step and allow your remote systems to talk to you.
NSCA uses port 5667, so you’ll want to make sure your firewall has this port open using the following command:
## Open NSCA Port (as root)
iptables -A INPUT -m state --state NEW -m tcp -p tcp --dport 5667 -j ACCEPT

# consider adding this change to your iptables configuration
# as well so when you reboot your system the port is
# automatically open for you. See: /etc/sysconfig/iptables
# You'll need to add a similar line as above (without the
# iptables reference)
# -A INPUT -m state --state NEW -m tcp -p tcp --dport 5667 -j ACCEPT
Another security in place with the NSCA configuration you installed out of
the box is that it is being managed by xinetd. The configuration can
be found here: /etc/xinetd.d/nsca. The security restriction in place that you’ll want to pay close attention to is line 16 which reads:
only_from = 127.0.0.1 ::1
If you remove this line, you’ll allow any system to connect to yours; this is a bit unsafe but an option. Personally, I recommend that you individually add each remote system you want to monitor to this line. Use a space to separate more the one system.
You can consider adding more security by setting up a NSCA paraphrase which will reside in /etc/nagios/nsca.cfg to which you can place the same paraphrase in all of the nsca-clients you set up by updating /etc/nagios/send_nsca.cfg.
Consider our example above; I can do the following to add a paraphrase:
# Configure Client
sed -i -e 's/^#*password=/password=ABCDEFGHIJKLMNOPQRSTUVWXYZ/g'
   /etc/nagios/send_nsca.cfg
# Configure Server
sed -i -e 's/^#*password=/password=ABCDEFGHIJKLMNOPQRSTUVWXYZ/g'
   /etc/nagios/nsca.cfg
# Reload xinetd so it rereads /etc/nagios/nsca.cfg
service xinetd reload
I don’t trust you, I want to repackage this myself!
As always, I will always provide you a way to build the source code from scratch if you don’t want to use what I’ve already prepared. I use mock for everything I build so I don’t need to haul in development packages into my native environment. You’ll need to make sure mock is setup and configured properly first for yourself:
# Install 'mock' into your environment if you don't have it already.
# This step will require you to be the superuser (root) in your native
# environment.
yum install -y mock

# Grant your normal every day user account access to the mock group
# This step will also require you to be the root user.
usermod -a -G mock YourNonRootUsername
At this point it’s safe to change from the ‘root‘ user back to the user account you granted the mock group privileges to in the step above. We won’t need the root user again until the end of this tutorial when we install our built RPM.
Just to give you a quick summary of what I did, here are the new spec files and patch files I created:
NSCA RPM SPEC File: Here is the enhanced spec file I used (enhancing the one already provided in the EPEL release found on pkgs.org). At the time I wrote this blog, the newest version of NSCA was v2.7.2-8. This is why I repackaged it as v2.7.2-9 to include my enhancements. I created 2 patches along with the spec file enhancements. nrpe.conf.d.patch was created to provide a working NRPE configuration right out of the box (as soon as it was installed) and nrpe.xinetd.logrotate.patch was created to pre-configure a working xinetd server configuration.
NRPE RPM SPEC File: Here is the enhanced spec file I used (enhancing the one already provided in the EPEL release found on pkgs.org). At the time I wrote this blog, the newest version of NRPE was v2.14-5. However v2.15 was available off of the Nagios website so this is why I repackaged it as v2.15-1 to include my enhancements. nsca.xinetd.logrotate.patch was the only patch I needed to create to prepare a NSCA xinetd server working out of the box.
Everything else packaged (patches and all) are the same ones carried forward from previous versions by their package managers.
Rebuild your external monitoring solutions:
Below shows the long way of rebuilding the RPMs from source.
# Perhaps make a directory and work within it so it's easy to find
# everything later
mkdir nagiosbuild
cd nagiosbuild
###
# Now we want to download all the requirements we need to build
###
# Prepare our mock environment
###
# Initialize Mock Environment
mock -v -r epel-6-x86_64 --init

# NRPE (v2.15)
wget http://repo.nuxref.com/centos/6/en/source/custom/nrpe-2.15-4.el6.nuxref.src.rpm
mock -v -r epel-6-x86_64 --copyin nrpe-2.15-1.el6.src.rpm /builddir/build

# NSCA (v2.7.2)
wget http://repo.nuxref.com/centos/6/en/source/custom/nsca-2.7.2-10.el6.nuxref.src.rpm
mock -v -r epel-6-x86_64 --copyin nsca-2.7.2-9.el6.src.rpm /builddir/build

#######################
### THE SHORT WAY #####
#######################
# Now, the short way to rebuild everything is through these commands:
mock -v -r epel-6-x86_64 --resultdir=$(pwd)/results
   --rebuild  nrpe-2.15-1.el6.src.rpm  nsca-2.7.2-9.el6.src.rpm

# You're done; You can find all of your rpms in a results directory
# in the same location you typed the above command in.  You can
# alternatively rebuild everything the long way allowing you to
# inspect the content in more detail and even change it for your
# own liking

#######################
### THE LONG WAY  #####
#######################
# Install NRPE Dependencies
mock -v -r epel-6-x86_64 --install
   autoconf automake libtool openssl-devel tcp_wrappers-devel

# Install NSCA Dependencies
mock -v -r epel-6-x86_64 --install
   tcp_wrappers-devel libmcrypt-devel

###
# Build Stage
###
# Shell into our enviroment
mock -v -r epel-6-x86_64 --shell

# Change to our build directory
cd builddir/build

# Install our SRPMS (within our mock jail)
rpm -Uhi nsca-*.src.rpm nrpe-*.src.rpm

# Now we'll have placed all our content in the SPECS and SOURCES
# directory (within /builddir/build).  Have a look to verify
# content if you like

# Build our RPMS
rpmbuild -ba SPECS/*.spec

# we're now done with our mock environment for now; Press Ctrl-D to
# exit or simply type exit on the command line of our virtual
# environment
exit

###
# Save our content that we built in the mock environment
###

#NRPE
mock -v -r epel-6-x86_64 --copyout /builddir/build/SRPMS/nrpe-2.15-1.el6.src.rpm .
mock -v -r epel-6-x86_64 --copyout /builddir/build/RPMS/nrpe-2.15-1.el6.x86_64.rpm .
mock -v -r epel-6-x86_64 --copyout /builddir/build/RPMS/nagios-plugins-nrpe-2.15-1.el6.x86_64.rpm .
mock -v -r epel-6-x86_64 --copyout /builddir/build/RPMS/nrpe-debuginfo-2.15-1.el6.x86_64.rpm .

#NSCA
mock -v -r epel-6-x86_64 --copyout /builddir/build/SRPMS/nsca-2.7.2-9.el6.src.rpm .
mock -v -r epel-6-x86_64 --copyout /builddir/build/RPMS/nsca-2.7.2-9.el6.x86_64.rpm .
mock -v -r epel-6-x86_64 --copyout /builddir/build/RPMS/nsca-client-2.7.2-9.el6.x86_64.rpm .
mock -v -r epel-6-x86_64 --copyout /builddir/build/RPMS/nsca-debuginfo-2.7.2-9.el6.x86_64.rpm .

# *Note that all the commands that interact with mock I pass in
# the -v which outputs a lot of verbose information. You don't
# have to supply it; but I like to see what is going on at times.

# **Note: You may receive this warning when calling the '--copyout'
# above:
# WARNING: unable to delete selinux filesystems
#    (/tmp/mock-selinux-plugin.??????): #
#    [Errno 1] Operation not permitted: '/tmp/mock-selinux-plugin.??????'
#
# This is totally okay; and is safe to ignore, the action you called
# still worked perfectly; so don't panic!
So where do I go from here?
NRPE and NSCA are both fantastic solutions that can allow you to tackle any monitoring problem you ever had. In this blog here I focus specifically on Linux, but these tools are also available on Microsoft Windows as well. You can easily have 1 Nagios Server manage thousands of remote systems (of all operating system flavours). There are hundreds of fantastic tools to monitor all mainstream applications used today (Databases, Web Servers, etc). Even if your trying to support a custom application you wrote. If you can interface with your application using the command line interface, well then Nagios can monitor it for you. You only need to write a small script with this in mind:
Your script should always have an exit code of 0 (zero) if everything is okay, 1 (one) if you want to raise a warning, and 2 (two) if you want to raise a critical alarm.
No matter what the exit code is, you should also echo some kind of message that someone could easily interpret what is going on.
There is enough information in this blog to do the rest for you (as far as creating a Nagios configuration entry for it goes). If you followed the 2 rules above, then everything should ‘just work’. It’s truely that easy and powerful.
How do I decide if I need NSCA or NRPE?
NRPE & NSCA High Level Overview
NRPE makes it Nagios’s responsibility to check your application where as NSCA makes it your applications responsible to report its status. Both have their pros and cons. NSCA could be considered the most secure approach because at the end of the day the only port that requires opening is the one on the Nagios server. NSCA does not use a completely secure connection (but there is encryption none the less). NRPE is very secure and doesn’t require you to really do much since it just simply works with the nagios-plugins already available. It litterally just extends these existing Nagios local checks to remote ones. NSCA requires you to configure a cron, or adjust your applications in such a way that it frequently calls the send_nsca command. NSCA can be a bit more difficult to set up but creates some what of a heartbeat between you and the system monitoring it (which can be a good thing too). I pre-configured the NSCA server with a small tweak that will automatically set your application to a critical state if a send_nsca call is missed for an extended period of time.
Always consider that the point of this blog was to state that you can use both at the same time giving you total flexibility over all of your systems that require monitoring.
Credit
All of the custom packaging in this blog was done by me personally. I took the open source available to me and rebuilt it to make it an easier solution and decided to share it. If you like what you see and wish to copy and paste this HOWTO, please reference back to this blog post at the very least. It’s really all I ask.
Sources
I referenced the following resources to make this blog possible:
Official NRPE download link; I used all of the official documentation to make the NRPE references on this blog possible.
A document identifying the common errors you might see and their resolution here.
Official NSCA download link; I used all of the official documentation to make the NSCA references on this blog possible.
The NRPE and NSCA images I’m reposting on this blog were taking straight from their official sites mentioned above.
Linux Packages Search (pkgs.org) was where I obtained the source RPMs as well as their old SPEC files. These would be a starting point before I’d expand them.
A bit outdated, but a great (and simple) representation of how NSCA works with Nagios can be seen here.
Security is important these days but sadly there are a scary amount of blogs and comments from people out there who solve their problems by turning off their firewall and/or disabling SELinux. These steps may work around a problem, but it will make your system much more vulnerable to cyber attacks. Learning alternative ways of solving your applications woes without disabling key safety components on your system is a better approach to keeping it secure. The goal of this blog is to offer a quick primer on some key security components that will protect you an your data!
The topics covered in this blog to keep your systems secure are:
For those of you who run a system on the front end of the internet have to deal with firewalls and security. Fail2Ban is a python based tool that wraps itself around iptables. It’s can cleverly watch system log files and detect abuse; it then proceeds to temporary (or permanently) block/ban the culprit by using their IP address in conjunction with your firewall.
At the time I blogged this, Fail2Ban was in the pre-release stages of v0.8.11. For this reason I’ll focus on v0.8.10.
Get the Software
Now the EPEL Repositories already provide us with software to do the installation here (and source rpm here).
Alternatively, I rebuilt the source myself and am hosting it here (in case the version changes significantly enough that this tutorial no longer works). My hosted version of version of Fail2Ban rpm can be retrieved here (and source rpm here).
Setting Up Fail2Ban
# Configure epel (if not already)
rpm -Uhi http://fedora.mirror.nexicom.net/epel/6/i386/epel-release-6-8.noarch.rpm

# Install the goods
yum -y install fail2ban

# Optionally install 'jwhois'. This tool gives you great detail on people
# accessing your system by performing a whois lookup on them and including
# the results of this in the automated email sent. Honestly it's worth it.
yum -y install jwhois
Out of the box the settings will work with SSHD only and for now that is all I need. However I’ve made it a bit more restrictive to satisfy my needs:
# Create a backup of our original configuration files before we apply
# any changes to them:
[ ! -f /etc/fail2ban/fail2ban.conf.orig ] && \
   cp -af /etc/fail2ban/fail2ban.conf /etc/fail2ban/fail2ban.conf.orig
[ ! -f /etc/fail2ban/jail.conf.orig ] && \
   cp -af /etc/fail2ban/jail.conf /etc/fail2ban/jail.conf.orig

# var/log/messages is busy enough; I prefer to use
# /var/log/fail2ban.log personally (it's already pre-configured
# with a logrotate.d entry to accommodate this)
sed -i -e 's|^logtarget[ t]=.*|logtarget = /var/log/fail2ban.log|g' \
	/etc/fail2ban/fail2ban.conf

# The below ;'sed' commands only change the first occurrence in the file
# # which is where the [default] is identified
# Default Ban for 1 day (86400 seconds = 1 day)
sed -i -e '0,/^bantime[ t]*=.*/s//bantime = 86400/' \
	/etc/fail2ban/jail.conf

# Default Ban if more then 3 unsuccessful attempts are made within 30 min
# (1800 seconds = 30 min).
sed -i -e '0,/^maxretry[ t]*=.*/s//maxretry = 3/' \
	/etc/fail2ban/jail.conf
sed -i -e '0,/^findtime[ t]*=.*/s//findtime = 1800/' \
	/etc/fail2ban/jail.conf

# These IPs don't conform to our very restrictive checks and will
# bypass the Fail2Ban security. For my own personal privacy, I've
# adjusted them from my own personal IPs. You might want to change
# this to reflect what you want (use spaces to delimit them). You
# can use masks too such as 10.128.3.0/16 (adding the slash (/)).
# but remember you need to escape () the slash in the below
# sed statement.  For example, the below will add the following:
#     127.0.0.1, 1.2.3.4, and 7.8.9.0/24
#
# Note: At a minimum, make sure to include 127.0.0.1
sed -i -e '0,/^ignoreip[ t]*=.*/s//ignoreip = 127.0.0.1 1.2.3.4 7.8.9.0\/24/' \
	/etc/fail2ban/jail.conf

# Configure the system to start fail2ban after every reboot
chkconfig --levels 345 fail2ban on

# Start it up now for the first time (use 'restart' instead
# of 'start)' if it was already running:
service fail2ban start
There are lots of configurations already available that ship with this tool (but disabled by default). Have a look at /etc/fail2ban/jails.conf, perhaps there are others you might be interested in. If you’re uncertain what some of them are, or what they do; just have a look at the fail2ban manual.
This literally your front line runner to all the security between you and the violent internet. Your firewall is your only shield and one of the last line of defense you have in some scenarios. SELinux would be the last line of defense you have which I talk about later. If troubleshooting a product has boiled down to stopping your firewall, then you’ve done something horribly wrong. There are other ways to debug firewall issues and stopping it shouldn’t be one of them.
Try running the following command just to see what ports your system is already listening on:
# The below lists all listening connections that could be
# being access remotely if your firewall is disabled
#
netstat -pnat | egrep LISTEN |
   tr -s ' ' | cut -f4,7 -d' ' | sed '/^0.0.0/d'
It’s the above list you’re trying to protect! It’s not uncommon for an application to communicate to another through ip (such as a database does); but these ports do not need to be open to the entire internet!
Setting Up a Simple Firewall
Here is a very simple firewall you can use to get you started:
# Set this to your internet interface (it might be ppp0 too)
# run ifconfig to see what interfaces you have
PUBLIC=eth0
cat << _EOF > /etc/sysconfig/iptables
#
# A Simple firewall that allows access to SSH and Web Based inbound
# connections but will allow you to access everything outside
#
*filter
#---------------------------------------------------------------
# Drop Everything by default
#---------------------------------------------------------------
:INPUT DROP [0:0]
:FORWARD DROP [0:0]
:OUTPUT DROP [0:0]

#---------------------------------------------------------------
# Internal Traffic is Okay
#---------------------------------------------------------------
-A INPUT -i lo -j ACCEPT
-A OUTPUT -o lo -j ACCEPT

#---------------------------------------------------------------
# Always accept already established connections
#---------------------------------------------------------------
-A INPUT -m state --state ESTABLISHED,RELATED -j ACCEPT

#---------------------------------------------------------------
# Deny traffic from internet that spoofs addresses used internally
#---------------------------------------------------------------
-A INPUT -i $PUBLIC -s 192.168.0.0/24 -j DROP
-A INPUT -i $PUBLIC -s 127.0.0.0/8 -j DROP
-A INPUT         -d 10.0.0.0/8 -j DROP
-A INPUT         -d 169.254.0.0/16 -j DROP

#---------------------------------------------------------------
#  All Outbound Traffic Accepted (for now)
#---------------------------------------------------------------
-A OUTPUT -o $PUBLIC -j ACCEPT

#---------------------------------------------------------------
# SSH Allowed
#---------------------------------------------------------------
-A INPUT -m state --state NEW -m tcp -p tcp --dport 22 -j ACCEPT

#---------------------------------------------------------------
# Web Traffic Allowed
#---------------------------------------------------------------
-A INPUT -m state --state NEW -m tcp -p tcp --dport 80 -j ACCEPT
-A INPUT -m state --state NEW -m tcp -p tcp --dport 443 -j ACCEPT

#---------------------------------------------------------------
# The default is to drop everything else
# but for read-ability and peace of mind
# we force it again anyway
#---------------------------------------------------------------
-A INPUT -i $PUBLIC -j DROP
-A FORWARD -i $PUBLIC -j DROP

# End
COMMIT
_EOF

# Now restart iptables for the new rules to take affect
service iptables restart

# If you're running fail2ban then you'll need to restart it too
# since the extra chains it creates into iptables would have just
# got wiped with the last command.  Restarting it will rebuild
# everything the way it should be
service fail2ban restart

# Ensure this file is not accessible by anyone
chmod 600 /etc/sysconfig/iptables
When or if you add a new program into your environment, it should just work… if you need to share or host it’s services to others, find out what ports it uses and ‘ONLY’ open them. Consider the security risks that become available to you once these ports are open to the world as well. Hence you are putting all your trust in the application listening on every port you open. Also note that every port your open is a potential point of entry a hacker can use into your system.
SSH is a great way for you to connect remotely to your server and see how things are going, make changes etc. But consider other people (whom you don’t know) might be trying to access it also (usually for malicious reasons). If you’ve set up fail2ban already, then you’re already in really good shape. But consider restricting the the SSH Daemon even more for precautionary reasons. Here is what I’m suggesting:
Disable remote SSH access for the root user login:
# Before you do this, be sure you have an non-root account you
# can still connect to the system as that you will use instead of
# root
useradd nuxref
# I always add my users to the users group, you don't have to do
# this:
usermod -G users nuxref
# Set a password for the user you created
passwd nuxref

# In the above example I can use 'nuxref' as an entrance into the
# system to which I can switch to the root after I establish a
# my connection.
# 90% of the constant connections your server will face when
# directly connected to the internet will be as the 'root' user.
# So why even bother enabling that account? Fail2Ban will end up
# blocking them shortly anyway, but why even give them 3 lucky
# guesses? It's really not worth it. It's much safer to use another
# account and switch to root if needed later.

# This also means that if for some miraculous reason someone
# guesses your non-root account to gain access to the system, the
# damage they can do will be as minimal as the access you've given
# that account.

# Now Deny Root Login Attempts
sed -i -e 's/^[# t]*PermitRootLogin .*/PermitRootLogin no/g' /etc/ssh/sshd_config

# To prevent the system from allowing additional users you add to
# your system from accessing it remotely you'll want to consider
# doing the following:
# First get rid of an existing entry
sed -i -e '/^[# t]*AllowUsers .*/d' /etc/ssh/sshd_config
# Now add our user restrictions (if you have more then one
# user you want to add, separate them using spaces
echo "AllowUsers nuxref" >> /etc/ssh/sshd_config
Consider using a banner message as a warning to let people know they’ve inadvertently accessed a system they shouldn’t. Sure a hacker will ignore this message, but for the poor fellow who really did just mistype an ip or host; this will give your server some character and notify them that you are monitoring them. Nothing but a scare tactic; but it’s still worth doing.
# A simple scare banner
cat << _EOF > /etc/banner
* - - - - - - - W A R N I N G - - - - - - - - - - W A R N I N G - - - - - - - *
*                                                                             *
* The use of this system is restricted to authorized users. All information   *
* and communications on this system are subject to review, monitoring and     *
* recording at any time, without notice or permission.                        *
*                                                                             *
* Unauthorized access or use shall be subject to prosecution.                 *
*                                                                             *
* - - - - - - - W A R N I N G - - - - - - - - - - W A R N I N G - - - - - - - *
_EOF

# Make sure it's not accessible by others
chmod 640 /etc/banner

# SELinux Handling
restorecon /etc/banner

# Now tell the SSH Daemon to reference it:
sed -i -e 's|^[# t]*Banner .*|Banner /etc/banner|g' /etc/ssh/sshd_config
Disable X11 forwarding and Tcp Forwarding; These are what hackers will want to utilize if they ever successfully gain access to your system:
# X11 grants someone the ability to launch X applications locally
# at their machine that are associated with your server.  In some
# cases this is okay. But if you're just hosting web servers and
# databases; you shouldn't offer free candy to a potential unknown
# users who may have just connected to your production system.
sed -i -e 's|^X11Forwarding .*|X11Forwarding no|g' /etc/ssh/sshd_config
# Yet another service that just shouldn't be open no a production
# system. Someone is trying to access something they couldn't
# otherwise have done it if they're invoking this. Not saying this
# feature isn't powerful, I'm just saying disable it until you
# find a reason not to.
sed -i -e 's|^[#]*AllowTcpForwarding .*|AllowTcpForwarding no|g' /etc/ssh/sshd_config
Disable UseDNS reference. This is optional; I just do this because it’s faster. Also IPs are easier to scan later. The DNS lookup can slow things down sometimes which can be annoying. This isn’t a security thing at all; it just makes things faster.
When you’re comfortable with all your changes, you can restart the SSH Daemon to take them on. If you were logged in remotely already, don’t worry, you won’t lose your connection when you do this.
# Restart SSHD so it will reread it's configuration
service sshd restart
If you have to resort to auditing, then your system may have already been compromised, but this will play a key role in figuring out what happened. Hopefully you’ll never have to rely on this step, but being cocky and going without it might become problematic in the future. This tool will help make your system better in the long run.
But auditing gives you something more as well; once it’s enabled you can set up the monitoring of it’s log file (/var/log/audit/audit.log) for suspicious activity. You can even go as far to write your own plugin for Fail2Ban to study the audit.log and react if certain suspicious system transaction takes place by a non-root user.
Auditing should be a considered mandatory service you implement on all of your servers.
Setting Up Some Simple Working Audit Rules
Here is a quick audit file you can use (and tailor to your liking) just to get you started; even if you added nothing else to this file, it’s configuration as is may save you one day:
# Install Auditing if it isn't already (most systems install this out of
# the box)
yum -y install audit
# Ensure your system will always run it
chkconfig --levels 345 auditd on
# Start it if it isn't already started:
service auditd status || service auditd start
# Install Audit Rules
cat << _EOF > /etc/audit/audit.rules
# First rule - delete all
-D

# increase the buffers to survive stress events. make this bigger for
# busy systems.
-b 1024

# monitor unlink() and rmdir() system calls.
-a exit,always -F arch=x86_64 -S unlink -S rmdir
# settimeofday so we know no one is adjusting the system times
-a exit,always -F arch=x86_64 -S settimeofday
# setrlimit.* so we know when kernel resources are being adjusted
-a exit,always -F arch=x86_64 -S setrlimit
# Filesystem Mounting (umount = 32bit, umount2 = 64bit)
-a exit,always -F arch=x86_64 -S mount -S umount2

#Ensure that failed use of the following system calls is audited
-a exit,always -F arch=x86_64 -S quotactl -S kill -S chroot -F success=0 -F auid=-1 -F auid=0

# some file and directory watches
-w /var/log/audit/
-w /etc/audit/auditd.conf -p rxwa
-w /etc/audit/audit.rules -p rxwa

# monitor write-access and change in file properties (read/write/execute)
# of the following files.
-w /etc/group -p wa
-w /etc/passwd -p wa
-w /etc/shadow -p wa
-w /etc/sudoers -p wa

# monitor write-access to the following directories
-w /etc/fail2ban -p wa
-w /etc/httpd -p wa
-w /etc/cron.d -p wa
-w /var/www -p wa

# lock the audit configuration to prevent any modification of this file.
#-e 2
_EOF

# Restart Audit To take on new configuration
service auditd restart
Now you can check for changes as root using commands like:
# Search for anyone touching the /etc/passwd file
ausearch -f /etc/passwd
# Search for anyone accessing the /etc/fail2ban/fail2ban.conf
ausearch -f /etc/fail2ban/fail2ban.conf
Don’t forget to uncomment the very last line of the /etc/audit/audit.rules if you’re using sample configuration file I have above as your template. The -e 2 will prevent someone from turning the auditing off before they wreck havoc on your system. the -e 2 will make it so a reboot is required for the rules to change. This IS what you want; trust me! Hackers aren’t stupid; disabling auditing is the first thing they’ll attempt before they begin creating their chaos.
I already wrote a tutorial on using Nagios here. Consider using this; it can even be configured to monitor the audit logs and set alarms off when something unusual is matched.
But consider monitoring things such as the following as well:
The System Load
Remaining Disk Space
Bandwidth Utilization
Number of Users Remotely Logged in
All of the suggestions above can help you quickly identify unusual behavior and allow you to take action immediately (instead of just the next time you happen to be on the system). Obviously you’ll know your system better than anyone else, so if you expect the system load to go high at night for certain tasks, you can consider this in your monitoring as well.
It’s the times that nothing should be out of the ordinary that an alarm could help you resolve a problem just minutes (if not seconds) after it occurs. Monitoring also works in your favour for checking other system commands such as web page availability (if you’re hosting one) etc. Find out something is wrong before your very own customers do is the key here.
In fact, there really isn’t a good reason you should ever consider snuffing monitoring from your security TODO list.
There are a lot of people who seem to be really against using SELinux when in fact it is totally amazing and really easy to work with once you understand it. The biggest problem most people have is they don’t ever take the time to learn it. Hell, even I’ll admit it’s a frustrating learning curve in it’s unknown state.
But honestly: it effectively allows you to revoke sections of your file system as well as major system calls based on the executable code (not just the user/group). Why is this so important? Well take Apache for example. If someone were to successfully compromise it from the outside (using a buffer overflow), they will have gained full user access granted to the apache user and can literally browse your entire system. Their goal would be to potentially look for other exploits that they can use to gain higher privileges (such as root access). Heck even as the Apache user, you can run quite a lot of programs including ones that access the internet.
With respect to the Apache example just explained, if the administrator had SELinux running (in Enforcing Mode) the hacker is restricted to only reading and accessing the permissions assigned to the /usr/sbin/httpd binary. At most they’d be able to view your Apache configuration file and read html files… That’s about it.
SELinux is an amazing tool for locking down your system. In fact, SELinux is your very last line of defense. If this isn’t running and an application gets compromised, you’re going to have to rely completely on your audit logs to find what damage was done to your system and attempt to repair it (hopefully from backups).
I won’t lie though, the big problem with SELinux is that the documentation is poor. Not to mention that no one really promotes it’s fantastic functionality. Instead everyone just disables it and moves on.
One of the simplest things you can do upfront when trying to work with SELinux is just keep it in enforcing mode. RHEL/CentOS packages have already looked after most of the settings for you. In the rare case something doesn’t work for you; instead of panicking and disabling SELinux (which all websites tell you to do). Set it to ‘Permissive’ mode instead. This is effectively the same as disabling it except it still records violations in /var/log/audit/audit.log what it would have otherwise denied.
# Set SELinux into Permissive mode
setenforce 0
At this point your application (that may have not worked prior to this call) may suddenly work again. It is at this point you you can begin seeing what SELinux was denying by referencing these very audit logs. These logs play a key in making everything work for you again.
Making a New Product SELinux Compatible
Take Nagios for example and the blog I did for it. This is really easy to protect and still have SELinux running in Enforcing mode. Assuming you set SELinux in Permissive mode already (explained above), you can now generate a fast set of rules to allow the product to work with it enabled. Here is how you can do it:
# First make sure you have the right package installed to work
# with:
yum install -y policycoreutils

# For alarms to be generated, you'll want to run Nagios with
# SELinux in Permissive mode for a while (preferably a day would
# be great to get everything)

# Filter out only nagios alarms that were generated by SELinux
cat /var/log/audit/audit.log | grep denied |
	grep nagios > nagios.audit.log

# Now tailor the file if necessary (strip out lines you don't
# want to grant access to). Use a simple editor (like vi) to do
# this. It's really not that hard to read, and the output will
# show you precisely what nagios tried to access.  In some
# cases, you may never want nagios to access these things. so
# remove these entries from this list. Only keep the denied
# messages you want to reverse (and allow)

# Create an installable Module (prefix with 'my' to avoid
# conflicts with other package management that it might be using)
audit2allow -v --input nagios.audit.log -M mynagios

## Install the new module you just created
semodule -i mynagios.pp
That’s it; now you can set SELinux back to enforcing mode for the added security it offers you:
# Set SELinux back to Enforcing mode
setenforce 1
Was that really so hard? Every now and then grep through your audit logs (like you already did above) and scan for the keyword ‘nagios’. It’s possible it may still try to do things to which it’s being denied access to. You may even need to update your mynagios.pp SELinux module with extra entries found using audit2allow again. Consider also that it may be doing things you’re quite happy to leave the way it is. You don’t need to grant it access to absolutely everything, just want is necessary for it to operate.
Remember; if your project is compromised it will try to do all sorts of things it shouldn’t do and SELinux will be the barrier that will save your system.
Even if you’re running SELinux and have locked your system with auditing. A hacker can still try to bring your system down completely by filling it’s disk space until it’s full. This can cause other applications to catastrophically fail or stop behaving as they should which will is not cool at all.
By enabling user disk quota’s you can restrict the amount disk space imposed by a user (and even group level). Above, in the "Restricting SSH Access" points, I created a user called nuxref who i’d use as the entry point into my system. If you followed that piece of advice and significantly restricted remote access to your system you’re already halfway there. But… in the extremely unlikely circumstances that remote entry account gets compromised, you will want to be sure you keep the hackers options to a minimum.
Since I’ll only use that account to access the system and either check a few things or switch to the root user to make a change, I want to eliminate it’s ability to do much anything else. Most hackers start transferring all their hacking tools onto the system the second they gain access. It’s through these tools they can exploit more content. Other hackers might just want to completely fill your disk space causing your production data to crash.
An Example When You Might Want To Consider Disk Quotas:
Some cloud hosting services that provide you a bare bone virtual machine do not partition/carve out it’s disks in ways you’d have otherwise done differently. They do this primarily because they usually offer such small amounts of disk space (like 20-40GB) and it would be unfair of them to carve it in a way you might complain about. It’s better for them to just give your the entire space as one partition. But hey! When you pay for a very cheap hosting service; you take what you get. 🙂
Here is an example of what one of the virtual hosting providers I use did to my system when they gave it to me:
[root@node01 ~]# df
Filesystem           1K-blocks      Used Available Use% Mounted on
/dev/vda              20642428   1437052  18156800   8% /
none                    251228         0    251228   0% /dev/shm
In this example, /home (where users log into) and /tmp are not carved into their own partition. These directories are critical because all users usually have full read/write permissions here. If this were your production environment (and it is for many), a user could completely fill these unprotected directories until the file system was full. So in this example, Disk Quotas would be a very good idea!
Setting Disk Quotas Up
I will set up a assuming the file system I have to work with is identical to that displayed above (where I only have a ‘/’ partition) and a single user account that is accessible by SSHD. I’ll keep using the nuxref account to make things consistent.
Up until now I also gave you ‘one-liners’ to automate everything by simply copying and pasting from your browser to your command line. Well this one here will differ across systems, so it’s not really fair for me to give you this.
First make sure the correct software is installed onto your system:
yum -y install quota
Identify what partition needs to be updated. You need to open up your /etc/fstab file for this. I’m personally a vi fan, but use whatever editor your comforatble with.
# Here is a before snapshot of the /etc/fstab file before I edited it:
[root@node01 ~]# cat /etc/fstab
LABEL=DOROOT       /               ext4    errors=remount-ro 0       1
none             /dev/shm      tmpfs   defaults                    0 0
I want to adjust the ‘/’ partition (column 4); I need to update the line that already reads errors=remount-ro with errors=remount-ro,usrquota,grpquota. The fstab file will look like this for me when i’m finished:
# Here is an after snapshot of the /etc/fstab file after I edited it:
[root@node01 ~]# cat /etc/fstab
LABEL=DOROOT       /               ext4    errors=remount-ro,usrquota,grpquota 0       1
none             /dev/shm      tmpfs   defaults                    0 0
Now remount the ‘/’ filesystem (or whatever mount you chose to update in your /etc/fstab file) by typing the following:
mount -o remount /
Now allow your system to scan your filesystem for files so it can begin tracking them:
quotacheck -avugm
The step above could take hours depending on how busy your system is or the number of files that reside on the partition your scanning.
You may see some output like this (don’t worry; nothing bad has happened) 🙂
quotacheck: Scanning /dev/vda [/] done
quotacheck: Cannot stat old user quota file: No such file or directory
quotacheck: Cannot stat old group quota file: No such file or directory
quotacheck: Cannot stat old user quota file: No such file or directory
quotacheck: Cannot stat old group quota file: No such file or directory
quotacheck: Checked 4404 directories and 30017 files
quotacheck: Old file not found.
quotacheck: Old file not found.
You may also see a warning like this:
quotacheck: Your kernel probably supports journaled quota but you are not using it. Consider switching to journaled quota to avoid running quotacheck after an unclean shutdown.
Journaling is a way of managing the transactions that are written and removed from your hard disk. It makes for a faster and more promising data recovery should your server ever suffers a hard crash (power outage or kernel crash). Journals sure do have their merits, but there are times when you don’t want them either. One reason is because your server is using a Solid State disk. These drives are SO much faster then traditional (mechanical) hardrives, but the trade off is they don’t like unnecessary writes. Disabling journaling is a way of prologging the life of these kind of drives.
In a nutshell… if you’re getting this warning about journaled quota being disabled, it’s not a bad thing. In the example I’m using, the ‘/’ (ext4) partition is in fact residing on a Solid State hardrive, so I’m already fully aware of my scenario and know that the filesystem was formatted with out journaling enabled. So if it’s disabled already on your system too, think twice before enabling it; it is probably disabled for a reason and is completely safe to leave off (despite this warning).
Now we can activate the quota system:
quotaon -av
You should see the following output (/dev/vda will be replaced with whatever device your currently watching quotas with):
/dev/vda [/]: group quotas turned on
/dev/vda [/]: user quotas turned on
Now you can look at the restrictions put in place:
[root@node01 ~]# repquota -a
*** Report for user quotas on device /dev/vda
Block grace time: 7days; Inode grace time: 7days
                        Block limits                File limits
User            used    soft    hard  grace    used  soft  hard  grace
----------------------------------------------------------------------
root      -- 1212596       0       0          32284     0     0
postfix   --      60       0       0             38     0     0
nuxref    --      60       0       0             10     0     0
apache    --      12       0       0              3     0     0
postgres  --      16       0       0              4     0     0
The quota are identified under the soft and hard columns which are all zero’s (0). This means there are no restrictions in place at all.
We want to impost a restriction on the nuxref user in my case. I want to restrict this user to 10MB as there is no excuse why I should need more then that if I’m only using the account to check on things or switch to root. This is done using the command edquota username which will pop up an editor allow you to change these fields.
# Edit the nuxref user's quota
edquota nuxref
# Adjusted both the soft and hard limits to 8 and 10 respectively.

[root@node01 ~]# repquota -a
*** Report for user quotas on device /dev/vda
Block grace time: 7days; Inode grace time: 7days
                        Block limits                File limits
User            used    soft    hard  grace    used  soft  hard  grace
----------------------------------------------------------------------
root      -- 1212596       0       0          32284     0     0
postfix   --      60       0       0             38     0     0
nuxref    --      60    8000   10000             10     0     0
apache    --      12       0       0              3     0     0
postgres  --      16       0       0              4     0     0
As you can see, the nuxref user is now restricted to 10 MB. If soft limit (set to 8MB in this example) is reached, an email will be sent to the user and for a ‘grace’ period (default is 6 days), the user will still be able to write more content to this directory. But after the grace period is reached the ‘soft’ limit is identical to the ‘hard’ limit and restricts further writing (until you clean up some space).
It’s worth noting too that we could have acomplished the exact same effect (without using an editor) as above with the following one liner:
# If you script the following; make sure you specify the correct device!
# /dev/vda is used below only because that follows inline with all my
# examples above.
setquota -u nuxref  8000 10000 0 0 /dev/vda
Disk Quotas Key Point If You Use Them:
I want to be clear about this: If you choose to use Disk Quotas, you only really need to lock down the accounts that ‘could’ be compromised. In my examples in this blog, I only have one account (nuxref). It’s not necessary to lock down system accounts like apache, postgres, mysql, etc. NEVER lock down the root user!. Most of you may not even need to do this step; It truly is an extreme (and in most cases unnecessary) precautionary step that only ‘some’ should take.
Heartbleed Security Exploit
This is probably one of the biggest security exploits that has surfaced in the past few years that can compromise many systems (and potentially has been for years). This includes systems such as CentOS 6.5 (or less) allowing attackers to access random (64K) chunks of your RAM (memory) at a time (which is almost never encrypted). This can allow them to extract a lot of sensitive information that they shouldn’t have otherwise been granted access to. If you’ve installed a newer version of CentOS (or Red Hat) than v6.5 you are most likely okay. But with that all said: Make sure your version of OpenSSL is at least 1.0.1e-16!
You can check your version by typing:
# Check the details of your openssl:
rpm -qi openssl
# The output should read this version (at least):
#
Name        : openssl                      Relocations: (not relocatable)
Version     : 1.0.1e                            Vendor: CentOS
Release     : 16.el6_5.7                    Build Date: Mon 07 Apr 2014 10:43:19 PM EDT
# ....
If your version of openssl is not satisfactory, then you should update it immediately to keep your system secure! Download it from the CentOS repositories directly, or use yum:
# Get the latest version of openssl
yum update -y openssl
The website heartbleed.com does a fantastic job explaining the details on this exploit if you are interested. The Common Vulnerabilities and Exposures is defined here: CVE-2014-0160.
Credit
This blog took me a very long time to put together and test! If you like what you see and wish to copy and paste this HOWTO, please reference back to this blog post at the very least. It’s really all I ask.
Sources
A lot of what I wrote here was accumulated knowledge over time. I can’t recall where all my sources came from and for that I’m sorry. This blog is more of a brain dump along content I keep in a personal Wiki containing information I’ve been meaning to share with everyone.
Here are some great links that may help you understand some topics discussed here a bit better though:

 An Ademco/Honeywell Vista 15p or 20p alarm system, but it doesn’t mean you can’t keep reading (just as long as your alarm panel is listed here as being supported).
 You’ll need full access to your Honeywell alarm system (usually in the basement) and at least one keypad (usually near the front entrance). Most alarm systems are (and should be) locked up in a small box accessible with a key. You will want this key because you’ll want to lock everything up when we’re done too!
 You’ll need one NuTech AD2USB device which is what will bridge/connect your security system to your Linux Server. The AD2USB device effectively just becomes a second keypad attached to your alarm system.