Tag Archives: Centos

Google Play Music Desktop Player for Linux

Introduction

Google Play Music Desktop Player (GPMDP) is an amazing application. Instead of opening up a browser every time to access your Google Music account (and songs), you can integrate it into your desktop experience instead. One of the best features GPMDP offers is the fact it becomes a standalone application and no longer requires you to have to deal with the memory hogging web browsers (especially Chrome) uses to stream your favorite music!

GPMDP doesn’t stop there though, there are tons of great features it offers that extend the already great functionality Google Music offers! Just to quote directly from their README file:

  • Supports media keys (play, pause, stop, next, previous)
  • last.fm Scrobbling and Now Playing support!
  • Hands free Voice Controls!
  • Desktop notifications on track change
  • A simplistic mini player
  • Customizable Dark theme
  • Smooth scrolling and overlay scrollbars for a nicer user experience.
  • HTML5 Audio Support – No more Adobe Flash Player!
  • Minimize to task bar for background music playing
  • Customizable hotkeys for those who don’t have media keys.
  • Choose your audio output device from within the player.
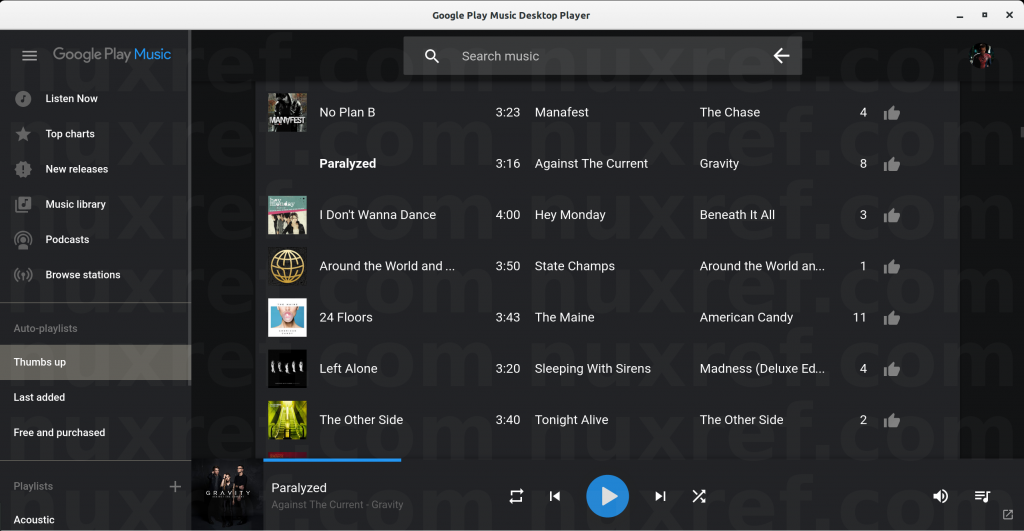
Google Music Dark Theme

I set up this blog because the RPMs distributed from GPMDP’s official website didn’t work for me. So I just ended up repackaging the whole thing and thought I would share my success.

It’s also important to note that this blog assumes you have a subscription to Google Music. If you don’t have one (and don’t intend to get one), then there is no need to read any further. πŸ™‚

Installation

If you are hooked up to my repository, you can upgrade to the latest packages through the following simple command:

  • CentOS (or Red Hat) 7.x:
    # Run as root (or a user with sudoers permission)
    sudo yum -y install --enablrepo=nuxref google-play-music-desktop-player
    
    # Or you can do it manually:
    # I sign everything; so it wouldn't hurt to just grab my key
    rpm --import http://repo.nuxref.com/pub/NUXREF-GPG-KEY
    # Now you can install the player
    rpm -Uhi http://repo.nuxref.com/centos/7/en/x86_64/custom/google-play-music-desktop-player-3.2.1-1.el7.nuxref.x86_64.rpm
    
  • Fedora 22:
    # I sign everything; so it wouldn't hurt to just grab my key
    rpm --import http://repo.nuxref.com/pub/NUXREF-GPG-KEY
    # Now you can install the player
    rpm -Uhi http://repo.nuxref.com/fedora/fc22/en/x86_64/custom/google-play-music-desktop-player-3.2.1-1.fc22.nuxref.x86_64.rpm
    
    
  • Fedora 23:
    # I sign everything; so it wouldn't hurt to just grab my key
    rpm --import http://repo.nuxref.com/pub/NUXREF-GPG-KEY
    # Now you can install the player
    rpm -Uhi http://repo.nuxref.com/fedora/fc23/en/x86_64/custom/google-play-music-desktop-player-3.2.1-1.fc23.nuxref.x86_64.rpm
    
    
  • Fedora 24:
    # I sign everything; so it wouldn't hurt to just grab my key
    rpm --import http://repo.nuxref.com/pub/NUXREF-GPG-KEY
    # Now you can install the player
    rpm -Uhi http://repo.nuxref.com/fedora/fc24/en/x86_64/custom/google-play-music-desktop-player-3.2.1-1.fc24.nuxref.x86_64.rpm
    
    
  • Fedora 25:
    # I sign everything; so it wouldn't hurt to just grab my key
    rpm --import http://repo.nuxref.com/pub/NUXREF-GPG-KEY
    # Now you can install the player
    rpm -Uhi http://repo.nuxref.com/fedora/fc25/en/x86_64/custom/google-play-music-desktop-player-3.2.1-1.fc25.nuxref.x86_64.rpm


Gnome Media Player Shell Extension

Pair this application with the Gnome Media Player Shell Extension and you’ll allow even get desktop notifications when songs change.
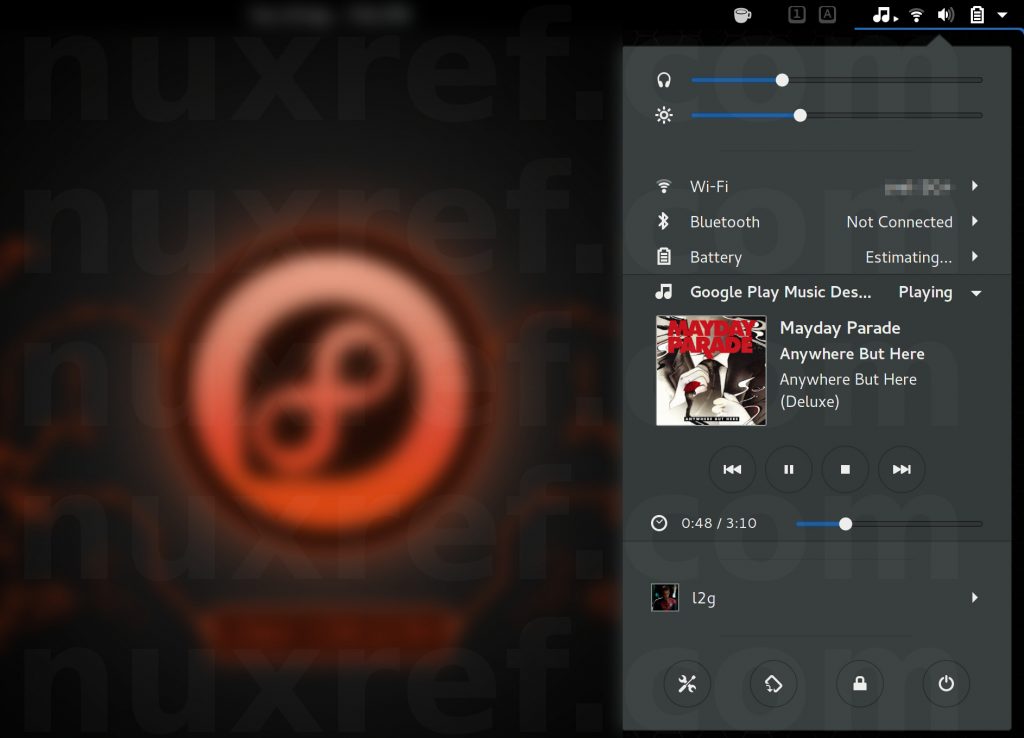
Media Player Gnome Extension

For CentOS / Red Hat 7 users, this extension sometimes does not properly install itself. So to make your life easier, I went ahead and packaged it into it’s own RPM as well. You can install it like so:

# Assuming you're hooked up to my repository, you can
# just easily install it:
sudo yum install --enablerepo=nuxref gnome-shell-extension-mediaplayer

I didn’t forget about the Fedora users either. It’s also in the repository (if you’re hooked up):

# Assuming you're hooked up to my repository, you can
# just easily install it:
sudo dnf install --enablerepo=nuxref gnome-shell-extension-mediaplayer

RPMs

You can also just visit the locations where I posted these RPMs and fetch them manually:

  Google Play Music Desktop Player Gnome Media Player Shell Extension
CentOS/Red Hat 7.x rpm / src rpm / src
Fedora 22 rpm / src rpm / src
Fedora 23 rpm / src rpm / src
Fedora 24 rpm / src rpm / src
Fedora 25 rpm / src rpm / src

Credit

All of the custom packaging in this blog was done by me personally. I took the open source available to me and rebuilt it to make it an easier solution and decided to share it. If you like what you see and wish to copy and paste this HOWTO, please reference back to this blog post at the very least. It’s really all I ask.

Sources

Install NodeJS v0.12 on CentOS 7

Introduction

NodeJS v0.10 presently ships on CentOS/Red Hat 7.x. If you Google around, there are some hacky ways to upgrade NodeJS on your system, but all of them (at least all of the ones I found) don’t manage these upgrades properly through RPMs.

Now the good folks over at nodesource.com attempted to package this all into one RPM but by doing this, they unfortunately violate a number of standards that Red Hat tries to follow. It also causes some conflicts with any existing (NodeJS) packages you may have been using vs simply gracefully upgrading them. This blog merely offers an alternative (more elegant) solution to the same problem nodesource.com already solved.

What is NodeJS?

For those of you who don’t know what it is, it’s a scripting language (like Python and PHP) which allows you to write your code in JavaScript. That’s right, the same language web developers would otherwise write client side code to enhance someones web experience. NodeJS however allows developers to write server side code using this technology.

The tool is constantly evolving and becoming more widely used which is exactly why you need to upgrade your copy to take advantage of the new features it has to offer! πŸ™‚

NodeJS Dependency Nightmare

I’ll be honest up front, NodeJS does suffer from a bit of a dependency nightmare. One component you’ll install will require some other components to work, they in turn will also require components (and so on and so forth). This is no different then other languages, however with NodeJS the problem is that some dependencies don’t connect up with others all the time and some dependencies conflict with another. This prevents you from being able to fully experiment with some of the on-going development and newer features easily. More importantly NodeJS struggles from the lack of Semantic Versioning which is the root cause of the dependency hell we have to work with.

The dependency issues that confront NodeJS are probably the biggest reason it’s not so easily integrated into Linux environments like the other scripting languages are.

The Extra Packages for Enterprise Linux (EPEL) team did do a good job of working out a ton of dependencies for us in the past. But no one seems to be keeping up with this. The packages they provided are old… I mean really old. Even the bleeding edge Linux distributions (Fedora 23 and Ubuntu 15.10 at the time) still ship with NodeJS 0.10 and haven’t updated their NodeJS packages in years either.

The good news is, I’ve worked out ton of these dependencies using many of the current packages available today and also share them on my repository. So although I can’t satisfy the needs of everyone… I can certainly start with my own and share my work in case others are interested! πŸ™‚

The Run Down

This blog focuses on properly providing installable RPMs that follow Red Hat standards. In addition to this, these packages will remain compatible with previous installations of NodeJS:

  • NodeJS v0.12 (from v0.10)
  • npm v3.8.x (from v1.3.x)
  • libuv v.1.9 (from v0.10.x)

Not only that, but I ported over 360+ NodeJS packages into install-able RPMs! They’re certainly not all tested, but it’s a heck of a lot farther then we were before as far as what was available to us.

Installation

Make sure you’ve connected to my repository which is documented here. After that, it’s as simple as the following:

NodeJS

The bread and butter of this entire blog entry. This will haul in the latest libuv packaging as well:

# Run as root (or a user with sudoers permission)
yum install --enablerepo=nuxref nodejs

NPM

If you want to stray away from the 360+ packages I put together, you can use the latest version of npm to haul in your own.

# Run as root (or a user with sudoers permission)
yum install --enablerepo=nuxref npm

Credit

I may not blog often; but I want to re-assure the stability and testing I put into everything I intend share.

If you like what you see and wish to copy and paste this HOWTO, please reference back to this blog post at the very least; it’s really all that I ask of you.

Sources

None of this would have been possible if I hadn’t referenced the following:

Permanently Ban Those Caught By Fail2Ban

Introduction

Fail2ban is probably one of the best intrusive detection based tools an administrator can deploy onto their system. This is especially the case if your system is connected to the internet. If you aren’t already using it; consider reading my blog entry here that talks about it.

In this blog, I provide a scripted solution that will capture the current list of banned users from Fail2Ban and make their ban permanent. This allows us to limit the constant emails one might receive about the same people trying to compromise our system(s). For those who aren’t using the emailing portion of Fail2Ban; this script still greatly takes the load off of Fail2Ban because it no longer has to manage the constant repeat offenders. Our logs are less cluttered too.

The script will address several things:

  1. It will handle multiple attacks from people within the same Class C type netmask.
  2. It will allow for the permanent bans to stick even after your system is rebooted. Unlike Fail2Ban’s list of blocked perpetrators, which is lost if the system (or iptables) is restarted.
  3. It will enforce the use of iptable’s DROP directive instead of REJECT. This is a slightly more secure approach in handling those who aren’t ever allowed to come back.
  4. It will support the fact that over time, you may want to add and remove from this new ban list I keep speaking of. Basically you can re-run the steps outlined in this blog again (and again) and not lose the addresses you’ve already blocked.
  5. The script maintains a global list of addresses in a simple delimited format. You can then choose to share this list with other systems (or colleagues) to block the same unwanted users on these systems too.

Script Dependencies and Requirements

For this script to work, you can virtually use any Linux/FreeBSD/Unix operating system as long as you’re also using fail2ban in conjunction with iptables.

The script makes use of sed, and gawk to massage the data. These tools are common an available to all operating systems. But not all of them necessarily have them installed by default. Make sure you’ve got them before proceeding:

# Fedora / CentOS 4,5,6 / RedHat 4,5,6
yum -i install gawk sed

# Ubuntu / Debian
apt-get install gawk sed

The Goods

Without further ado, the below code is documented quite heavily so that you can just copy the sections into your terminal screen as the systems root user. Don’t try the next section until you’re done with the previous.

Although this code works for me, I still must caution you all the same: I will not be held liable for any loss, damage or expense as a result of the actions taken by my script. I’ve only used it without problem with CentOS 6.x. That said, the simplicity of it should make it work with any other *nux based OS as well.

# Author: Chris Caron
# Date: Tue, Apr 7th, 2015
########################################
# Environment Variables
########################################
# YOU MUST CORRECTLY SET THESE OR THE REMAINING FUNCTIONS OF
# THIS CODE WILL NOT WORK CORRECTLY.
#
# THIS SCRIPT ASSUMES YOU ARE RUNNING AS 'root'
#
# Public Ethernet Device
# For my home system, i have this set to ppp0; You'll want to
# set this to the Ethernet device that harm can venture from.
# such as the internet.
PUBDEV=eth0

# The name of the iptables chain to manage the permanent bans
# within. The name doesn't matter so long that it doesn't
# collide with a chain you're already managing.
# Also, Do not change this value in the future because that
# will hinder the ability to upgrade/append new bans easily.
# It is doubtful that it's current set value will conflict
# with anything. Therefore just leave the name the way it is
# now:
FILTER=nuxref-perm-ban

# The script makes an effort to detect IP Addresses all
# coming from the same Class C type network.  Rather then
# have an entry per IP like fail2ban manages; we group
# them into 1 to speed the look-ups iptables preforms.
# You'll want to identify the minimum number of IP
# addresses matched within the same alike (Class C) network
# before this grouping takes place.
CLASSCGRP_MIN=2

# IP Tables configuration file read during your system
# startup.
IPTABLES_CFG=/etc/sysconfig/iptables

# IPTables Chain Index
# Identify where you want your ban list to be applied
# To reduce overhead, the banlist should be processed 'after'
# some core checks you do.  For example I have a series of other
# checks i do first such as allowing already established
# connections to pass through.  I didn't want the ban list
# being applied to these, so for my system, i set this to 11.
# Setting it to 1 is safe because it guarantees it's at least
# processed first on systems who don't actively maintain their
# own custom firewall list.
CHAINID=1

########################################
# Preparation
########################################

# First we built a massive sorted and unique list of
# already banned IP addresses.
# The below is clever enough to include previous content
# you've banned from before (if any exists):
(
   # carry over old master list
   iptables -L -n | awk "/Chain $FILTER/, $NF ~ /RETURN/" | 
    egrep DROP | sed -e 's/^[^0-9.]*([0-9]+.[0-9]+.[0-9]+).([0-9/]+).*/1 .2/g'
   # update master list with new data
   iptables -L -n | egrep REJECT | 
    sed -e 's/^[^0-9.]*([0-9]+.[0-9]+.[0-9]+).([0-9]+).*/1 .2/g'
) | sort -n | uniq > list
 
# Now we build a separate list (in memory) that will track
# all of the ip addresses that met our $CLASSCGRP_MIN flag.
CLASSC_LIST=$(cat list | cut -f1 -d' ' | uniq -c | 
    sed 's/^ *//g' | sort -n | 
    awk "int($1)>=$CLASSCGRP_MIN" | cut -f2 -d' ')
 
# We eliminate the duplicates already pulled into memory
# from the master list of IPs
for NW in $CLASSC_LIST; do sed -i -e "/^$NW /d" list; done

# Now we scan our list and repopulate them into our master
# list. We place these entries at the head of the file so
# that they'll be added to our iptable ban chain first.
for NW in $CLASSC_LIST; do sed -i "1s/^/$NW .0/24n/" list; done

# Using our list of banned IP addresses, we now generate
# the actual iptable entries (into a file called
# 'commands':
(
   # Creates the chain
   echo iptables -N $FILTER
 
   # Build List of Addresses using our list file
   while read line; do           
      IP=$(echo $line | tr -d '[:space:]')
      echo iptables -A $FILTER -s $IP -j DROP;
   done < list
 
   # Allow future iptable processing to continue 
   # after reading through this chain by appending
   # the RETURN action.
   echo iptables -A $FILTER -j RETURN
 
   # Add chain to INPUT
   echo iptables -t filter -I INPUT $CHAINID -i $PUBDEV -j $FILTER
) > commands

########################################
# IPTables (Temporary Instalment)
########################################

# Have a look at our commands if you want:
cat commands

# Apply these new rules now with the following command:
sh commands

# The commands generated in the 'commands' text file 
# are only temporary; they will be lost if your
# machine (or iptables) is ever restarted

########################################
# IPTables (Permanent Installation)
########################################
# Consider making a backup of your configuration in case you
# need to roll back
/bin/cp -f $IPTABLES_CFG $IPTABLES_CFG.backup

# Now we generate all of the commands needed to place
# into our iptables configuration file:
sed -e 's/^iptables[ ]*//g' commands | 
    egrep "^-A $FILTER -s " > commands-iptables
# Clean up old configuration
sed -i -e "/^:$FILTER -/d" "$IPTABLES_CFG"
sed -i -e "/^-A INPUT .* $FILTER$/d" "$IPTABLES_CFG"
sed -i -e "/^-A $FILTER -/d" "$IPTABLES_CFG"
 
# Now push all of our new ban entries into the iptables file
sed -i -e "/:OUTPUT .*/a:$FILTER - [0:0]" "$IPTABLES_CFG"
sed -i -e "/:$FILTER - .*/a-A INPUT -i $PUBDEV -j $FILTER" "$IPTABLES_CFG"
sed -i -e "/-A INPUT -i $PUBDEV -j $FILTER.*/r commands-iptables" "$IPTABLES_CFG"

# Now preform the following to reset all of the fail2ban
# jails you've got as well load your new permanent ban setup
service fail2ban stop
service iptables restart
service fail2ban start

# If you have a problem; just roll back your backup you
# created and rerun the 3 commands above again. You can
# have a look at the table with the following command:
iptables -L -n -v

########################################
# IPTables (Optional Tiding)
########################################
# the above will insert the banlist at the top
# The below will just correct this and move it
# clean entry(s) from INPUT
(
   while [ 1 -eq 1 ]; do
      ID=$(iptables -nL --line-numbers | 
           egrep "^[0-9]+[ t]+$FILTER " | 
           head -n 1 | 
           sed -e 's/^([0-9]+).*/1/g')
      [ -z "$ID" ] && break;
      iptables -D INPUT $ID
   done
   # Re insert at the correct $CHAINID
   iptables -t filter -I INPUT $CHAINID -i $PUBDEV -j $FILTER
)

# have another look if you want (if you tidied)
iptables -L -n -v

########################################
# Cleanup (Optional)
########################################
# Remove temporary files when your done; or save them if you
# want to port this data to another server:
rm -f list commands commands-iptables

You can undo and destroy the new entries an any time using the following:

# disassociate filter from INPUT
while [ 1 -eq 1 ]; do
   ID=$(iptables -nL --line-numbers | 
        egrep "^[0-9]+[ t]+$FILTER " | 
        head -n 1 | 
        sed -e 's/^([0-9]+).*/1/g')
   [ -z "$ID" ] && break;
   iptables -D INPUT $ID
done
# flush filter
iptables -F $FILTER
# remove filter
iptables -X $FILTER

Credit

This blog took some time to put together and test! If you like what you see and wish to copy and paste this HOWTO, please reference back to this blog post at the very least. It’s really all I ask.

Sources

There were not many sources used to make this entry. Most of it is just shell scripting knowledge I’ve adopted over the years mixed with some iptable commands. Here are some sources anyway that are applicable: