Tag Archives: Fedora

Google Play Music Desktop Player for Linux

Introduction

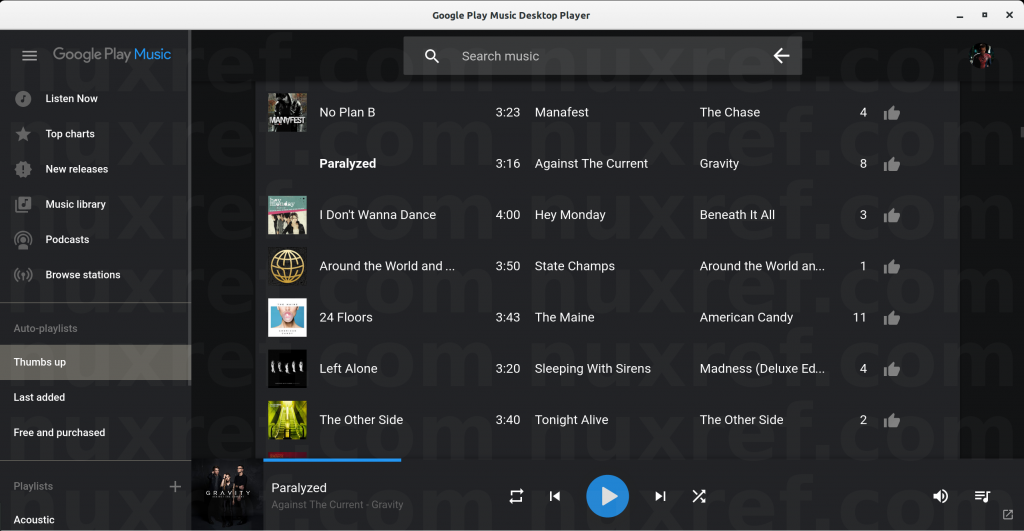
Google Play Music Desktop Player (GPMDP) is an amazing application. Instead of opening up a browser every time to access your Google Music account (and songs), you can integrate it into your desktop experience instead. One of the best features GPMDP offers is the fact it becomes a standalone application and no longer requires you to have to deal with the memory hogging web browsers (especially Chrome) uses to stream your favorite music!

GPMDP doesn’t stop there though, there are tons of great features it offers that extend the already great functionality Google Music offers! Just to quote directly from their README file:

  • Supports media keys (play, pause, stop, next, previous)
  • last.fm Scrobbling and Now Playing support!
  • Hands free Voice Controls!
  • Desktop notifications on track change
  • A simplistic mini player
  • Customizable Dark theme
  • Smooth scrolling and overlay scrollbars for a nicer user experience.
  • HTML5 Audio Support – No more Adobe Flash Player!
  • Minimize to task bar for background music playing
  • Customizable hotkeys for those who don’t have media keys.
  • Choose your audio output device from within the player.
Google Music Dark Theme

I set up this blog because the RPMs distributed from GPMDP’s official website didn’t work for me. So I just ended up repackaging the whole thing and thought I would share my success.

It’s also important to note that this blog assumes you have a subscription to Google Music. If you don’t have one (and don’t intend to get one), then there is no need to read any further. 🙂

Installation

If you are hooked up to my repository, you can upgrade to the latest packages through the following simple command:

  • CentOS (or Red Hat) 7.x:
    # Run as root (or a user with sudoers permission)
    sudo yum -y install --enablrepo=nuxref google-play-music-desktop-player
    
    # Or you can do it manually:
    # I sign everything; so it wouldn't hurt to just grab my key
    rpm --import http://repo.nuxref.com/pub/NUXREF-GPG-KEY
    # Now you can install the player
    rpm -Uhi http://repo.nuxref.com/centos/7/en/x86_64/custom/google-play-music-desktop-player-3.2.1-1.el7.nuxref.x86_64.rpm
    
  • Fedora 22:
    # I sign everything; so it wouldn't hurt to just grab my key
    rpm --import http://repo.nuxref.com/pub/NUXREF-GPG-KEY
    # Now you can install the player
    rpm -Uhi http://repo.nuxref.com/fedora/fc22/en/x86_64/custom/google-play-music-desktop-player-3.2.1-1.fc22.nuxref.x86_64.rpm
    
    
  • Fedora 23:
    # I sign everything; so it wouldn't hurt to just grab my key
    rpm --import http://repo.nuxref.com/pub/NUXREF-GPG-KEY
    # Now you can install the player
    rpm -Uhi http://repo.nuxref.com/fedora/fc23/en/x86_64/custom/google-play-music-desktop-player-3.2.1-1.fc23.nuxref.x86_64.rpm
    
    
  • Fedora 24:
    # I sign everything; so it wouldn't hurt to just grab my key
    rpm --import http://repo.nuxref.com/pub/NUXREF-GPG-KEY
    # Now you can install the player
    rpm -Uhi http://repo.nuxref.com/fedora/fc24/en/x86_64/custom/google-play-music-desktop-player-3.2.1-1.fc24.nuxref.x86_64.rpm
    
    
  • Fedora 25:
    # I sign everything; so it wouldn't hurt to just grab my key
    rpm --import http://repo.nuxref.com/pub/NUXREF-GPG-KEY
    # Now you can install the player
    rpm -Uhi http://repo.nuxref.com/fedora/fc25/en/x86_64/custom/google-play-music-desktop-player-3.2.1-1.fc25.nuxref.x86_64.rpm


Gnome Media Player Shell Extension

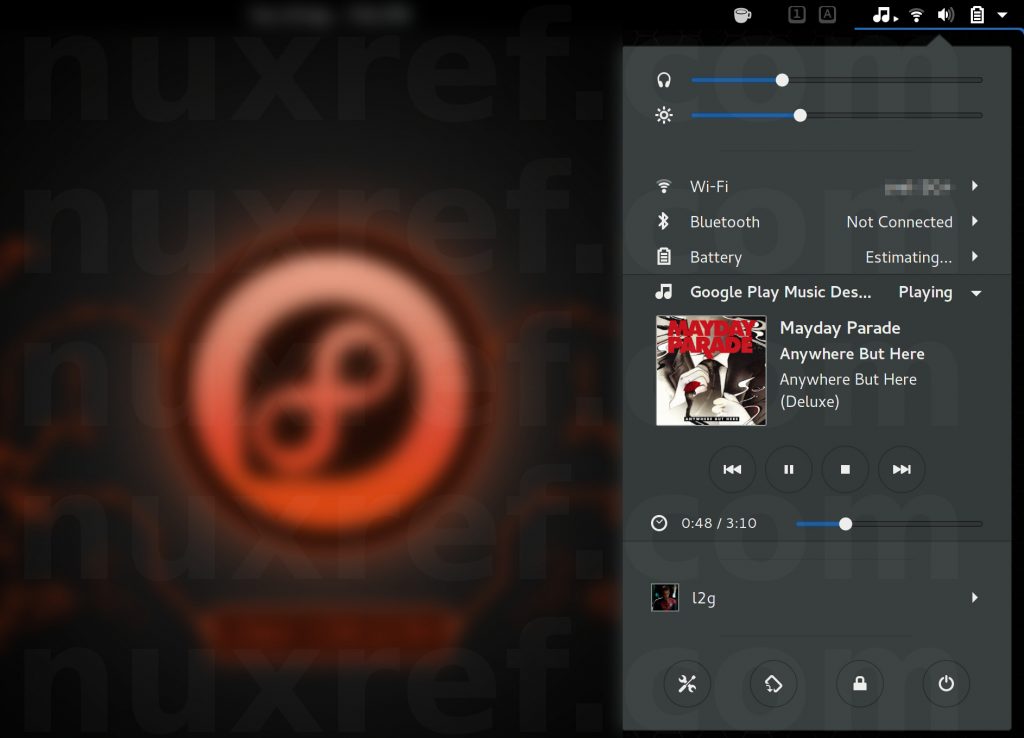
Pair this application with the Gnome Media Player Shell Extension and you’ll allow even get desktop notifications when songs change.

Media Player Gnome Extension

For CentOS / Red Hat 7 users, this extension sometimes does not properly install itself. So to make your life easier, I went ahead and packaged it into it’s own RPM as well. You can install it like so:

# Assuming you're hooked up to my repository, you can
# just easily install it:
sudo yum install --enablerepo=nuxref gnome-shell-extension-mediaplayer

I didn’t forget about the Fedora users either. It’s also in the repository (if you’re hooked up):

# Assuming you're hooked up to my repository, you can
# just easily install it:
sudo dnf install --enablerepo=nuxref gnome-shell-extension-mediaplayer

RPMs

You can also just visit the locations where I posted these RPMs and fetch them manually:

  Google Play Music Desktop Player Gnome Media Player Shell Extension
CentOS/Red Hat 7.x rpm / src rpm / src
Fedora 22 rpm / src rpm / src
Fedora 23 rpm / src rpm / src
Fedora 24 rpm / src rpm / src
Fedora 25 rpm / src rpm / src

Credit

All of the custom packaging in this blog was done by me personally. I took the open source available to me and rebuilt it to make it an easier solution and decided to share it. If you like what you see and wish to copy and paste this HOWTO, please reference back to this blog post at the very least. It’s really all I ask.

Sources

Unlock and Root Your Nexus Using Linux

Introduction

I’ve had a lot of trouble gathering information on how to unlock and root my Nexus 6 phone (having never done anything like this before). The information on how to do this is definitely out there, but it’s all over the place in bits and pieces. So that’s where this blog comes in; I tried to group everything I learned after successfully rooting my phone and installing TWRP on it.

This diagram explains very loosely how the upgrades work; the diagram will make more sense as you read on.
Nexus Upgrade In Nutshell
Here are the topics of interest:

  • Installing the Android SDK and preparing a useful (Linux) Environment: This step is important in order to be able to interact with your device and update it via a USB cable attached to your PC. It specifically focuses on enabling the use of the adb and fastboot tools. This entire blog is useless to you if you don’t have this part set up.
  • Enabling Debug (Developer) Mode on your Android device: This step pairs with the SDK. The SDK allows your PC to communicate with your Android device while this step allows your device to be communicated with. Each device you plan on unlocking or rooting will have to have Debug Mode turned on.
  • Unlock Your Bootloader: You can not root your device unless your bootloader is unlocked. This action opens your device up to a world of tweaks and hacks. Note: this step can also can void your warranty.
  • Root Your Device: You can not root your device unless your bootloader is unlocked. This step focuses on using the excellent work of Chainfire‘s (CF-)Auto-Root boot.img and SuperSU application.
  • Upgrade Your Rooted Device: When Google puts out their new Over The Air (OTA) upgrade. You’ll notice that rooted devices won’t successfully get upgraded. Don’t worry; nothing breaks, the update simply fails. I identify the steps here how you can play along and still upgrade your rooted device.

A few other things worth sharing:

  • Fantastic Android (Root Required) Apps: Got your Android device rooted? Here are some amazing applications worth installing on it.
  • TWRP Setup: TWRP allows you to try out custom firmware. This is one of the fantastic apps i had to make a separate section for since it’s setup can be a bit confusing if you’ve never done it before.
  • Backups and Restores: Just some tips I found on creating backups and their accompanied restoring operations (in a time of need).

Getting Started

I performed all of the steps below on a Fedora 20 Linux box, but it should work on any variation of Linux (the instructions that is). Please note that these steps are specifically geared towards a Nexus 6, but I’m sure any competent person can adjust what is identified here to work with their own Android device (phone/tablet) too. 🙂

Android SDK Preparation

This step is vital for the two-way communication to your device using your PC. I did the following using Fedora 20; but the rules don’t change for most distributions.

  1. As root, make sure the proper libraries are installed and available to your environment:
    # You'll need the 32-bit version of libstdc and the JDK 
    yum install libstdc++.i686 java-1.7.0-openjdk -y
    
  2. Download the full Android SDK here (scroll to the bottom of the page>DOWNLOAD FOR OTHER PLATFORMS>SDK Tools Only). At the time I did this, the file was called: android-sdk_r24.0.2-linux.tgz.
    # Alternatively, you can fetch it this way
    # (as long as the site doesn't change their paths around):
    wget http://dl.google.com/android/android-sdk_r24.0.2-linux.tgz
    
  3. Install it’s contents into a workable directory; the following prepared my development environment placing everything in ”’~/Development/Android/SDK”’:
    mkdir -p ~/Development/Android/SDK
    # Extract contents of the SDK into our newly created directory
    # the --strip 1 eliminates the parent directory (called android-sdk-linux)
    # we just want the root of this to go into the SDK directory instead
    tar xvfz android-sdk_r24.0.2-linux.tgz -C ~/Development/Android/SDK --strip 1
    
  4. The following will allow regular users to utilize the fastboot command. Without this step, you must switch to root to utilize the command.

    cat < /etc/udev/rules.d/51-android.rules
    # Nexus 6 ID: 18d1
    SUBSYSTEM=="usb", ATTR{idVendor}=="18d1", MODE="0666", GROUP="plugdev" 
    _EOF
    chmod 644 /etc/udev/rules.d/51-android.rules
    
  5. Now we need to add a few more tools to complete our setup. This can be done through the tools/android binary.

    # Create an environment variable to simplify the commands
    ASDK="$HOME/Development/Android/SDK"
    # Change to our development directory
    pushd $ASDK
    # Update our path
    export PATH="$PATH$ASDK/tools:$ASDK/platform-tools"
    
    # Install (the following were in the SDK r24.0.2 package)
    # they may be different in yours.
    #  1- Android SDK Platform-tools
    #  2- Android SDK Build-tools
    # 57- Android Support Library
    #
    # The following command lists all of the packages you can install:
    #    > android list sdk
    #
    # If you want to be certain you grab the right packages and
    # are using a different release, here is a cheat that will
    # fetch this information for you:
    PACKAGES=$(tools/android list sdk --extended | 
                egrep -B2 -i 'Android (Support Library|SDK Platform-tools|SDK Build-tools)' | 
                egrep '^id:' | 
                sed -e 's/[^"]+"([^"]+)"/1/g' | 
                cut -d- -f1 | tr -s '[:space:]' , | 
                sed -e 's/,+$//g')
    
    # Now install our packages! (if there are any to install)
    android update sdk -u -a -t $PACKAGES
    
    # if you get the following error, it's because you didn't install
    # libstdc++ as identified in an earlier setup:
    #   ...
    #   Stopping ADB server failed (code 127).
    #   Starting ADB server failed (code 127).
    #   Done. 3 packages installed.
    #
    # To fix this, make sure you have installed the 32-bit libstd++ (as root):
    #    yum install libstdc++.i686
    #
    # After it's installed, you can restart the adb server with the
    # following command:
    #     adb start-server
    

    Alternatively, you can just launch the tools/android binary and use the GUI to set things up. You will need to install the following (3) packages (minimally):

    1. Tools >> Android SDK Tools
    2. Tools >> Android SDK Platform-tools
    3. Extras >> Android Support Library
  6. You can test to see if you’ve got everything working by preforming the following:
    # Tests if the adb-server is successfully running
    adb version
    
    # NOTE:
    # If it doesn't work, don't panic (yet); try killing the server
    # (it's possible it's not even running) and restarting it:
    adb kill-server
    adb start-server
    
    
  7. Now try testing the command identified earlier again:
    adb version

    If it displays Android Debug Bridge version x.x.x, then you’ve completed the first part successfully.

Enable Development / Debugging Mode on Device

You must log into your device and access the settings to enable Development / Debugging mode:

  1. Go into Settings.
  2. Under About, you’ll be able to locate your Build Number.
  3. Tap Build Number 7 times until you are notified that you have activated Developer options.
  4. Go into Developer Options, ensure it is enabled and check the Enable OEM Unlock checkbox.
  5. While in Developer Options, ensure the USB Debugging checkbox is checked too.

Unlock the Bootloader

Once the bootloader is unlocked, your Android device will prompt you that it will erase everything.
Before proceeding with this step, make sure you’ve backed up everything important to you. Preferably you’re doing this step with a brand new device so you have nothing to lose at this time.

  1. Turn the device off (if it’s on already) and turn it back on while holding the volume down and the power button at the same time. This will start your device into the bootloader/fastboot mode.
  2. Plug the device into your PC (via a USB cable), then open a command prompt window window and type the following:
    # Create an environment variable to simplify the commands
    ASDK="$HOME/Development/Android/SDK"
    # Change to our development directory
    pushd $ASDK
    # Update our path
    export PATH="$PATH:$ASDK/tools:$ASDK/platform-tools"
    
    # list the devices detected in fastboot mode:
    fastboot devices
    

    If your device’s serial number shows up, you are good to go! If not, you’ll need to figure this part out before continuing.

  3. This next step will completely wipe EVERYTHING off of your device. Make sure to back up anything worth saving before proceeding. If you’re having second thoughts about this; now is the time to back out. You can reboot your device again and it will return how it was.

    Otherwise, for all intent and purposes, unlock the bootloader with the following command:

    fastboot oem unlock

    On the device (still attached to the computer), a screen should pop up asking whether or not you would like to unlock the bootloader. Use the volume rockers to highlight “Yes” then press power to confirm the action.
    After the above command has finished executing, run the following to restart your device:

    fastboot reboot

    The device will reboot at this time.

    Next you will be presented with a screen containing an Android logo as well as a progress bar. It can take about 8 minutes or so to finish.

    When it’s complete, it will restart and act as though it was the first time you’ve ever turned on the device. There is no sense in doing anything yet, we still have a few more steps to do. Just power off the device at this time and keep reading.

Root Your Android Device

Your bootloader must be unlocked for this step to work correctly. Otherwise, you can root your device with the following actions:

  1. Download the Chainfire‘s (CF-)Auto-Root tool to automate everything for you downloadable from here.
  2. Extract the ZIP file to your Desktop; this makes it easy to access.
  3. Turn the device off (if it’s on already) and turn it back on while holding the volume down + power button at the same time. This will start your device into the bootloader/fastboot mode.
  4. Plug the device into your PC (via a USB cable), then open a command prompt window window and type the following:
    # Create an environment variable to simplify the commands
    ASDK="$HOME/Development/Android/SDK"
    # Change to our development directory
    pushd $ASDK
    # Update our path
    export PATH="$PATH:$ASDK/tools:$ASDK/platform-tools"
    
    # Create a directory to place the Auto-Root contents in:
    mkdir -p "$ASDK/autoroot"
    
    # Uncompress contents to this directory:
    unzip CF-Auto-Root-shamu-shamu-nexus6.zip -d "$ASDK/autoroot"
    
    # Reboot your device into bootloader mode (power+volume down or this option):
    adb reboot bootloader
    
    # Now root your device with the following commands:
    IMAGE=$(find autoroot/image -type f -name '*.img')
    chmod ug+x autoroot/tools/fastboot-linux
    autoroot/tools/fastboot-linux boot "$IMAGE"
    

Upgrade Your Rooted Device

When Android v5.1 came out; the OTA failed (rebooted to an ‘error’). I had to fetch the stock version I was currently running so I could specifically just flash 2 images (system and recovery).

  1. Setup your development environment
    # Create an environment variable to simplify the commands
    ASDK="$HOME/Development/Android/SDK"
    # Change to our development directory
    pushd $ASDK
    # Update our path
    export PATH="$PATH:$ASDK/tools:$ASDK/platform-tools"
    
  2. The point of this section is you want to update your Android ‘without’ losing your data.Nexus 6 Settings Build Number

    Download the stock firmware associated with the (rooted) version currently installed on your device here. The steps below will show you how you can access what is important from what you just downloaded.

    The best way to be sure you’re downloading the correct version is to go into the About settings of your device and pay attention to Build number identified at the bottom. You just need to download and work with this version as your base.

    # 5.0.1 shamu Stock (Nexus 6); You will need to visit the following
    # website to get the right firmware for your device if it's not the
    # same version I'm using: 
    # - https://developers.google.com/android/nexus/images
    #
    wget https://dl.google.com/dl/android/aosp/shamu-lrx22c-factory-ff173fc6.tgz
    mkdir -p "$ASDK/firmware.nexus.6-shamu.5.0.1"
    tar xvfz shamu-lrx22c-factory-ff173fc6.tgz -C "$ASDK/firmware.nexus.6-shamu.5.0.1"  --strip 1
    
    # Change into our Firmware Directory
    pushd "$ASDK/firmware.nexus.6-shamu.5.0.1"
    
    ######################################
    # After previously running the update from 5.0.1 to 5.1.0
    # My Nexus was updated to LMY47D (seen from options)
    # So this can be set up as follows:
    wget https://dl.google.com/dl/android/aosp/shamu-lmy47d-factory-6c44d402.tgz
    mkdir -p "$ASDK/firmware.nexus.6-shamu.5.1.0"
    tar xvfz shamu-lmy47d-factory-6c44d402.tgz -C "$ASDK/firmware.nexus.6-shamu.5.1.0"  --strip 1
    
    # Change into our Firmware Directory
    pushd "$ASDK/firmware.nexus.6-shamu.5.1.0"
    
    ######################################
    # After the update from 5.1.0 to 5.1.1 was successful
    # I checked for the version i was running for a recovery
    # point (in the future)
    # My Nexus was updated to LMY47Z (seen from options)
    # So this can be set up as follows:
    wget https://dl.google.com/dl/android/aosp/shamu-lmy47z-factory-33951732.tgz
    mkdir -p "$ASDK/firmware.nexus.6-shamu.5.1.1"
    tar xvfz shamu-lmy47z-factory-33951732.tgz -C "$ASDK/firmware.nexus.6-shamu.5.1.1"  --strip 1
    
    # Change into our Firmware Directory
    pushd "$ASDK/firmware.nexus.6-shamu.5.1.1"
    
    ######################################
    # The below applies to any firmware previously downloaded above
    
    # Extract the system images next
    unzip *.zip -d image
    
    # Reboot your device into bootloader mode (power+volume down or this option):
    adb reboot bootloader
    
    # Flash the 2 critical images that will allow your OTA to properly
    # update itself. You will loose 'root' if you've done so.
    # Don't worry; you won't lose your data when you do this.
    fastboot flash system image/system.img
    fastboot flash recovery image/recovery.img
    
    # If you've got other boot modifications (mods) installed (such as TWRP
    # or BusyBox) running your Android device in an unencrypted mode,
    # you should additionally run the following:
    fastboot flash boot image/boot.img
    
    # If you have nothing to lose and just want to completely reset
    # your device to the version you downloaded, you can run the command:
    #    ./flash-all.sh
    # Otherwise, don't do this (to save your data)!! Just move on
    # to the next command identified below to reboot.
    
    # Your device no longer has root access at this point
    # you can reboot it now
    fastboot reboot
    
    popd
    
  3. Nexus 6 OTA UpdateAfter the reboot, you will have lost your root privileges. However, you can now upgrade using the OTA update Google provides. Once the OTA upgrade has complete, you can re-root your device using the steps already identified above.

Fantastic (Root Requiring) Apps to Install

Here are some great apps worth installing on your rooted devic:

If you’re feeling brave and want to start playing with custom firmware:

If I forgot one, or you have one to share; please feel free to let me know and I’ll add it!

TWRP Setup

TWRP allows you to backup your firmware as well as flash and install/uninstall custom firmware. It requires (Stericson) BusyBox or BusyBox Pro to work correctly. Naturally it also requires that your device is rooted already. Here are the devices TWRP support. For the Nexus 6; here is the direct link.

You can think of this application has installing 2 key components onto your device:

  • The .apk (front end application) which provides you with some rudimentary control to it’s backend. This is a simple app you just download from the Google Play store here.

    It provides you with the ability to flash the backend for you. I’ll explain how to flash it manually below; the only advantage of doing it manually is you can use some of the newer firmware that hasn’t made it back to the .apk yet. That and you know for certain you’ll flash the right ROM as using the .apk gives you the ‘chance’ to brick your device through accidental choice selections.

  • The backend itself. This is the beauty behind TWRP. It’s an image file you need to flash directly to your device (overwrite the stock version). Through this you can:
    1. Backup your entire device’s state (everything; including the firmware you’re running)
    2. Restore any previous backup you already created.
    3. Flash a new custom firmware you feel is worth trying without worry for if something goes wrong, you can just restore a backup. Note: It’s presumed that the first thing you do once you get this software installed is backup your current system so you have a good restore point.
  1. Setup your development environment
    # Create an environment variable to simplify the commands
    ASDK="$HOME/Development/Android/SDK"
    # Change to our development directory
    pushd $ASDK
    # Update our path
    export PATH="$PATH:$ASDK/tools:$ASDK/platform-tools"
    
  2. The point of this section is you want to update your Android ‘without’ losing your data.

    Download the stock firmware associated with the (rooted) version currently installed on your device here and prepare it’s content. If you have nothing to loose; the easiest way is to just flash everything using the latest stock firmware. But if you’re like me; here is the custom steps i took to upgrade from 5.0.1 to 5.1.0.

    # 2.8.6.0 shamu Stock (Nexus 6); You will need to visit the following
    # website to get the right firmware for your device if it's not the
    # same version I'm using:
    # - http://dl.twrp.me/shamu/
    
    [ ! -d "$ASDK/twrp/" ] && mkdir -p "$ASDK/twrp/"
    pushd "$ASDK/twrp/"
    # At the time; the latest image was twrp-2.8.6.0-shamu.img
    curl --referer http://dl.twrp.me/shamu/twrp-2.8.6.0-shamu.img 
         -O http://dl.twrp.me/shamu/twrp-2.8.6.0-shamu.img
    
    # Reboot your device into bootloader mode (power+volume down or this option):
    adb reboot bootloader
    
    # Flash the recovery image with TWRP's version
    fastboot flash recovery twrp-2.8.6.0-shamu.img
    
    # You now have TWRP installed
    fastboot reboot
    
    popd
    

Backup / Restore

  • TWRP allows you to preform full backups and restores of your device without the need of a PC connected to it. It doesn’t hurt to use this option. In order to do this; it needs to modify the recovery ROM of your device. But this isn’t really a big deal since you can easily flash it back to where it was using the firmware provided on Google’s website. Note: This application requires that your device is already rooted.
  • Titanimum Backup allows you to backup your applications and even clean out the ones you don’t want. This application is an absolutely MUST for all rooted devices!
  • Android SDK supports backups and restores too.Here is a great forum post explaining the whole operation in great detail; but in short the following commands will do the trick (assuming your device is powered on).
    # Create an environment variable to simplify the commands
    ASDK="$HOME/Development/Android/SDK"
    # Update our path
    export PATH="$PATH:$ASDK/tools:$ASDK/platform-tools"
    
    # Create Backup
    adb backup -f $(date +'%Y.%m.%d-nexus6.backup') -apk -shared -all
    
    # You can later restore this file with the command:
    adb restore YYYY.MM.DD-nexus6.backup
    

    The nice thing about the built in Android backup and restore commands is that they don’t require a rooted device to use. Your device has to be unlocked and connected to your PC (via USB) for this option to work though! Honestly, if your device is already rooted, then TWRP and Titanium Backup are the best solutions.

Reverting Everything Back

Sometimes you may want to revert everything back to how it was. This is especially an essential step if you have to send your device back to Google (or another carrier) to full fill it’s warranty.

  1. Setup your development environment
    # Create an environment variable to simplify the commands
    ASDK="$HOME/Development/Android/SDK"
    # Change to our development directory
    pushd $ASDK
    # Update our path
    export PATH="$PATH:$ASDK/tools:$ASDK/platform-tools"
    
  2. Download the stock firmware associated with your device here and prepare it’s content.

    # 5.0.1 shamu Stock (Nexus 6); You will need to visit the following
    # website to get the right firmware for your device if it's not the
    # same version I'm using: 
    # - https://developers.google.com/android/nexus/images
    # 2015 Jan - Updated Nexus 6 to v5.1.0; Future flashes for myself
    #            will involve treating that version as my stock instead.
    wget https://dl.google.com/dl/android/aosp/shamu-lrx22c-factory-ff173fc6.tgz
    mkdir -p "$ASDK/firmware.nexus.6-shamu.5.0.1"
    tar xvfz shamu-lrx22c-factory-ff173fc6.tgz -C "$ASDK/firmware.nexus.6-shamu.5.0.1"  --strip 1
    
    # now run the firmware restore
    pushd "$ASDK/firmware.nexus.6-shamu.5.0.1"
    # This command does it all and restarts the device when your done.
    ./flash-all.sh
    popd
    
  3. Now you need to re-lock the device. The easiest way to do this is power on the device with the power and volume down button held down.

    Note: if you are in a unique position where the volume down button doesn’t work (making it impossible to do the bootloader combination; do the following:

    • Log back into your device using any user (it really doesn’t matter); Don’t bother putting your real information in otherwise you’ll have to wait while your device downloads and re-installs all of your apps. The main thing is you need to enable the developer mode again and Debugging Mode. You will be prompted to authorize the connection within your device (make sure to do so).
    • Once Debugging Mode is enabled, you can connect your device up to your laptop and type the following:
      adb reboot bootloader
    • You can safely relock your device with the following command:
      fastboot oem lock
      

      After the above command has finished executing, run the following to restart your device:

      fastboot reboot

      The device will reboot at this time.

    Next you will be presented with a screen containing an Android logo as well as a progress bar. It can take about 8 minutes or so to finish.

    When it’s complete, it will restart and act as though it was the first time you’ve ever turned on the device. You can safely power it off now. It’s good to be shipped back to Google!

Sources

Credit

This blog took me a very long time to put together and test! If you like what you see and wish to copy and paste this HOWTO, please reference back to this blog post at the very least. It’s really all I ask.

Permanently Ban Those Caught By Fail2Ban

Introduction

Fail2ban is probably one of the best intrusive detection based tools an administrator can deploy onto their system. This is especially the case if your system is connected to the internet. If you aren’t already using it; consider reading my blog entry here that talks about it.

In this blog, I provide a scripted solution that will capture the current list of banned users from Fail2Ban and make their ban permanent. This allows us to limit the constant emails one might receive about the same people trying to compromise our system(s). For those who aren’t using the emailing portion of Fail2Ban; this script still greatly takes the load off of Fail2Ban because it no longer has to manage the constant repeat offenders. Our logs are less cluttered too.

The script will address several things:

  1. It will handle multiple attacks from people within the same Class C type netmask.
  2. It will allow for the permanent bans to stick even after your system is rebooted. Unlike Fail2Ban’s list of blocked perpetrators, which is lost if the system (or iptables) is restarted.
  3. It will enforce the use of iptable’s DROP directive instead of REJECT. This is a slightly more secure approach in handling those who aren’t ever allowed to come back.
  4. It will support the fact that over time, you may want to add and remove from this new ban list I keep speaking of. Basically you can re-run the steps outlined in this blog again (and again) and not lose the addresses you’ve already blocked.
  5. The script maintains a global list of addresses in a simple delimited format. You can then choose to share this list with other systems (or colleagues) to block the same unwanted users on these systems too.

Script Dependencies and Requirements

For this script to work, you can virtually use any Linux/FreeBSD/Unix operating system as long as you’re also using fail2ban in conjunction with iptables.

The script makes use of sed, and gawk to massage the data. These tools are common an available to all operating systems. But not all of them necessarily have them installed by default. Make sure you’ve got them before proceeding:

# Fedora / CentOS 4,5,6 / RedHat 4,5,6
yum -i install gawk sed

# Ubuntu / Debian
apt-get install gawk sed

The Goods

Without further ado, the below code is documented quite heavily so that you can just copy the sections into your terminal screen as the systems root user. Don’t try the next section until you’re done with the previous.

Although this code works for me, I still must caution you all the same: I will not be held liable for any loss, damage or expense as a result of the actions taken by my script. I’ve only used it without problem with CentOS 6.x. That said, the simplicity of it should make it work with any other *nux based OS as well.

# Author: Chris Caron
# Date: Tue, Apr 7th, 2015
########################################
# Environment Variables
########################################
# YOU MUST CORRECTLY SET THESE OR THE REMAINING FUNCTIONS OF
# THIS CODE WILL NOT WORK CORRECTLY.
#
# THIS SCRIPT ASSUMES YOU ARE RUNNING AS 'root'
#
# Public Ethernet Device
# For my home system, i have this set to ppp0; You'll want to
# set this to the Ethernet device that harm can venture from.
# such as the internet.
PUBDEV=eth0

# The name of the iptables chain to manage the permanent bans
# within. The name doesn't matter so long that it doesn't
# collide with a chain you're already managing.
# Also, Do not change this value in the future because that
# will hinder the ability to upgrade/append new bans easily.
# It is doubtful that it's current set value will conflict
# with anything. Therefore just leave the name the way it is
# now:
FILTER=nuxref-perm-ban

# The script makes an effort to detect IP Addresses all
# coming from the same Class C type network.  Rather then
# have an entry per IP like fail2ban manages; we group
# them into 1 to speed the look-ups iptables preforms.
# You'll want to identify the minimum number of IP
# addresses matched within the same alike (Class C) network
# before this grouping takes place.
CLASSCGRP_MIN=2

# IP Tables configuration file read during your system
# startup.
IPTABLES_CFG=/etc/sysconfig/iptables

# IPTables Chain Index
# Identify where you want your ban list to be applied
# To reduce overhead, the banlist should be processed 'after'
# some core checks you do.  For example I have a series of other
# checks i do first such as allowing already established
# connections to pass through.  I didn't want the ban list
# being applied to these, so for my system, i set this to 11.
# Setting it to 1 is safe because it guarantees it's at least
# processed first on systems who don't actively maintain their
# own custom firewall list.
CHAINID=1

########################################
# Preparation
########################################

# First we built a massive sorted and unique list of
# already banned IP addresses.
# The below is clever enough to include previous content
# you've banned from before (if any exists):
(
   # carry over old master list
   iptables -L -n | awk "/Chain $FILTER/, $NF ~ /RETURN/" | 
    egrep DROP | sed -e 's/^[^0-9.]*([0-9]+.[0-9]+.[0-9]+).([0-9/]+).*/1 .2/g'
   # update master list with new data
   iptables -L -n | egrep REJECT | 
    sed -e 's/^[^0-9.]*([0-9]+.[0-9]+.[0-9]+).([0-9]+).*/1 .2/g'
) | sort -n | uniq > list
 
# Now we build a separate list (in memory) that will track
# all of the ip addresses that met our $CLASSCGRP_MIN flag.
CLASSC_LIST=$(cat list | cut -f1 -d' ' | uniq -c | 
    sed 's/^ *//g' | sort -n | 
    awk "int($1)>=$CLASSCGRP_MIN" | cut -f2 -d' ')
 
# We eliminate the duplicates already pulled into memory
# from the master list of IPs
for NW in $CLASSC_LIST; do sed -i -e "/^$NW /d" list; done

# Now we scan our list and repopulate them into our master
# list. We place these entries at the head of the file so
# that they'll be added to our iptable ban chain first.
for NW in $CLASSC_LIST; do sed -i "1s/^/$NW .0/24n/" list; done

# Using our list of banned IP addresses, we now generate
# the actual iptable entries (into a file called
# 'commands':
(
   # Creates the chain
   echo iptables -N $FILTER
 
   # Build List of Addresses using our list file
   while read line; do           
      IP=$(echo $line | tr -d '[:space:]')
      echo iptables -A $FILTER -s $IP -j DROP;
   done < list
 
   # Allow future iptable processing to continue 
   # after reading through this chain by appending
   # the RETURN action.
   echo iptables -A $FILTER -j RETURN
 
   # Add chain to INPUT
   echo iptables -t filter -I INPUT $CHAINID -i $PUBDEV -j $FILTER
) > commands

########################################
# IPTables (Temporary Instalment)
########################################

# Have a look at our commands if you want:
cat commands

# Apply these new rules now with the following command:
sh commands

# The commands generated in the 'commands' text file 
# are only temporary; they will be lost if your
# machine (or iptables) is ever restarted

########################################
# IPTables (Permanent Installation)
########################################
# Consider making a backup of your configuration in case you
# need to roll back
/bin/cp -f $IPTABLES_CFG $IPTABLES_CFG.backup

# Now we generate all of the commands needed to place
# into our iptables configuration file:
sed -e 's/^iptables[ ]*//g' commands | 
    egrep "^-A $FILTER -s " > commands-iptables
# Clean up old configuration
sed -i -e "/^:$FILTER -/d" "$IPTABLES_CFG"
sed -i -e "/^-A INPUT .* $FILTER$/d" "$IPTABLES_CFG"
sed -i -e "/^-A $FILTER -/d" "$IPTABLES_CFG"
 
# Now push all of our new ban entries into the iptables file
sed -i -e "/:OUTPUT .*/a:$FILTER - [0:0]" "$IPTABLES_CFG"
sed -i -e "/:$FILTER - .*/a-A INPUT -i $PUBDEV -j $FILTER" "$IPTABLES_CFG"
sed -i -e "/-A INPUT -i $PUBDEV -j $FILTER.*/r commands-iptables" "$IPTABLES_CFG"

# Now preform the following to reset all of the fail2ban
# jails you've got as well load your new permanent ban setup
service fail2ban stop
service iptables restart
service fail2ban start

# If you have a problem; just roll back your backup you
# created and rerun the 3 commands above again. You can
# have a look at the table with the following command:
iptables -L -n -v

########################################
# IPTables (Optional Tiding)
########################################
# the above will insert the banlist at the top
# The below will just correct this and move it
# clean entry(s) from INPUT
(
   while [ 1 -eq 1 ]; do
      ID=$(iptables -nL --line-numbers | 
           egrep "^[0-9]+[ t]+$FILTER " | 
           head -n 1 | 
           sed -e 's/^([0-9]+).*/1/g')
      [ -z "$ID" ] && break;
      iptables -D INPUT $ID
   done
   # Re insert at the correct $CHAINID
   iptables -t filter -I INPUT $CHAINID -i $PUBDEV -j $FILTER
)

# have another look if you want (if you tidied)
iptables -L -n -v

########################################
# Cleanup (Optional)
########################################
# Remove temporary files when your done; or save them if you
# want to port this data to another server:
rm -f list commands commands-iptables

You can undo and destroy the new entries an any time using the following:

# disassociate filter from INPUT
while [ 1 -eq 1 ]; do
   ID=$(iptables -nL --line-numbers | 
        egrep "^[0-9]+[ t]+$FILTER " | 
        head -n 1 | 
        sed -e 's/^([0-9]+).*/1/g')
   [ -z "$ID" ] && break;
   iptables -D INPUT $ID
done
# flush filter
iptables -F $FILTER
# remove filter
iptables -X $FILTER

Credit

This blog took some time to put together and test! If you like what you see and wish to copy and paste this HOWTO, please reference back to this blog post at the very least. It’s really all I ask.

Sources

There were not many sources used to make this entry. Most of it is just shell scripting knowledge I’ve adopted over the years mixed with some iptable commands. Here are some sources anyway that are applicable: