Introduction
We have been relying on the Domain Name System (DNS) since the dawn of the internet. Simply put: it allows us to access information by a human readable string or recognizable name such as google.com or nuxref.com instead of it’s actual IP address (which is not as easily memorizable). If we didn’t have the DNS, then the internet would not have evolved as far as it has today. The DNS was built on a series of Name Servers that are all looking after their respected domain (or zone). Our Internet Service Provider (ISP) is lending us their DNS servers everyday when we connect to them. It’s our wireless router (at home or at work) that passes this server to our tablet, phone, laptop etc… when we connect to it.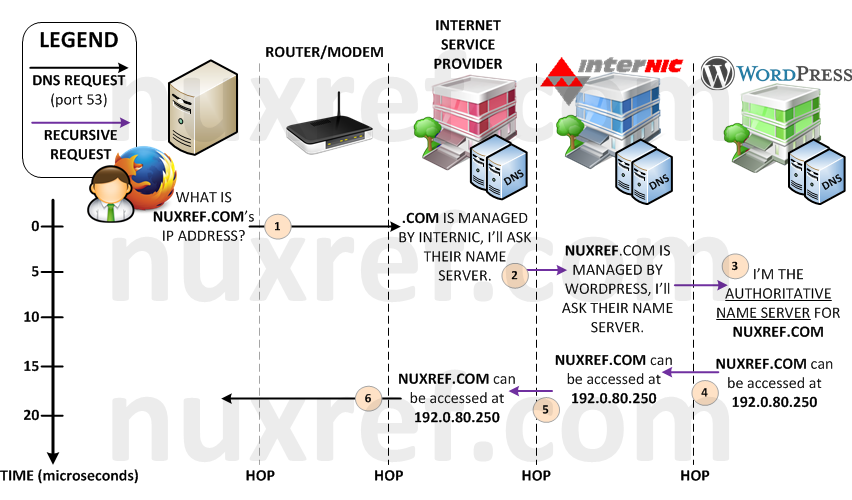
PowerDNS is my preferred DNS server solution. I personally prefer this to it’s long-term predecessor Berkeley Internet Name Domain (BIND). BIND has been around since 1984 and has gone through years of hacky patches to get to where it is today. PowerDNS is much younger (first release was in 1999), but was written without all of the growing pains BIND suffered through from the start. In all fairness, BIND developers were forced to deal with RFC (Request for Comments) as DNS continued to evolve to what it is today. Where as PowerDNS already had a stable set of requirements to work with from day one. Not to mention PowerDNS can be easily configured to use alternative backend databases.
You are reading this blog because you want the following:
- A fast and reliable Authoritative DNS server with a PostgreSQL database backend.
- You want a central configuration point; you want everything to be easy to maintain after it’s all set up.
- You want everything to just work the first time and you want to leave the figuring it out part to the end.
- Package management and version control is incredibly important to you.
- You want the ability to catalog your local network by assigning devices on it their own unique (easy to remember) hostnames.
- You want to maintain the ability to surf the internet by forwarding on requests your DNS server doesn’t know to another that does.
Here is what my tutorial will be focused on:
- PowerDNS (v3.x) configured to use a Database Backend (PostgreSQL) giving you central configuration. This tutorial focuses on version 8.4 because that is what ships with CentOS and Red Hat. But most (if not all) of this tutorial should still work fine if you choose to use version 9.x of the database instead.
- PowerDNS Recursor (v3.x) will be configured to handle anything records we don’t otherwise host or override
- Security Considered
- Poweradmin (v2.x) will provide our administration of the DNS records we add via it’s simple web interface.
Please note the application versions identified above as this tutorial focuses specifically on only them. One big issue I found while researching how to set up thing on the net was some tutorials I found didn’t really mention the version they were using. Hence, when I would stumble across these old article(s) with new(er) software, it would make for quite a painful experience when things didn’t work.
Please also note that other tutorials will imply that you setup one feature at a time. Then test it to see if it worked correctly before moving on to the next step. This is no doubt the proper way to do things. However, I’m just going to give it all to you at once. If you stick with the versions and packages I provide… If you follow my instructions, it will just work for you the first time. Debugging on your end will be a matter of tracing back to see what step you missed.
I tried to make this tutorial as cookie cutter(ish) as I could. Therefore you can literally just copy and paste what I share right to your shell prompt and the entire setup will be automated for you.
Installation
The following four (4) steps will get you set up with your very own DNS server.
Step 1 of 4: Setup Your Environment
This is the key to my entire blog; it’s going to make all of the remaining steps just work the first time for you. All; I repeat All of the steps below (after this one) assume that you’ve set this environment up. You will need to reset up your environment at least once before running through any of the remaining steps below or they will not work.
It’s also important to mention that you will need to be root to configure the DNS server. This applies to all of the steps identified below throughout this blog.
I re-hosted all of the packages I used to successfully pull this blog off. This allows me to host this information and pair it with the software it works against. Feel free to hook up to my repositories to speed up your setup.
Install all of the necessary packages:
# Connect to my repository to which I've had to rebuild a few
# packages to support PostgreSQL as well as fix some bugs in
# other bugs. This step will really make your life easy and let
# us compare apples to apples with package versions. It also
# allows you to haul in a working setup right out of the box.
#
# Be sure you're connected to my repository for the below to work
# visit: http://nuxref.com/nuxref-repository/

################################################################
# Install our required products
################################################################
yum install -y
       --enablerepo=nuxref
       --enablerepo=nuxref-shared
           postgresql-server postgresql
           php-pgsql php-imap php-mcrypt php-mbstring
           pdns pdns-backend-postgresql pdns-recursor
           poweradmin
           nuxref-templates-pdns

# Also make sure these products are installed as well since we
# use them to manipulate and test some of the data
yum install -y awk sed bind-utils curl

# Choose between NginX or Apache
## NginX Option (a) - This one is my preferred choice:
yum install -y
       --enablerepo=nuxref
       --enablerepo=nuxref-shared
           nginx php-fpm

## Apache Option (b):
yum install -y
       --enablerepo=nuxref
       --enablerepo=nuxref-shared
            httpd php

# Setup Default Timezone for PHP. For a list of supported
# timezones you can visit here: http://ca1.php.net/timezones
TIMEZONE="America/Montreal"
sed -i -e "s|^[ t]*;*(date.timezone[ t]*=).*|1 $TIMEZONE|g"
    /etc/php.ini

# Ensure we're not using Strict PHP Handling
sed -i -e 's/^[ t]*(error_reporting)[ t]*=.*$/1 = E_ALL & ~E_STRICT/g'
    /etc/php.ini

################################################################
# Setup PostgreSQL (v8.4)
################################################################
# The commands below should all work fine on a PostgreSQL v9.x
# database too; but your mileage may vary as I've not personally
# tested it yet. You can skip this section if you've already
# got a database running using one of my earlier tutorials.

# Only init the database if you haven't already. This command
# could otherwise reset things and you'll loose everything.
# If your database is already setup and running, then you can
# skip this line
service postgresql initdb

# Now that the database is initialized, configure it to trust
# connections from 'this' server (localhost)
sed -i -e 's/^[ t]*(local|host)([ t]+.*)/#12/g'
    /var/lib/pgsql/data/pg_hba.conf
cat << _EOF >> /var/lib/pgsql/data/pg_hba.conf
# Configure all local database access with trust permissions
local   all         all                               trust
host    all         all         127.0.0.1/32          trust
host    all         all         ::1/128               trust
_EOF

# Make sure PostgreSQL is configured to start up each time
# you start up your system
chkconfig --levels 345 postgresql on

# Start the database now too because we're going to need it
# very shortly in this tutorial
service postgresql start
To simplify your life, I’ve made the configuration of all the steps below reference a few global variables. The ones identified below are the only ones you’ll probably want to change. May I suggest you paste the below information in your favourite text editor (vi, emacs, etc) and adjust the variables to how you want them making it easier to paste them back to your terminal screen.
# The following is only used for our SSL Key Generation.
# You can skip SSL Key generation if you've done so using an
# earlier tutorial
COUNTRY_CODE="7K"
PROV_STATE="Westerlands"
CITY="Lannisport"
SITE_NAME="NuxRef"
Now for the rest of the global configuration; There really should be no reason to change any of these values (but feel free to). It’s important that you paste the above information (tailored to your liking’s) as well as the below information below to your command line interface (CLI) of the server you wish to set up.
# PostgreSQL Database
PGHOST=localhost
PGPORT=5432
PGNAME=system_dns
PGRWUSER=pdns
PGRWPASS=pdns

# Identify the domain name of your server here
# I use the .local extension because I only intend to resolve
# internal addresses with my DNS server.  You may wish to use
# a different value.
DOMAIN=nuxref.local

# Configure a recursor, the recursor will cache your database hits
# and will greatly increase performance.  Ideally you want to set
# the recursor address to the address you want to host your server
# on.  This is the same IP address you will add to everyones
# /etc/resolve.conf later.  This is in fact your name server.
# If you leave this value at 127.0.0.1 your DNS will be restricted
# to just the server you're hosting on.
# If you aren't sure what your IP Address is, you can just type 'ifconfig'
#
# This command may also fetch your ip address:
# cat /etc/sysconfig/network-scripts/ifcfg-* |
#    egrep '^IPADDR=' | egrep -v '127.0.0.1' |
#    cut -f2 -d'=' | head -n1
NAMESERVER_ADDR=$(cat /etc/sysconfig/network-scripts/ifcfg-* |
    egrep '^IPADDR=' | egrep -v '127.0.0.1' |
    cut -f2 -d'=' | head -n1)
# Alternatively, if you're not reading this and 'only' if the
# above failed we'll just set the address to your local address.
NAMESERVER_ADDR=${NAMESERVER_ADDR:=127.0.0.1}

# The Network that our DNS server resides on is important information
# for security purposes.  We want to only allow recursion on this
# network alone and not others hitting our server.  The below
# looks kind of cryptic, but it's just a method of extracting
# the network information automatically if you don't already
# know it. It may or may not work; it will depend on if you set
# a proper NAMESERVER_ADDR
SUBNET_ADDR=$(/sbin/ifconfig | egrep -m1 $NAMESERVER_ADDR |
    sed -e 's/.*Mask:([0-9.]+).*/1/g')
NAMESERVER_PRFX=$(ipcalc -s -p $NAMESERVER_ADDR $SUBNET_ADDR |
                   cut -f2 -d'=')
# Assign a default in case the above command failed.
NAMESERVER_PRFX=${NAMESERVER_PRFX:=24}

# Calculate our network
NAMESERVER_NWRK=$(ipcalc -s -n $NAMESERVER_ADDR $SUBNET_ADDR |
                   cut -f2 -d'=')
# Assign a default in case the above command failed.
NAMESERVER_NWRK=${NAMESERVER_NWRK:=$(echo $NAMESERVER_ADDR |
                   cut -f1,2,3 -d'.').0}

# Reverse Address Resolution Preparation
# This converts and IP Address of 1.2.3.4 to 3.2.1.in-addr.arpa
# We can use this later to create a reverse translation which
# PowerDNS can administrate for us also.  The templates I created
# will set some early examples up for you.
NAMESERVER_ARPA=$(echo "$NAMESERVER_ADDR" |
    awk -F"." '{print $3 "." $2 "." $1 ".in-addr.arpa"}')

# We now need the 4th octet of our Name Server Address to complete
# our ARPA address for the reverse lookup. For example, if your server
# ip is 2.4.8.16, we want the '16' defined here.  The below is just
# a cheat to go ahead and extract it from the address you specified
NAMESERVER_OCT4=$(echo "$NAMESERVER_ADDR" |
    cut -f4 -d'.')

# This is where our templates get installed to make your life
# incredibly easy and the setup to be painless. These files are
# installed from the nuxref-templates-pdns RPM package you
# installed above. If you do not have this RPM package then you
# must install it or this blog simply won't work for you.
# > yum install --enablerepo=nuxref nuxref-templates-pdns
NUXREF_TEMPLATES=/usr/share/nuxref
I realize the above environment can seem a bit cryptic. I tried to simplify this DNS setup so that even a novice’s life would be easy. The environment variables attempt to detect everyones settings automatically. In some cases, I may have just made it worse for some (hopefully not). It would be a good idea to just echo the defined variables to your screen and confirm they are as you expect them to be. They really are the key to making all of the next steps work in this blog.
# Simple Check
# Note: grab the brackets too when you copy and paste the below
(
   for VAR in COUNTRY_CODE PROV_STATE CITY SITE_NAME
              PGHOST PGPORT PGNAME PGRWUSER PGRWPASS
              DOMAIN NAMESERVER_ADDR NAMESERVER_PRFX
              NAMESERVER_NWRK NAMESERVER_ARPA
              NAMESERVER_OCT4 NUXREF_TEMPLATES; do
      [ -z $(eval "echo $$VAR") ] && echo "You must set the variable: $VAR"
   done
)
# Pretty Printing
# Note: grab the brackets too when you copy and paste the below
(
   echo "PostgreSQL:"
   echo -e "tPGHOST=$PGHOSTntPGPORT=$PGPORTntPGNAME=$PGNAMEntPGRWUSER=$PGRWUSERntPGRWPASS=$PGRWPASSn"
   echo "SSL:"
   echo -e "tCOUNTRY_CODE='$COUNTRY_CODE'ntPROV_STATE='$PROV_STATE'ntCITY='$CITY'ntSITE_NAME='$SITE_NAME'n"
   echo "Nameserver:"
   echo -e "tDOMAIN=$DOMAINntNAMESERVER_ADDR=$NAMESERVER_ADDRntNAMESERVER_NWRK=$NAMESERVER_NWRKntNAMESERVER_PRFX=$NAMESERVER_PRFX"
   echo -e "tNAMESERVER_ARPA=$NAMESERVER_ARPAntNAMESERVER_OCT4=$NAMESERVER_OCT4n"
   echo "NuxRef Templating"
   echo -e "tNUXREF_TEMPLATES=$NUXREF_TEMPLATES"
   echo
)
Step 2 of 4: Setup PowerDNS
First off, make sure you’ve set up your environment correctly (defined in Step 1 above) or you will have problems with the outcome of this step!
Database Configuration:
################################################################
# Configure PostgreSQL (for PowerDNS)
################################################################
# Optionally Eliminate Reset Database.
/bin/su -c "/usr/bin/dropdb -h $PGHOST -p $PGPORT $PGNAME 2>&1" postgres &>/dev/null
/bin/su -c "/usr/bin/dropuser -h $PGHOST -p $PGPORT $PGRWUSER 2>&1" postgres &>/dev/null

# Create Read/Write User (our Administrator)
echo "Enter the role password of '$PGRWPASS' when prompted"
/bin/su -c "/usr/bin/createuser -h $PGHOST -p $PGPORT -S -D -R $PGRWUSER -P 2>&1" postgres

# Create our Database and assign it our Administrator as it's owner
/bin/su -c "/usr/bin/createdb -h $PGHOST -p $PGPORT -O $PGRWUSER $PGNAME 2>&1" postgres 2>&1

# the below seems big; but will work fine if you just copy and
# it as is right to your terminal: This will prepare the SQL
# statement needed to build your DNS server's database backend
sed -e '/^--?/d'
    -e "s/%PGRWUSER%/$PGRWUSER/g"
        $NUXREF_TEMPLATES/pgsql.pdns.template.schema.sql >
          /tmp/pgsql.pdns.schema.sql

# load DB
/bin/su -c "/usr/bin/psql -h $PGHOST -p $PGPORT -f /tmp/pgsql.pdns.schema.sql $PGNAME 2>&1" postgres 2>&1
# cleanup
/bin/rm -f /tmp/pgsql.pdns.schema.sql

# This will get your database started with some working data to use.
# This part is optional, but since it's so easy to delete stuff later
# and there really isn't a whole lot taking place here, you should run
# this step. It becomes especially useful in debugging later.
sed -e "/^--?/d"
    -e "s/%DOMAIN%/$DOMAIN/g"
    -e "s/%NAMESERVER_ADDR%/$NAMESERVER_ADDR/g"
    -e "s/%NAMESERVER_ARPA%/$NAMESERVER_ARPA/g"
    -e "s/%NAMESERVER_OCT4%/$NAMESERVER_OCT4/g"
        $NUXREF_TEMPLATES/pgsql.pdns.template.data.sql >
            /tmp/pgsql.pdns.data.sql

# load DB with our data
/bin/su -c "/usr/bin/psql -h $PGHOST -p $PGPORT -f /tmp/pgsql.pdns.data.sql $PGNAME 2>&1" postgres 2>&1
# cleanup
/bin/rm -f /tmp/pgsql.pdns.data.sql
Server Configuration:
################################################################
# Configure PowerDNS
################################################################
# Create backup of configuration files
[ ! -f /etc/pdns/pdns.conf.orig ] &&
   cp /etc/pdns/pdns.conf /etc/pdns/pdns.conf.orig

# Install our configuration using the template
sed -e "/^#?/d"
    -e "s/%NAMESERVER_ADDR%/$NAMESERVER_ADDR/g"
    -e "s/%NAMESERVER_NWRK%/$NAMESERVER_NWRK/g"
    -e "s/%NAMESERVER_PRFX%/$NAMESERVER_PRFX/g"
    -e "s/%PGRWUSER%/$PGRWUSER/g"
    -e "s/%PGRWPASS%/$PGRWPASS/g"
    -e "s/%PGHOST%/$PGHOST/g"
    -e "s/%PGPORT%/$PGPORT/g"
    -e "s/%PGNAME%/$PGNAME/g"
        $NUXREF_TEMPLATES/pgsql.pdns.template.pdns.conf >
          /etc/pdns/pdns.conf

# Protect our configuration since it has user/pass info
# inside of it.
chmod 640 /etc/pdns/pdns.conf
chown root.pdns /etc/pdns/pdns.conf
Step 3 of 4: Setup PowerDNS Recursor
################################################################
# Configure PowerDNS Recursor
################################################################
# Create backup of configuration files
[ ! -f /etc/pdns-recursor/recursor.conf.orig ] &&
   cp /etc/pdns-recursor/recursor.conf
        /etc/pdns-recursor/recursor.conf.orig

# Install our configuration using the template
sed -e "/^#?/d"
        $NUXREF_TEMPLATES/pgsql.pdns-recursor.template.recursor.conf >
          /etc/pdns-recursor/recursor.conf

# Generate an up to date root.hints file, this allows recursion
# back out to the internet.
curl -u ftp:ftp 'ftp://ftp.rs.internic.net/domain/db.cache'
    -o /etc/pdns-recursor/root.hints

# If the above command did not work, you can use the one I shipped
# with the nuxref-template.pdns packaging:
#   cp $NUXREF_TEMPLATES/root.hints /etc/pdns-recursor/root.hints

# Alternatively, PowerDNS is hardcoded with a default set of root-hints.
# But i personally just like seeing it as an external configuration instead
# But... if all of this is combersom to you and you simply don't want
# to use the offical root.hints and the hard-coded one instead you can
# do the following:
#
# sed -i -e '/^([ t]*hint-file=.*)/d' /etc/pdns-recursor/recursor.conf

# Start up all of our services
chkconfig pdns-recursor --level 345 on
chkconfig pdns --level 345 on
service pdns-recursor restart
service pdns restart
It’s important to take a time-out on this step just to make sure everything is working.
A few simple commands should work perfectly for you otherwise we have an issue:
# The following command should output a bunch of googles DNS servers
nslookup google.com $NAMESERVER_ADDR
# The following command should output the same list
nslookup -port=5300 google.com 127.0.0.1

# If you receive an error such as
#      ** server can't find google.com: NXDOMAIN
# Then you need to revisit the above steps again

# Alternatively, if you receive an error such as:
#  ;; connection timed out; trying next origin
#  ;; connection timed out; trying next origin
#  ;; connection timed out; no servers could be reached
# Then you have been most likely been restricted access
# to port 53 to the outside world. You're not really
# in a problem state at this point. Make sure the rest
# of the tests (Below) work and then make sure to follow
# the section of this blog entitled:
#     'Zone Forwarding Alternative'
#
#
# You should be able to resolve the domain
# poweradmin.$DOMAIN to this very server your hosting
# on:
nslookup poweradmin.$DOMAIN $NAMESERVER_ADDR

# You can even test reverse lookups using our data
# we loaded with the following command:
nslookup $NAMESERVER_ADDR $NAMESERVER_ADDR

# The above should resolve itself to hostmaster.your.domain
Step 4 of 4: Setup PowerAdmin
First off, make sure you’ve set up your environment correctly (defined in Step 1 above) or you will have problems with the outcome of this step!
################################################################
# Configure PostgreSQL (for PowerAdmin)
################################################################

# Now we need to update our database with a schema for
# poweradmin to work with
sed -e "/^--?/d"
    -e "s/%DOMAIN%/$DOMAIN/g"
    -e "s/%PGRWUSER%/$PGRWUSER/g"
        $NUXREF_TEMPLATES/pgsql.poweradmin.template.schema.sql >
            /tmp/pgsql.poweradmin.schema.sql

# Now we can load the file:
/bin/su -c "/usr/bin/psql -h $PGHOST -p $PGPORT -f /tmp/pgsql.poweradmin.schema.sql $PGNAME 2>&1" postgres 2>&1
# cleanup
/bin/rm -f /tmp/pgsql.poweradmin.schema.sql

# If you loaded the sample dataset for PowerDNS earlier, then you'll
# want to additionally load this file too to help PowerAdmin access it
sed -e "/^--?/d"
    -e "s/%DOMAIN%/$DOMAIN/g"
    -e "s/%NAMESERVER_ADDR%/$NAMESERVER_ADDR/g"
    -e "s/%NAMESERVER_ARPA%/$NAMESERVER_ARPA/g"
        $NUXREF_TEMPLATES/pgsql.poweradmin.template.data.sql >
            /tmp/pgsql.poweradmin.data.sql

# load DB with our data
/bin/su -c "/usr/bin/psql -h $PGHOST -p $PGPORT -f /tmp/pgsql.poweradmin.data.sql $PGNAME 2>&1" postgres 2>&1
# cleanup
/bin/rm -f /tmp/pgsql.poweradmin.data.sql

################################################################
# Configure PowerAdmin (for PowerDNS Administration)
################################################################
# Create backup of configuration files
[ ! -f /etc/poweradmin/config.inc.php.orig ] &&
   cp /etc/poweradmin/config.inc.php
        /etc/poweradmin/config.inc.php.orig

# Apply our configuration
sed -e "/^//?/d"
    -e "s/%DOMAIN%/$DOMAIN/g"
    -e "s/%PGHOST%/$PGHOST/g"
    -e "s/%PGNAME%/$PGNAME/g"
    -e "s/%PGPORT%/$PGPORT/g"
    -e "s/%PGRWUSER%/$PGRWUSER/g"
    -e "s/%PGRWPASS%/$PGRWPASS/g"
        $NUXREF_TEMPLATES/pgsql.poweradmin.template.config.inc.php >
            /etc/poweradmin/config.inc.php

# Protect file since it contains passwords
chmod 640 /etc/poweradmin/config.inc.php
chown root.apache /etc/poweradmin/config.inc.php

# NginX Configuration
sed -e "/^#?/d"
    -e "s/%DOMAIN%/$DOMAIN/g"
        $NUXREF_TEMPLATES/nginx.poweradmin.template.conf >
            /etc/nginx/conf.d/poweradmin.conf

################################################################
# Generate SSL Keys For Webpage Security
################################################################
# Generate SSL Keys (if you don't have any already) that we
# will secure all our inbound and outbound mail as.
openssl req -nodes -new -x509 -days 730 -sha256 -newkey rsa:2048
   -keyout /etc/pki/tls/private/$DOMAIN.key
   -out /etc/pki/tls/certs/$DOMAIN.crt
   -subj "/C=$COUNTRY_CODE/ST=$PROV_STATE/L=$CITY/O=$SITE_NAME/OU=IT/CN=$DOMAIN"

# Permissions; protect our Private Key
chmod 400 /etc/pki/tls/private/$DOMAIN.key

# Permissions; protect our Public Key
chmod 444 /etc/pki/tls/certs/$DOMAIN.crt
At this point you should be able to start NginX. If it’s already running
send it a reload or just run the below command.
# If you chose the NginX approach you'll want to make sure it's
# setup to run correctly and restart itself if the system is
# ever restarted:

# Ensure NginX runs even after a reboot
chkconfig nginx --level 345 on
chkconfig php-fpm --level 345 on

# Restart the service if it isn't running already
service php-fpm restart
service nginx restart
Now, we’re almost done. We need to make sure our server is referencing our new DNS server. You may need to update your network settings, but the following will just cheat for the time being and set you up:
[ ! -f /etc/resolv.conf.orig ] &&
   cp /etc/resolv.conf
       /etc/resolv.conf.orig

# Tell our server to use our new DNS server
cat << _EOF > /etc/resolv.conf
search $DOMAIN
nameserver $NAMESERVER_ADDR
_EOF

# Restore your old configuration like so
# if you need to:
#  /bin/mv -f /etc/resolv.conf.orig /etc/resolv.conf
You will want to additionally add the following to your iptables /etc/sysconfig/iptables:
#---------------------------------------------------------------
# DNS Traffic
#---------------------------------------------------------------
-A INPUT -m state --state NEW -m tcp -p tcp --dport 53 -j ACCEPT
-A INPUT -m state --state NEW -m udp -p udp --dport 53 -j ACCEPT

#---------------------------------------------------------------
# Web Traffic for PowerAdmin
#---------------------------------------------------------------
-A INPUT -m state --state NEW -m tcp -p tcp --dport 80 -j ACCEPT
-A INPUT -m state --state NEW -m tcp -p tcp --dport 443 -j ACCEPT

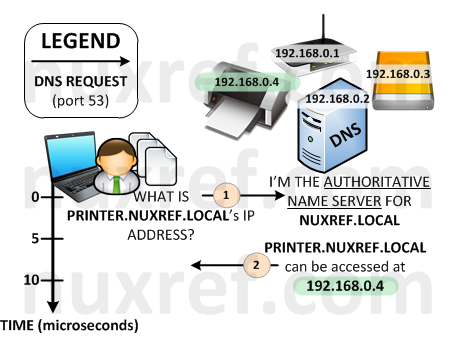
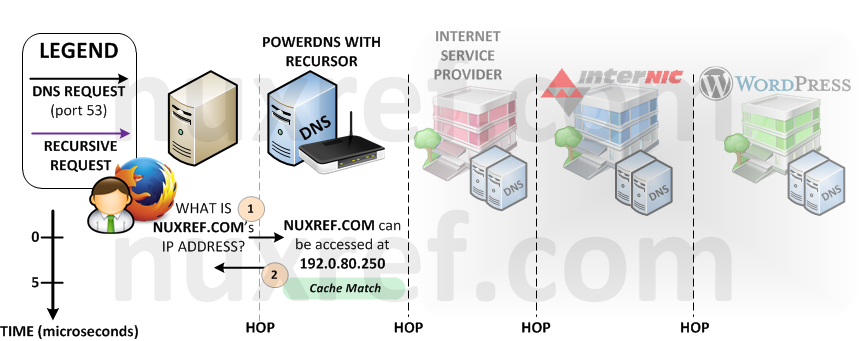
Your setup can now be illustrated by the model below. It’s virtually the same setup as you had before however now instead of querying your ISPs DNS Server, you query your very own local one. Now you can easily maintain your own local network and begin labeling the devices you use on it using PowerAdmin.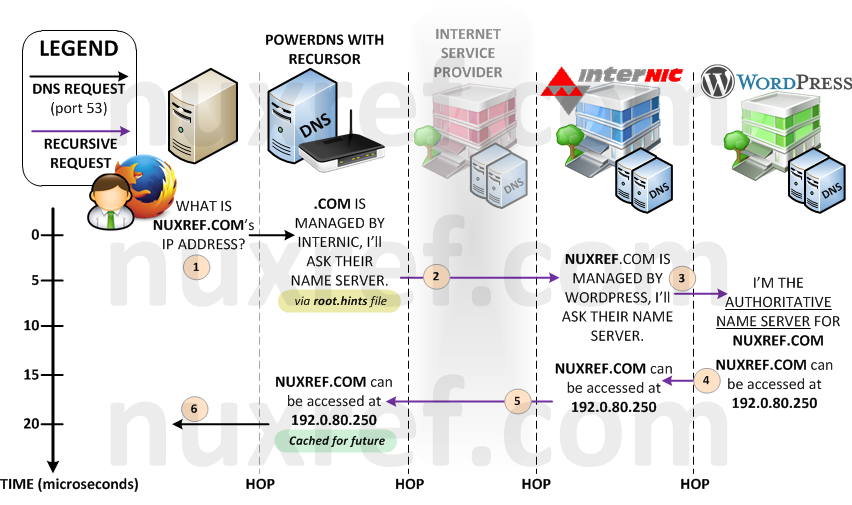
Zone Forwarding Alternative
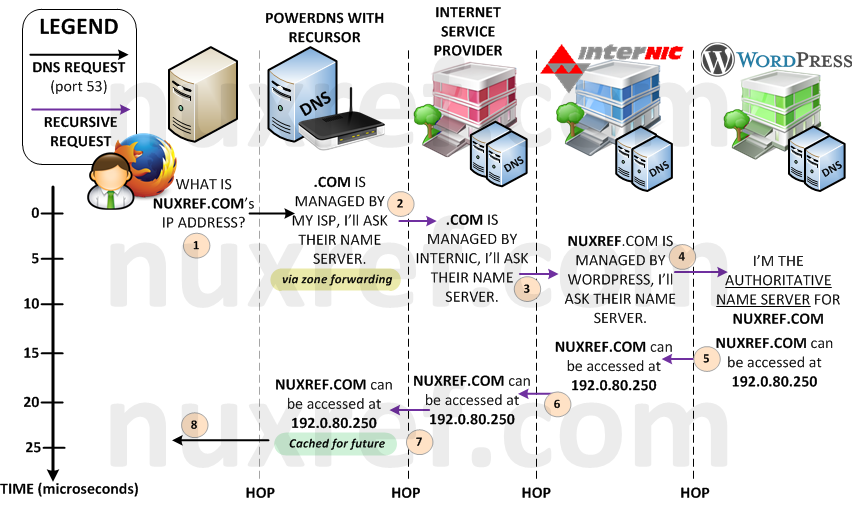
Up until now, our ISP was using it’s own root.hints file (or some alternative method) to look up your request. But now, it is our server that is going out directly into the big bad internet instead using this technique. Since DNS requests are not encrypted, it’s now possible for others to spy on the hostnames we’re resolving (and places we’re are visiting). Not only that, these same people can easily trace the source back to us (all DNS requests originate from our IP now). This can allow someone to specifically know the online banking site you use as an example. Prior to hosting your own DNS server, all websites and servers you accessed were channeled privately between you and your ISP so this was never a problem. It was our ISP who made the (recursive) requests for us instead of us doing them ourselves. Prior to now, what we looked up didn’t explicitly trace back to you, it traced back to our ISP. Previously, we actually had more privacy (depending on the contract we signed with our ISP).
Your ISP has thousands of clients making requests to it’s DNS servers constantly. As a result, it has probably already cached 90% of all the websites we intend to visit. Cached content means a very a speedy response from our server. Meanwhile, our local DNS server’s cache will (probably) be empty most of the time (depending on how many people will use it). Hence your ISP’s DNS Server will be MUCH faster then yours.
When you signed up with your ISP, they would have gave you (at least) 1 DNS server to use (most provide 2 – a primary and backup). We can actually tell our DNS Server to use these instead of our root.hints file when it finds a domain that needs to be further looked up. This way, you regain your secure pipe between you and your ISP. The trade off is your adding one more hop to your recursive lookups. But in most scenarios, they would have already cached what your looking for, so it would be an imediate response. The below diagram illustrates the worst case scenario:
Here is how you can alter your configuration:
# Put your DNS Servers below,  the ones in place right
# now are the public ones offered by Google.
DNS_SERVERS="8.8.8.8 8.8.4.4"

# Remove any information that may conflict
sed -i -e '/^([ t]*hint-file=.*)/d' /etc/pdns-recursor/recursor.conf
sed -i -e '/^([ t]*forward-zones=.*)/d' /etc/pdns-recursor/recursor.conf

# Disable hint-file
echo 'hint-file=' >> /etc/pdns-recursor/recursor.conf

# Prepare Forwarding Zones for everything unmatched:
echo -n 'forward-zones=*=' >> /etc/pdns-recursor/recursor.conf
echo $(echo "$DNS_SERVERS" |
    sed -e 's/^[ t]*//g' -e 's/[ t]*$//g' -e 's/[ t]+/, /g') >>
     /etc/pdns-recursor/recursor.conf

# Now restart our recursor
service pdns-recursor restart
Got Old BIND Configuration You Need Imported?
This step is completely optional! If your not familiar with what BIND even is, or know you’ve never used it, you can freely skip this section.
If you migrating from BIND to PowerDNS then you may have a setup in place. PowerDNS makes an easy transition by writing a tool that will scan your old BIND configuration and generate the SQL needed for an easy migration to PowerDNS.
################################################################
# Generate SQL content from all of your zone files
################################################################
# I just had 1 simple DNS zone, but you may many.
# The below did all the work for me (bind was configured to
# run in chroot environment):
# zone2sql --gpgsql --zone=/var/chroot/var/named/data/zone.nuxref.local >
#    /tmp/pgsql.pdns.zones.sql
# zone2sql --gpgsql --zone=/var/chroot/var/named/data/192.168.0 >>
#     /tmp/pgsql.pdns.zones.sql

# You could even cheat and run all your files with a command like this
# Please note that this is optional (and not part of the blog, it's just
# a simple conversion tool for those who already have bind configuration
ZONE_DIR=/var/chroot/var/named/data/
[ -f /tmp/pgsql.pdns.zones.sql ] && /bin/rm -f /tmp/pgsql.pdns.zones.sql
for ZONE in $(find $ZONE_DIR -type f); do
   # Fetch ORIGIN/ZONE ID
   ZONE_ID=$(cat $ZONE | egrep '^[ t]*$ORIGIN' |
              sed -e 's/^.*$ORIGIN[ t]+([^ t]+).*/1/g'
                  -e 's/[. t]*$//g')
   [ -z "$ZONE_ID" ] && echo "Error Parsing: $ZONE" && continue
   zone2sql --gpgsql --zone=$ZONE --zone-name=$ZONE_ID >> /tmp/pgsql.pdns.zones.sql
done

# Now before you load this file into your database, you may
# want to review it.  It doesn't hurt to scan it over and remove
# any entries you don't think would be useful.

# Under normal circumstances you would be done at this point, however because
# we are additionally using poweradmin, we need to create a few zone entries
# based on the SQL file we just generated.
$NUXREF_TEMPLATES/import2zone.awk /tmp/pgsql.pdns.zones.sql >>
    /tmp/pgsql.pdns.zones.sql

# Then I just loaded the file straight into the database:
/bin/su -c "/usr/bin/psql -h $PGHOST -p $PGPORT -f /tmp/pgsql.pdns.zones.sql $PGNAME 2>&1" postgres 2>&1
# cleanup
/bin/rm -f /tmp/pgsql.pdns.zones.sql
# You're done!
So… That’s it? Now I’m done?
Yes and No… My blog pretty much hands over a working DNS server with little to no extra configuration needed on your part.
No system is bulletproof; disaster can always strike when you’re least expecting it. To cover yourself, always consider backups of the following:
- Your PostgreSQL Database: This is where all of your DNS configuration is stored. You definitely do not want to lose this. May I suggest you reference my other blog entry here where I wrote a really simple backup/restore tool for a PostgreSQL database.
- /etc/poweradmin/*: Your PowerAdmin flat file configuration allowing you to centrally manage everything via a webpage.
- /etc/pdns/*: Your PowerDNS flat file configuration which defines the core of your DNS Server. It’s configuration allows you to centrally manage everything else through the PowerAdmin website.
- /etc/pdns-recursor/*: Your PowerDNS Recursor flat file configuration which grants you the recursive functionality of your DNS Server.
What about Apache?
Apache is a perfectly fine alternative solution as well! I simply chose NginX because it is much more lightweight approach. In fact, PowerAdmin already comes with Apache configuration out of the box located in /etc/httpd/conf.d/. Thus, if you simply start up your Apache instance (service httpd start), you will be hosting its services right away. Please keep in mind that the default (Apache) configuration does not come with all the SSL and added security I provided with the NginX templates. Perhaps later on, I will update the template rpm to include an Apache secure setup as well.
Credit
This blog took me a very (,very) long time to put together and test! The repository hosting alone now accomodates all my blog entries up to this date. If you like what you see and wish to copy and paste this HOWTO, please reference back to this blog post at the very least. It’s really all I ask.
I’ve tried hard to make this a complete working solution out of the box. Please feel free to email me or post comments below with any suggestions you have so I can ensure this blog is as complete as possible! Positive feedback is always welcome too!
Repository
This blog makes use of my own repository I loosely maintain. If you’d like me to continue to monitor and apply updates as well as hosting the repository for long terms, please consider donating or offering a mirror server to help me out! This would would be greatly appreciated!